INSTRUCTION MANUAL
GUIDE D'UTILISATION
MANUAL DE INSTRUCCIONES
DW880/DW882/DW887/DW888
Die Grinders/Straight Grinders
Rectifieuses et fraiseuses pour matrices
Rectificadoras/Esmeriladoras rectas
INSTRUCTIVO DE OPERACIÓN, CENTROS DE SERVICIO Y
PÓLIZA DE GARANTÍA. ADVERTENCIA: LÉASE ESTE
INSTRUCTIVO ANTES DE USAR EL PRODUCTO.
F YOU HAVE ANY QUESTIONS OR COMMENTS ABOUT THIS OR ANY DEWALT TOOL,
CALL US TOLL FREE AT:
1-800-4-DEWALT (1-800-433-9258)
Important Safety Instructions
WARNING: When using electric tools, basic safety precautions should always be followed
to reduce risk of fire, electric shock, and personal injury, including the following:
READ ALL INSTRUCTIONS
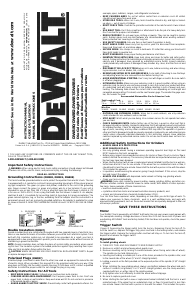
Grounding Instructions
(DW880, DW882, DW888)
This tool should be grounded while in use to protect the operator from electric shock. The tool
is equipped with a 3-conductor cord and 3-prong grounding type plug to fit the proper ground-
ing type receptacle. The green (or green and yellow) conductor in the cord is the grounding
wire. Never connect the green (or green and yellow) wire to a live terminal. If your unit is
intended for use on less than 150 V, it has a plug that looks like that shown in sketch A. If it
is for use on 150 to 250 V, it has a plug that looks like that shown in sketch D. An adapter,
sketches B and C, is available for connecting sketch A type plugs to 2-prong receptacles. The
green-colored rigid ear, lug, or the like, extending from the adapter must be connected to a
permanent ground, such as a properly grounded outlet box. No adapter is available for a plug
as shown in sketch D. ADAPTER SHOWN IN FIGURES B and C IS NOT FOR USE IN CANA-
DA.
Double Insulation (DW887)
Double insulated tools are constructed throughout with two separate layers of electrical insu-
lation or one double thickness of insulation between you and the tool’s electrical system. Tools
built with this insulation system are not intended to be grounded. As a result, your tool is
equipped with a two prong plug which permits you to use extension cords without concern for
maintaining a ground connection.
NOTE: Double insulation does not take the place of normal safety precautions when operat-
ing this tool. The insulation system is for added protection against injury resulting from a pos-
sible electrical insulation failure within the tool.
CAUTION: WHEN SERVICING USE ONLY IDENTICAL REPLACEMENT PARTS. Repair
or replace damaged cords.
Polarized Plugs (DW887)
Polarized plugs (one blade is wider than the other) are used on equipment to reduce the risk
of electric shock. When provided, this plug will fit in the polarized outlet only one way. If the
plug does not fit fully into the outlet, reverse the plug. If it still does not fit, contact a qualified
electrician to install the proper outlet. Do not change the plug in any way.
Safety Instructions For All Tools
• KEEP WORK AREA CLEAN. Cluttered areas and benches invite injuries.
• CONSIDER WORK AREA ENVIRONMENT. Don’t expose power tools to rain. Don’t use
power tools in damp or wet locations. Keep work area well lit. Do not use tool in presence
of flammable liquids or gases.
• GUARD AGAINST ELECTRIC SHOCK. Prevent body contact with grounded surfaces. For
example; pipes, radiators, ranges, and refrigerator enclosures.
• KEEP CHILDREN AWAY. Do not let visitors contact tool or extension cord. All visitors
should be kept away from work area.
• STORE IDLE TOOLS. When not in use, tools should be stored in dry, and high or locked-
up place — out of reach of children.
• DON’T FORCE TOOL. It will do the job better and safer at the rate for which it was intend-
ed.
• USE RIGHT TOOL. Don’t force small tool or attachment to do the job of a heavy-duty tool.
Don’t use tool for purpose not intended.
• DRESS PROPERLY. Do not wear loose clothing or jewelry. They can be caught in moving
parts. Rubber gloves and non-skid footwear are recommended when working outdoors.
Wear protective hair covering to contain long hair.
• USE SAFETY GLASSES. Also use face or dust mask if operation is dusty.
• DON’T ABUSE CORD. Never carry tool by cord or yank it to disconnect from receptacle.
Keep cord from heat, oil, and sharp edges.
• SECURE WORK. Use clamps or a vise to hold work. It’s safer than using your hand and it
frees both hands to operate tool.
• DON’T OVERREACH. Keep proper footing and balance at all times.
• MAINTAIN TOOLS WITH CARE. Keep tools sharp and clean for better and safer perfor-
mance. Follow instructions for lubricating and changing accessories. Inspect tool cords peri-
odically and if damaged, have repaired by authorized service facility. Inspect extension
cords periodically and replace if damaged. Keep handles dry, clean, and free from oil and
grease.
• DISCONNECT OR LOCK OFF TOOLS when not in use, before servicing, and when chang-
ing accessories, such as blades, bits, cutters.
• REMOVE ADJUSTING KEYS AND WRENCHES. Form habit of checking to see that keys
and adjusting wrenches are removed from tool before turning it on.
• AVOID UNINTENTIONAL STARTING. Don’t carry tool with finger on switch. Be sure switch
is off when plugging in.
• EXTENSION CORDS. Make sure your extension cord is in good condition. When using an
extension cord, be sure to use one heavy enough to carry the current your product will draw.
An undersized cord will cause a drop in line voltage resulting in loss of power and over-
heating. The following table shows the correct size to use depending on cord length and
nameplate ampere rating. If in doubt, use the next heavier gage. The smaller the gage num-
ber, the heavier the cord.
Recommended Minimum Wire Size for Extension Cords
Total Length of Cord
25 ft. 50 ft. 75 ft. 100 ft. 125 ft. 150 ft. 175 ft.
7.6 m 15.2 m 22.9 m 30.5 m 38.1 m 45.7 m 53.3 m
Wire Size
18 AWG 18 AWG 16 AWG 16 AWG 14 AWG 14 AWG 12 AWG
• OUTDOOR USE EXTENSION CORDS. When tool is used outdoors, use only extension
cords intended for use outdoors and so marked.
• STAY ALERT. Watch what you are doing. Use common sense. Do not operate tool when
you are tired.
• CHECK DAMAGED PARTS. Before further use of the tool, a guard or other part that is
damaged should be carefully checked to determine that it will operate properly and perform
its intended function. Check for alignment of moving parts, binding of moving parts, break-
age of parts, mounting, and any other conditions that may affect its operation. A guard or
other part that is damaged should be properly repaired or replaced by an authorized service
center unless otherwise indicated elsewhere in this instruction manual. Have defective
switches replaced by authorized service center. Do not use tool if switch does not turn it on
and off.
Additional Safety Instructions for Grinders
• ALWAYS WEAR EYE PROTECTION.
• KEEP GUARDS IN PLACE.
• Use only grinding wheels having a maximum operating speed at least high as “No Load
RPM” marked on the tool’s nameplate.
• Before using, inspect recommended accessory for cracks or flaws. If such a crack or flaw is
evident, discard the accessory. The accessory should also be inspected whenever you think
the tool may have been dropped.
• When starting the tool (with a new or replacement wheel installed) hold the tool in a well pro-
tected area and let it run for one minute. If the wheel has an undetected crack or flaw, it
should burst in less than one minute. Never start the tool with a person in line with the wheel.
This includes the operator.
• In operation, avoid bouncing the wheel or giving it rough treatment. If this occurs, stop the
tool and inspect the wheel.
• ALWAYS USE GUARDS with depressed center wheels or flaring cup grinding wheels.
• Clean your tool out periodically.
WARNING: Some dust created by power sanding, sawing, grinding, drilling, and other con-
struction activities contains chemicals known to cause cancer, birth defects or other reproduc-
tive harm. Some examples of these chemicals are:
• lead from lead-based paints,
• crystalline silica from bricks and cement and other masonry products, and
• arsenic and chromium from chemically-treated lumber (CCA).
Your risk from these exposures varies, depending on how often you do this type of work. To
reduce your exposure to these chemicals: work in a well ventilated area, and work with
approved safety equipment, such as those dust masks that are specially designed to filter out
microscopic particles.
SAVE THESE INSTRUCTIONS
Motor
Your DEWALT tool is powered by a DEWALT built motor. Be sure your power supply agrees with
the nameplate marking. Voltage decrease of more than 10% will cause loss of power and
overheating. All D
EWALT tools are factory tested; if this tool does not operate, check the power
supply.
Trigger Switch
(Figure 2) Depressing the trigger switch turns the tool on. Releasing it turns the tool off. To
lock the switch on, depress the trigger fully, press and hold in the locking button, and release
the trigger switch. Release the locking button and tool will stay on. To turn turn the tool off,
depress and release the trigger switch.
Operation
To install grinding wheels:
1. TURN OFF TOOLAND DISCONNECT FROM POWER SUPPLY.
2. Remove or unlatch and pivot away wheel guard cover.
3. Remove mounting nut by turning it counterclockwise (when facing outer side of wheel).
The spindle can be held stationary by :
a. inserting and holding a suitable pin in one of the holes provided in the spindle collar, next
to the inward side of the wheel (5" and 6" straight grinders).
b. holding a wrench on the flats provided on the exposed portion of the spindle (2 1/2" straight
grinder).
4. When installing the new grinding wheel, always use blotters between the wheel and each
surface it contacts (all grinders). For 5" and 6" straight grinders, use the clamp washers,
supplied with tool, on either side of the grinding wheel.
5. Only tighten arbor nut sufficiently to drive the wheel without slippage.
6. Be sure to replace guard end cover.
7. When starting the tool (with a new or replacement wheel installed) hold the tool in a well
protected area. If the wheel has an undetected crack or flaw, it should burst in less than
one minute. Never start tool with a person in line with the wheel. This includes the opera-
DEWALT Industrial Tool Co., 701 East Joppa Road, Baltimore, MD 21286
Printed in U.S.A. (JUN00-CD-1) Form No.383566-01 DW880, etc. Copyright © 1999
Questions? See us in the World Wide Web at www.dewalt.com
AB CD
GROUNDING PIN
GROUNDED
OUTLET
BOX
GROUNDING
MEANS
GROUNDING PIN
ADAPTER


Joignez-vous à la conversation sur ce produit
Ici, vous pouvez partager ce que vous pensez du DeWalt DW888 Meuleuse droite. Si vous avez une question, lisez d’abord attentivement le mode d’emploi. La demande d’un mode d’emploi peut être effectuée en utilisant notre formulaire de contact.