1 2 3 4 5 6 7 8
IT
EN
AVVERTENZE
IMPORTANTI
LEGGERE QUESTE ISTRUZIONI PRIMA
DELL’USO.
Usando apparecchi elettrici è necessario
prendere le opportune precauzioni, tra le
quali:
Assicurarsi che il voltaggio elettrico 1.
dell’apparecchio corrisponda a quello
della vostra rete elettrica.
Non lasciare l’apparecchio incustodito 2.
quando collegato alla rete elettrica;
disinserirlo dopo ogni uso.
Non mettere l’apparecchio sopra o 3.
vicino a fonti di calore.
Durante l’utilizzo posizionare l’apparec-4.
chio su di un piano orizzontale, stabile
e ben illuminato.
Non lasciare l’apparecchio esposto ad 5.
agenti atmosferici (pioggia, sole, ecc...).
Fare attenzione che il cavo elettrico non 6.
venga a contatto con superfici calde.
Questo apparecchio può essere usato 7.
da ragazzi di età maggiore o uguale a
8 anni; le persone con capacità fisiche,
sensoriali o mentali ridotte o privi di
esperienza e conoscenza dell’apparech-
chio oppure ai quali non siano state date
istruzioni relative all’utilizzo dovranno
essere soggette alla supervisione da
parte di una persona responsabile della
loro sicurezza oppure dovranno essere
prima adeguatamente formati su come
usare tale apparecchio in sicurezza e sui
rischi connessi all’uso dello stesso. Ai
bambini è vietato giocare con l’apparec-
chio. Le operazioni di pulizia e di manu-
tenzione non possono essere effettuate
da ragazzi a meno che non abbiano
un’ètà superiore agli 8 anni e in ogni
caso sotto supervisione di un adulto.
Tenere l’apparecchio e il suo cavo fuori 8.
dalla portata di bambini di età inferiore
agli 8 anni.
Non immergere mai il corpo del prodot-9.
to, la spina ed il cavo elettrico in acqua
o altri liquidi, usare un panno umido per
la loro pulizia.
Anche quando l’apparecchio non è in 10.
funzione, staccare la spina dalla presa
di corrente elettrica prima di inserire o
togliere le singole parti o prima di ese-
guire la pulizia.
Assicurarsi di avere sempre le mani 11.
ben asciutte prima di utilizzare o di
regolare gli interruttori posti sull’appa-
recchio o prima di toccare la spina e i
collegamenti di alimentazione.
Per staccare la spina, afferrarla diretta-12.
mente e staccarla dalla presa a parete.
Non staccarla mai tirandola per il cavo.
Non usare l’apparecchio se il cavo elettri-13.
co o la spina risultano danneggiati, o se
l’apparecchio stesso risulta difettoso; tutte
le riparazioni, compresa la sostituzione
del cavo di alimentazione, devono essere
eseguite solamente dal centro assistenza
Ariete o da tecnici autorizzati Ariete, in
modo da prevenire ogni rischio.
In caso di utilizzo di prolunghe elettri-14.
che, quest’ultime devono essere ade-
guate alla potenza dell’apparecchio,
onde evitare pericoli all’operatore e per
la sicurezza dell’ambiente dove si opera.
Le prolunghe non adeguate possono
provocare anomalie di funzionamento.
Non lasciar pendere il cavo in un luogo 15.
dove potrebbe essere afferrato da un
bambino.
Per non compromettere la sicurezza 16.
dell’apparecchio, utilizzare solo parti di
ricambio e accessori originali, approva-
ti dal costruttore.
Eventuali modifiche a questo prodotto, 17.
non espressamente autorizzate dal pro-
duttore, possono comportare il decadi-
mento della sicurezza e della garanzia
del suo utilizzo da parte dell’utente.
Allorchè si decida di smaltire come 18.
rifiuto questo apparecchio, si racco-
manda di renderlo inoperante taglian-
done il cavo di alimentazione. Si rac-
comanda inoltre di rendere innocue
quelle parti dell’apparecchio suscettibili
di costituire un pericolo, specialmente
per i bambini che potrebbero servirsi
dell’apparecchio per i propri giochi.
Gli elementi dell’imballaggio non devono 19.
essere lasciati alla portata dei bambini
in quanto potenziali fonti di pericolo.
Durante l’uso l’apparecchio deve esse-20.
re sempre maneggiato con cura e
senza toccare le sue piastre calde.
21. ATTENZIONE: Superficie calda.
Maneggiare con attenzione l’apparec-22.
chio, soprattutto in fase di apertura o
chiusura delle piastre, al fine di evitare
danni accidentali a mani o altri oggetti.
Usate l’apparecchio lontano dai liquidi 23.
infiammabili; non addossarlo a pareti o
parti in plastica non resistenti al calore.
Pulite l’apparecchio solo con un panno 24.
umido dopo aver disinserito la spina dalla
presa di corrente e dopo che l’apparec-
chio si sia completamente raffreddato.
Dopo l’uso riporre l’apparecchio solo 25.
quando si è completamente raffreddato.
Per il funzionamento dell’apparecchio 26.
non è permesso l’utilizzo di temporizzato-
ri esterni o comandi a distanza separati.
27. Per il corretto smaltimento del pro-
dotto ai sensi della Direttiva Europea
2012/19/CE si prega leggere l’apposito
foglietto allegato al prodotto.
CONSERVARE QUESTE
ISTRUZIONI
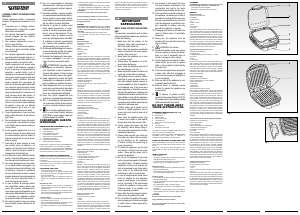
DESCRIZIONE DEI COMPONENTI (Fig. 1-2)
A Impugnatura coperchio trasparente
B Coperchio piastra per panini
C Corpo apparecchio
D Piastra antiaderente per panini
E Levetta apertura coperchio
F Spia accensione / pronto temperatura
G Contenitore raccogli grasso
H Impugnatura piastra superiore
I Piastre antiaderenti per hamburger
L’apparecchio è concepito per il SOLO USO DOMESTICO e
non deve essere adibito ad uso commerciale o industriale.
Questo apparecchio è conforme alla direttiva 2006/95/EC e
EMC 2004/108/EC, ed al regolamento (EC) No. 1935/2004 del
27/10/2004 sui materiali in contatto con alimenti.
PRIMO UTILIZZO DELL’APPARECCHIO
L’apparecchio può emettere un leggero fumo la prima volta che
viene usato: non è da considerarsi un difetto ed il fumo cesserà
in pochi minuti.
In occasione del primo impiego ungere le piastre di cottura
dell’apparecchio con olio o burro. Non è necessario ripetere
queste operazioni in seguito.
ISTRUZIONI PER L’USO
- Inserire la spina nella presa di corrente.
- Si accenderà la spia (F) che segnala l’inserimento della
spina nella presa di corrente e che l’apparecchio ha iniziato
la fase di riscaldamento.
- Dopo alcuni minuti, la spia (F) si spegnerà ad indicare che
l’apparecchio avrà raggiunto la temperatura ed è pronto per
l’uso.
Riscaldamento panini
- Agendo sull’apposita levetta (E), aprire completamente il
coperchio trasparente superiore (B) utilizzando la relativa
impugnatura (A).
- Posizionare i panini sulla piastra (D) ed attendere che si
siano riscaldati; contemporaneamente è possibile procedere
anche con la cottura degli hamburger.
Cottura hamburger
- Inserire il contenitore raccogli grasso (G) nell’apposita cavità
sotto la piastra inferiore (I) (Fig. 3).
- Aprire completamente l’apparecchio sollevando la piastra
superiore (I) mediante l’apposita impugnatura (H).
- Posizionare gli hamburger da cuocere sulla piastra inferiore
(I).
- Chiudere la piastra superiore su quella inferiore premendola
leggermente verso il basso.
- A cottura ultimata staccare la spina dalla presa di corrente.
Per togliere gli hamburger dall’apparecchio, qualora fosse
necessario, usare solamente una spatola di legno o plastica.
ATTENZIONE:
Non toccare le piastre calde al fine di evitare ustioni.
Cuocere gli hamburger soltanto con le piastre chiuse.
Non usare oggetti appuntiti (es.: coltello) per evitare di
danneggiare le piastre.
PULIZIA
ATTENZIONE: Pulite l’apparecchio solo con un panno
umido dopo aver disinserito la spina dalla presa di
corrente e dopo che l’apparecchio si sia completamente
raffreddato.
- Per la pulizia delle piastre usare solo un panno umido.
- Dopo ogni utilizzo, svuotare e lavare il cassetto raccogli
grasso (G).
RICETTE
Bacon cheeseburger
Ingredienti per 2 hamburger:
2 hamburger
2 panini per hamburger
bacon
2 fette di formaggio
1 pomodoro
2 foglie di lattuga
sale q.b.
Scaldare la piastra Party Time e, quando la luce rossa si sarà
spenta, aprire la piastra inferiore ed adagiarvi i due hamburger
già salati ed il bacon. Richiudere la piastra ed aprire lo scom-
parto superiore dove andremo a riscaldare i due panini, quindi
richiudere il coperchio trasparente. Attendere circa 3-4 minuti
in base al livello di cottura desiderato (3,5 al sangue, 4 ben
cotto). Aprire la piastra inferiore e mettere una fetta di formag-
gio sopra ai 2 hamburger e lasciare cuocere un altro minuto
con il coperchio aperto prima di rimuovere gli hamburger.
Togliere gli hamburger, il bacon ed i panini dalla piastra Party
Time e farcire i panini con hamburger, pomodoro, bacon, salse
a piacere e lattuga.
Hamburger vegetale con salsa allo yogurt
Ingredienti per 2 hamburger
2 panini per hamburger
2 burger vegetali (seitan, tofu, verdure, legumi o cereali)
salsa allo yogurt
1 pomodoro
olio, sale q.b.
Scaldare la piastra Party Time e, quando la luce rossa si sarà
spenta, aprire la piastra inferiore ed adagiarvi i due hamburger
già salati. Richiudere la piastra ed aprire lo scomparto supe-
riore dove andremo a riscaldare i due panini, quindi chiudere
il coperchio trasparente. Attendere circa 3-4 minuti in base
al livello di cottura desiderato. A cottura ultimata togliere gli
hamburger ed i panini dalla piastra Party Time e farcirli con
l’hamburger, il pomodoro e la salsa allo yogurt.
Club sandwich con pollo
Ingredienti per 2 club sandwich
6 fette di pancarré (3 per ogni sandwich)
3 fette di petto di pollo
4 foglie di lattuga
1 pomodoro a fettine
salsa rosa
olio e sale q.b., spezie a piacere
Eliminare i bordi del pancarré. Scaldare la piastra Party Time
e, quando la luce rossa si sarà spenta, aprire la piastra inferio-
re per adagiarvi le due fette di petto di pollo già salate e spe-
ziate a piacere. Richiudere la piastra ed aprire lo scomparto
superiore dove andremo a riscaldare il pancarré già tostato (è
possibile tostare il pane utilizzando la piastra inferiore, prece-
dentemente alla cottura della carne. Tempo di tostatura: 2-3
min), quindi chiudere il coperchio trasparente. Attendere circa
3-4 minuti, avendo cura di controllare l’avanzamento della
cottura della carne. A cottura ultimata togliere il petto di pollo
e il pancarré e comporre il club sandwich: farcire una fetta di
pancarré con salsa rosa, insalata, una fetta di pollo tagliato
a piccoli pezzetti e pomodoro; coprire con una fetta di pare
e ripetere di nuovo terminando con un’altra fetta di pancarré.
Infilzare il club sandwich con uno stecchino abbastanza lungo
da trapassarlo. Ripetere tutti i passaggi anche per l’altro club
sandwich.
Club sandwich con prosciutto cotto e verdure grigliate
Ingredienti per 2 club sandwich
6 fette di pancarré
4 fette di prosciutto cotto
4 fette di formaggio tipo edamer o cheddar
1 zucchina tagliata a fette trasversali
1/2 melanzana tagliata a fette
maionese
olio e sale q.b.
Eliminare i bordi del pancarré. Scaldare la piastra Party
Time e, quando la luce rossa si sarà spenta, aprire la piastra
inferiore per adagiarvi le verdure già tagliate. Richiudere la
piastra ed aprire lo scomparto superiore dove andremo a
riscaldare il pancarré già tostato (è possibile tostare il pane
utilizzando la piastra inferiore, precedentemente alla cottura
della verdura. Tempo di tostatura: 2-3 min), quindi chiudere il
coperchio trasparente. Attendere circa 8 minuti, avendo cura
di controllare l’avanzamento di cottura della verdura. A cottura
ultimata togliere le il pancarré e le verdure (condirle con olio e
sale) e comporre il club sandwich: farcire una fetta di pancarré
con maionese, verdure grigliate, formaggio e prosciutto cotto;
coprire con una fetta di pare e ripetere di nuovo terminando
con un’altra fetta di pancarré. Infilzare il club sandwich con
uno stecchino abbastanza lungo da trapassarlo. Ripetere tutti
i passaggi anche per l’altro club sandwich.
Panino con salsiccia e cipolle
Ingredienti per 2 panini
2 panini tipo hot dog o pagnottelle
2 salsicce
1 cipolla
salse a piacere: maionese, ketchup, senape, salsa rosa, etc…
Scaldare la piastra Party Time e, quando la luce rossa si sarà
spenta, aprire la piastra inferiore ed adagiarvi le due salsic-
ce aperte a metà e le cipolle tagliate finemente a rondelle.
Richiudere la piastra ed aprire lo scomparto superiore dove
Fig. 1
Fig. 2
Fig. 3
andremo a riscaldare i due panini, quindi chiudere il coperchio
trasparente. Attendere circa 3-4 minuti in base al livello di
cottura desiderato. A cottura ultimata togliere le salsicce ed
il pane dalla piastra Party Time e farcirli con la salsiccia, le
cipolle e le tue salse preferite.
IMPORTANT
SAFEGUARDS
READ THESE INSTRUCTIONS BEFORE
USE
The necessary precautions must be taken
when using electrical appliances, and these
include the following:
Make sure that the voltage on the 1.
appliance rating plate corresponds to
that of the mains electricity.
Never leave the appliance unattended 2.
when connected to the power supply;
unplug it after every use.
Never place the appliance on or close 3.
to sources of heat.
Always place the appliance on a flat, 4.
level surface during use.
Never leave the appliance exposed to 5.
the elements (rain, sun, etc....).
Make sure that the power cord does not 6.
come into contact with hot surfaces.
This appliance can be used by children 7.
aged from 8 years and above and per-
sons with reduced physical, sensory or
mental capabilities or lack of experience
and knowledge only if they have been
given supervision or instruction concern-
ing use of the appliance in a safe way and
understand the hazards involved. Do not
allow children to play with the appliance.
Cleaning and user maintenance must not
be carried out by children unless they are
older than 8 and supervised.
Children under age 8 should not be 8.
allowed to handle appliance and its
power cord which must be kept out of
their reach.
Never place the appliance body, plug 9.
or power cord in water or other liquids;
always wipe clean with a damp cloth.
Always unplug the power cord from 10.
the electricity mains before fitting or
removing single attachments or before
cleaning the appliance.
Always make sure that your hands are 11.
thoroughly dry before using or adjust-
ing the switches on the appliance,
or before touching the power plug or
power connections.
To unplug the appliance, grip the plug 12.
and remove it directly from the power
socket. Never pull the power cord to
unplug the appliance.
Do not use the appliance if the power 13.
cord or plug are damaged or if the appli-
ance itself is faulty; all repairs, including
substitution of power cord, must be car-
ried out exclusively by an Ariete assist-
ance centre or by authorized Ariete
technicians in order to avoid all risks.
In case of using extension leads, these 14.
must be suitable for the appliance
power to avoid danger to the operator
and for the safety of the environment
in which the appliance is being used.
Extension leads, if not suitable, can
cause operating anomalies.
Never allow the cord to dangle in places 15.
where it may be grabbed by a child.
Do not threaten the safety of the appli-16.
ance by using parts that are not original
or which have not been approved by
the manufacturer.
Any changes to this product that have 17.
not been expressly authorised by the
manufacturer may lead to the user’s
guarantee being rendered null and void.
In the event that you decide to dispose of 18.
the appliance, we advise you to make it
inoperative by cutting off the power cord.
We also recommend that any parts that
could be dangerous be rendered harm-
less, especially for children, who may
play with the appliance or its parts.
Packaging must never be left within the 19.
reach of children since it is potentially
dangerous.
During use, the appliance must be 20.
handled with care and without touching
its hot surfaces.
21. WARNING: Hot surface.
Handle the appliance with care, above 22.
all when opening or closing the plates;
there is a risk of accidental harm to
hands or damage to other objects.
Use the appliance well away from flam-23.
mable liquids; do not use up against
walls or close to parts in plastic that do
not resist heat.
Only clean the appliance by wiping with 24.
a damp cloth, after first unplugging it
from the mains power and waiting for it
to cool completely.
After use, wait for the appliance to cool 25.
completely before storing it.
External timers or separate remote 26.
controls to operate the appliance are
not permitted.
27. To dispose of product correctly
according to European Directive 2012/19/
CE, please refer to and read the provided
leaflet enclosed with the product.
DO NOT THROW AWAY
THESE INSTRUCTIONS
COMPONENT DESCRIPTION (Fig. 1-2)
A Transparent lid handle
B Bread plate lid
C Appliance body
D Bread non-stick plate
E Lid opening lever
F Power indicator and temperature light
G Drip tray
H Top plate handle
I Hamburger non-stick plate
The appliance is intended for DOMESTIC USE ONLY; do not
use it for commercial or industrial purposes.
This appliance complies with directives 2006/95/EC, EMC
2004/108/EC and to regulation (EC) no. 1935/2004 of
27/10/2004 concerning materials in contact with food.
USING THE APPLIANCE FOR THE FIRST TIME
When using the appliance for the first time, it may emit some
smoke: this is not a defect and the smoke will cease in few
minutes.
When using for the first time, grease the appliance cook-
ing plates with oil or butter. Do not repeat these operations
further.
HOW TO OPERATE
- Plug in appliance.
- The light (F), signalling insertion of plug into the socket and
the beginning of heating phase, will go on.
- After few minutes, when the appliance reaches the tempera-
ture and is ready for use, the light (F) will turn off.
Heating of bread roll
- By means of the apposite lever (E) and handle (A), fully open
the upper transparent lid (B).
- Position bread on the plate (D) and allow it to heat up; at the
same, also hamburgers can be grilled.
Hamburger grilling
- Insert the drip tray (G) into the apposite cavity underneath
the bottom plate (I) (Fig. 3).
- Fully open the appliance by lifting the top plate (I) using the
apposite handle (H).
- Place the hamburger to grill on the bottom plate (I).
- Close the top plate on the bottom one, by slightly pressing it
downwards.
- After each use, unplug the appliance.To remove hamburgers
from the appliance, use only a wooden or plastic spatula, if
necessary.
ATTENTION:
Do not touch the hot plates to prevent burn hazard.
Only grill hamburgers with closed plates.
Do not use sharp objects (e.g. knife) to prevent plates
from being damaged.
CLEANING
ATTENTION: Clean appliance just with a damp cloth after
having unplugged it and when it is completely cold.
- Use a damp cloth to clean the plates.
- After each use, empty and wash the drip tray (G).
RECIPES
Bacon cheeseburger
Ingredients for 2 hamburgers:
2 hamburgers
2 hamburger buns
bacon
2 slices of cheese
1 tomato
2 leaves lettuce
salt to taste
Heat the Party time plate up and, when the red light turns off,
open the bottom plate and put the two hamburgers already
salty and the bacon. Close the plate and open the top plate,
where the two buns will be heated, and then close the transpar-
ent lid. Wait approximately 3-4 minutes according to required
grilling time (3.5 minutes rare, 4 minutes well cooked). Open
the bottom plate and put a slice of cheese on the 2 hamburg-
ers, continuing cooking for another minute with the lid open
before removing the hamburgers. Remove hamburgers, bacon
and bread from the Party Time plate and stuff the buns with
hamburger, tomato, bacon, sauces and lettuce.
Vegetable hamburger with yogurt sauce
Ingredients for 2 hamburgers
2 hamburger buns
2 vegetable burgers (seitan, tofu, legumes, or cereals)
yogurt sauce
1 tomato
oil, salt to taste
Heat the Party time plate up and, when the red light turns off,
open the bottom plate and put the two hamburgers already
salty and the bacon. Close the plate and open the top plate,
where the two buns will be heated, and then close the transpar-
ent lid. Wait approximately 3-4 minutes according to required
grilling time. After cooking, remove hamburgers and bread
from the Party Time plate and stuff the buns with hamburger,
tomato, and yogurt sauce.
Chicken club sandwich
Ingredients for 2 club sandwiches
6 slices sandwich bread (3 for each sandwich)
3 slices chicken breast
4 leaves lettuce
1 sliced tomato
Maryrose sauce
oil and salt to taste, spices as desired
Remove edges of sandwich bread. Heat the Party time plate
up and, when the red light turns off, open the bottom plate and
put the two chicken breast slices already salty and spiced as
desired. Close the plate and open the top plate, where the
already toasted sandwich bread will be heated (bread can
also be toasted on the bottom plate before grilling the meat.
Toasting time: 2-3 min), and then close the transparent lid.
Wait 3-4 minutes, controlling meat grilling in the meantime.
After cooking, remove the chicken breast and sandwich bread
and prepare the sandwich: stuff a sandwich bread slice with
Maryrose sauce, salad, a slice of chicken cut into small pieces
and tomato; cover with a slice of sandwich bread and repeat
the whole procedure putting another slice of sandwich bread
on the top. Stick the club sandwich with a toothpick long
enough to pierce it. Repeat the above steps also for the other
sandwich.
Club sandwich with roasted ham and grilled vegetables
Ingredients for 2 club sandwiches
6 slices sandwich bread
4 slices roasted ham
4 slices cheese (Edamer or Cheddar type)
1 zucchini cut into diagonal slices
1/2 aubergine cut into slices
mayonnaise
oil and salt to taste
Remove edges of sandwich bread. Heat the Party time plate
up and, when the red light turns off, open the bottom plate
and put vegetables already cut. Close the plate and open the
top plate, where the already toasted sandwich bread will be
heated (bread can also be toasted on the bottom plate before
grilling vegetables. Toasting time: 2-3 min), and then close
the transparent lid. Wait 8 minutes, controlling vegetables
grilling in the meantime. After cooking, remove the sandwich
bread and vegetables (season with oil and salt) and prepare
the sandwich: stuff a sandwich bread slice with mayonnaise,
grilled vegetables, cheese, and roasted ham; cover with a slice
of sandwich bread and repeat the whole procedure putting
another slice of sandwich bread on the top. Stick the club
sandwich with a toothpick long enough to pierce it. Repeat the
above steps also for the other sandwich.
Sandwich with sausage and onions
Ingredients for 2 sandwiches
2 bread rolls (type hot dog or loaves)
2 sausages
1 onion
sauces to taste: mayonnaise, ketchup, mustard, Maryrose
sauce, etc.
Heat the Party time plate up and, when the red light turns off,
open the bottom plate and put the two sausages open in halves
and the finely sliced onion rings. Close the plate and open the
top plate, where the two buns will be heated, and then close
the transparent lid. Wait approximately 3-4 minutes according
to required cooking time. After cooking, remove sausages and
bread from the Party Time plate and stuff bread with sausages,
onion rings and sauces as desired.
B
I
A
D
H
C
E
F
G


Joignez-vous à la conversation sur ce produit
Ici, vous pouvez partager ce que vous pensez du Ariete 185 Grill. Si vous avez une question, lisez d’abord attentivement le mode d’emploi. La demande d’un mode d’emploi peut être effectuée en utilisant notre formulaire de contact.