FRANÇAIS DEUTSCHENGLISH NEDERLANDS
Made in China
Fabriqué en Chine
MS750E-F93a
BABYLISS SARL
ZI du Val de Calvigny
59141 Iwuy
France
www.babyliss.com
FAC 2022/05
IB-22/055-01
MS750E
Lees eerst de veiligheidsinstructies.
GEBRUIKSAANWIJZING
WAARSCHUWING! Zorg dat het hete oppervlak van het
apparaat niet in contact komt met de huid, met name de oren,
de ogen, het gezicht en de nek.
WAARSCHUWING! Raak de hete buizen of metalen
onderdelen van het apparaat niet aan zolang hij heet is.
GEBRUIKSAANWIJZING
• Zorg ervoor dat het haar droog is en klitvrij is doorgekamd.
Verdeel het haar in plukken om het te stylen.
• Plaats het gewenste opzetstuk zoals hieronder beschreven en
zorg dat het opzetstuk op zijn plaats is vergrendeld.
• Sluit het apparaat aan op een geschikt stopcontact en schuif
de schakelaar naar de stand ‘I’ om het apparaat aan te zetten.
Het indicatielampje zal gaan branden en knipperen totdat de
geselecteerde warmtestand is bereikt.
Let op: Doe voor u begint de universele hittebestendige
handschoen aan, aan de hand die het haar om de warmtebuis
gaat rollen.
• Plaats dit apparaat tijdens gebruik niet op een hittegevoelige
ondergrond, zelfs niet bij gebruik van het matje.
• Laat het apparaat opwarmen.
• Schuif de schakelaar naar stand ‘0’ om het apparaat uit te
zetten en haal de stekker uit het stopcontact.
• Laat hem afkoelen op de standaard alvorens hem op te
bergen.
BELANGRIJK! De buizen van het apparaat worden erg heet als
het apparaat aan staat. Voordat u opzetstukken gaat plaatsen
of verwijderen, dient het apparaat volledig afgekoeld te zijn en
uit te staan en dient de stekker uit het stopcontact te zijn.
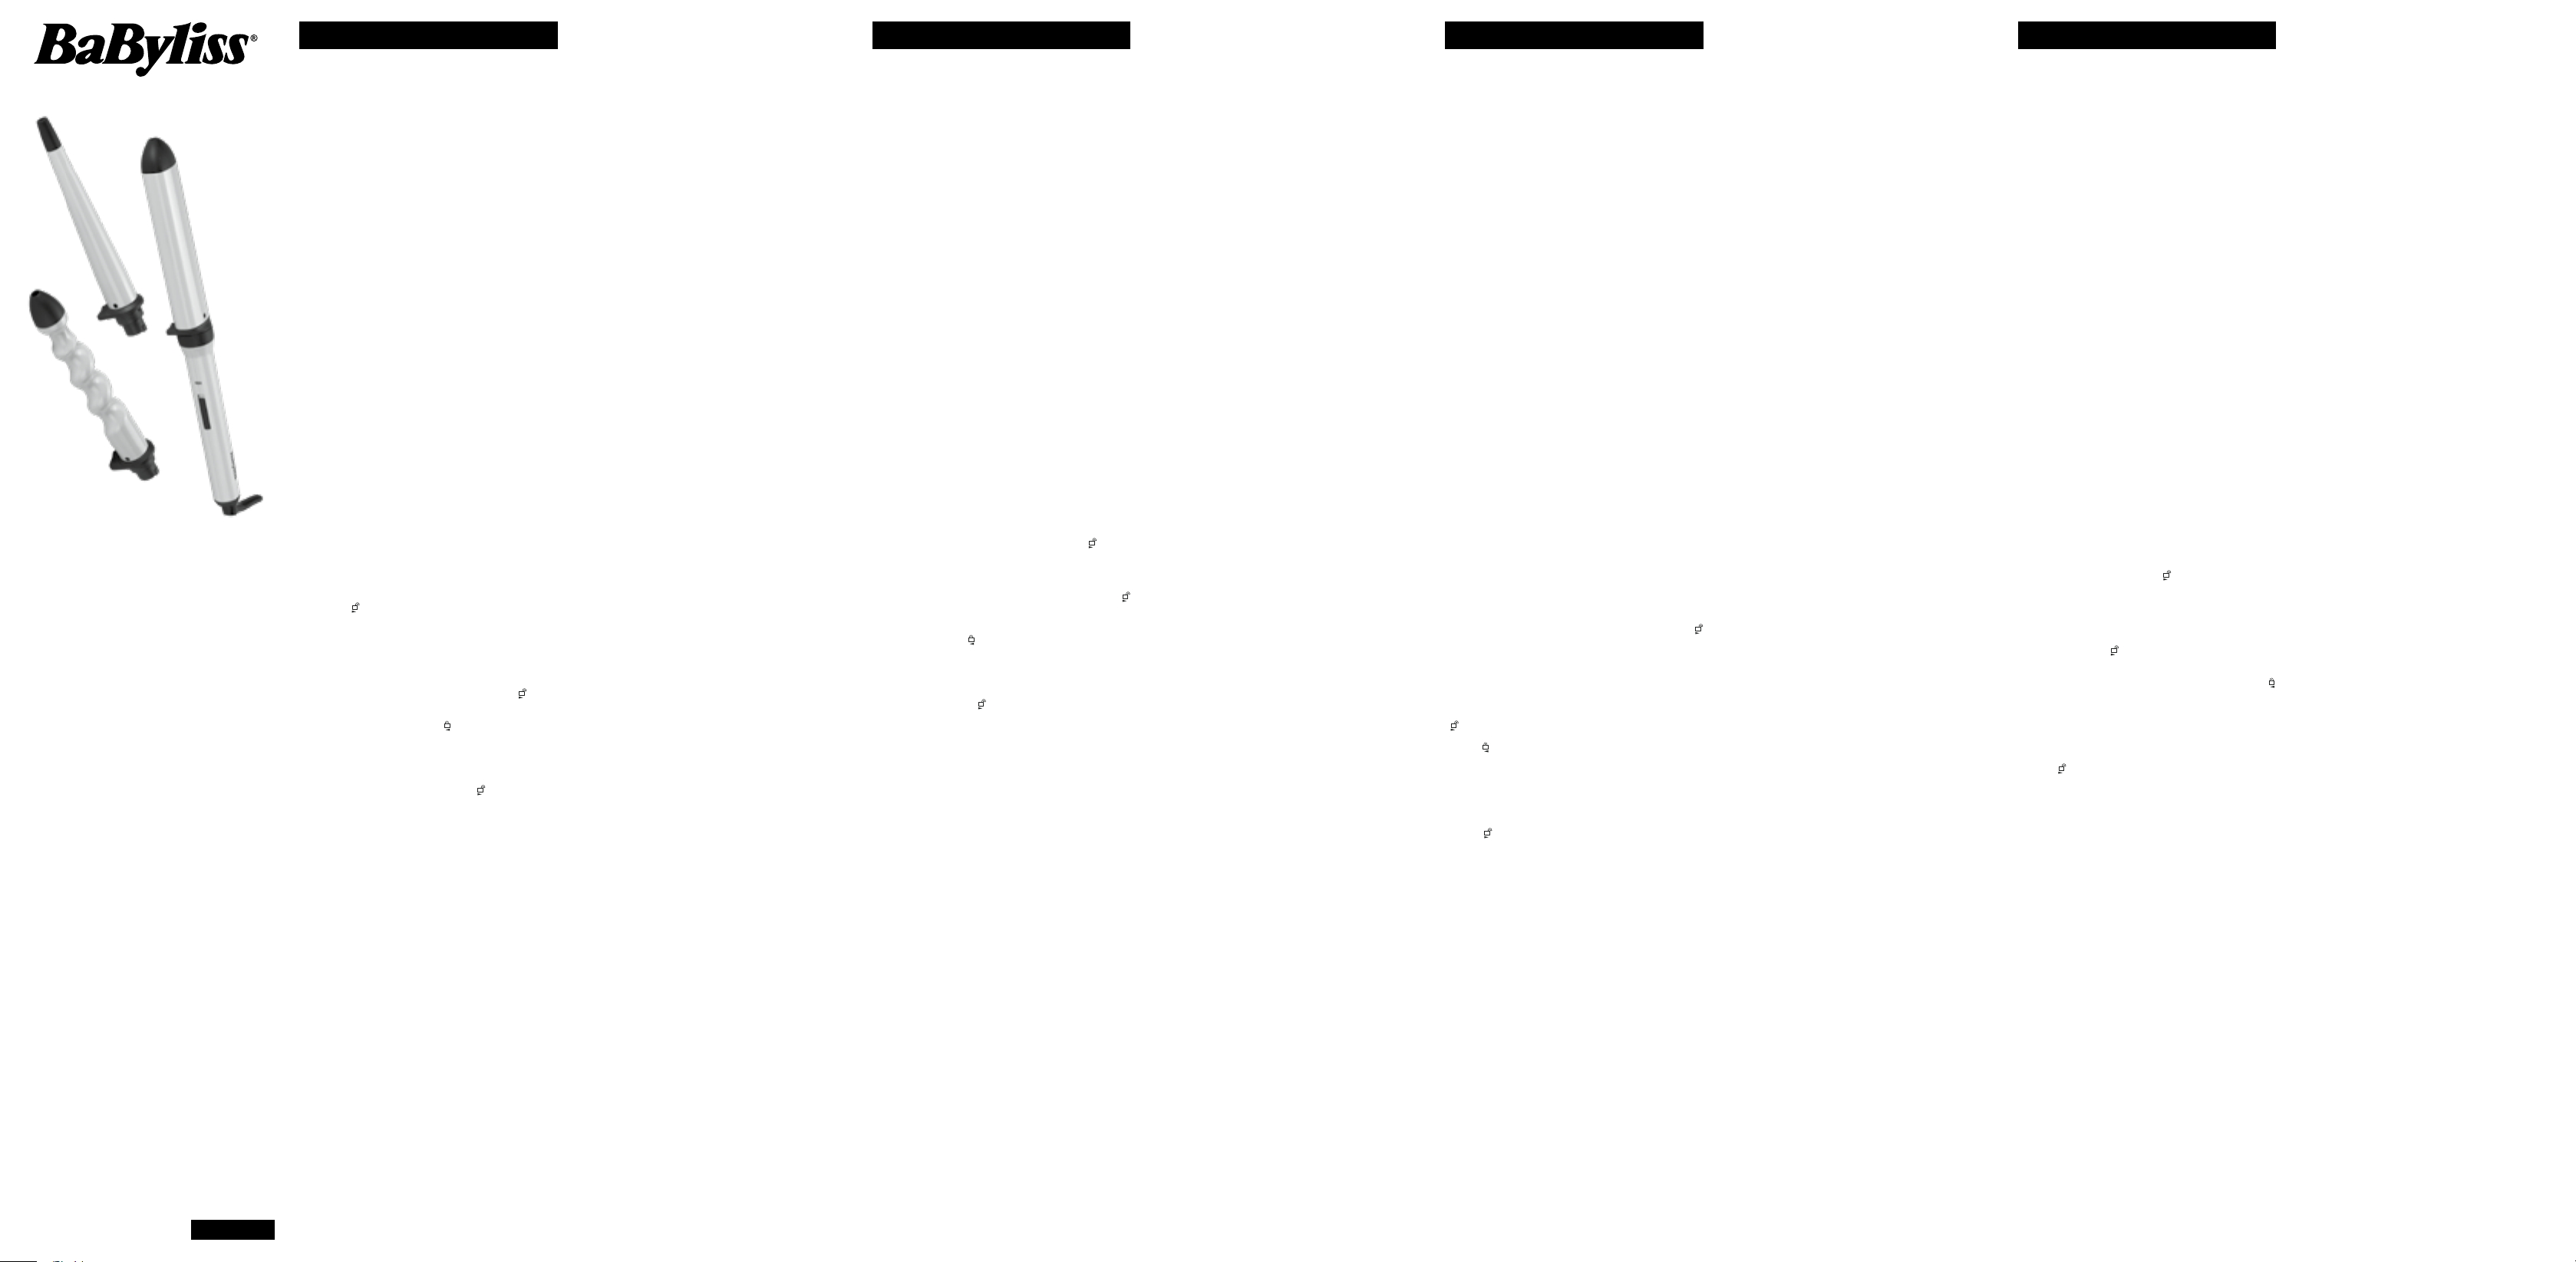
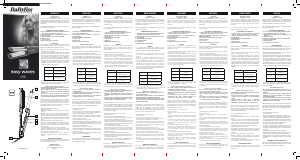
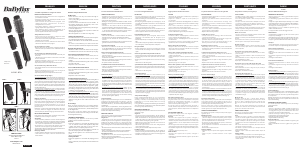
3 OPZETSTUKKEN
Om het haar te krullen, golven en textuur te geven:
- Gebruik de conische krultang voor soepele krullen
- Gebruik de ovale krultang om het haar volume te geven en
te laten golven
- Gebruik de gedraaide krultang om een strandlook te creëren
Het plaatsen van de opzetstukken
BELANGRIJK! Voordat u hulpstukken gaat plaatsen of
verwijderen, dient het apparaat afgekoeld te zijn en uit te staan
en dient de stekker uit het stopcontact te zijn.
• Draai de borgring op het handvat zo ver mogelijk naar rechts
naar de ontgrendelstand met het
-ontgrendelpictogram.
• Plaats het opzetstuk op één lijn met de borgring op het
elektrische handvat.
• Duw het opzetstuk in het handvat totdat de warmtesteun
gelijk ligt aan de borgring.
• Mocht er weerstand zijn, controleer dan of de borgring zo
ver mogelijk is doorgedraaid naar de ontgrendelpositie die is
gemarkeerd met het
ontgrendelpictogram.
• Als het opzetstuk op zijn plaats zit, vergrendel hem dan
door de borgring zo ver mogelijk naar links te draaien
naar de vergrendelstand die is gemarkeerd met het
vergrendelpictogram.
Opzetstukken verwijderen
BELANGRIJK! Voordat u een opzetstuk gaat plaatsen of
verwijderen, dient het apparaat afgekoeld te zijn en uit te staan
en dient de stekker uit het stopcontact te zijn.
• Draai de borgring zo ver mogelijk naar de ontgrendelstand
met het
ontgrendelpictogram.
• Trek het opzetstuk van de handgreep af.
Gebruiksaanwijzing voor de ovale en conische opzetbuis.
• Zorg ervoor dat het haar droog is en klitvrij is doorgekamd.
Verdeel het haar in strengen die klaar zijn om te stylen en laat
het apparaat opwarmen.
• Rol de haarlok dan om de buis die u een beetje schuin houdt,
zodat het haar zich in een spiraalbeweging om de gekozen
buis wikkelt. Doe dit gelijkmatig zodat het haar gelijk wordt
verdeeld en al het haar de buis raakt. Probeer het haar niet
over elkaar heen te rollen. Als u de conische buis als opzetstuk
gebruikt, begint u met het wikkelen van het haar bij het
dikkere gedeelte van de buis.
• Houd dit 5 à 10 seconden zo vast, afhankelijk van de textuur
en de lengte van uw haar.
• Om het apparaat uit het haar te verwijderen, kunt u het
gewoon wegtrekken.
• Laat de krul eerst goed afkoelen, voordat u gaat stylen.
• Herhaal dit voor elke haarlok.
• Schakel het apparaat na gebruik uit en haal de stekker uit het
stopcontact.
• Laat hem afkoelen op de standaard voordat u hem opbergt.
Gebruiksaanwijzing voor gedraaide opzetbuis
• Zorg dat het haar droog is en klitvrij is doorgekamd. Verdeel
het haar in strengen die klaar zijn om te stylen en laat het
apparaat opwarmen.
• Om het haar textuur te geven, wikkelt u elke haarlok
spiraalsgewijs over de hele buis. Zorg dat het hete oppervlak
van de buis de hoofdhuid, het gezicht, de ogen en de nek niet
raakt.
• Houd de lok zo 5 à 10 seconden vast, afhankelijk van de
textuur en de lengte van uw haar.
• Om het apparaat uit het haar te verwijderen, draait u hem
eruit.
• Laat de krul eerst goed afkoelen, voordat u gaat stylen.
• Herhaal dit voor elke haarlok.
• Schakel het apparaat na gebruik uit en haal de stekker uit het
stopcontact.
• Laat hem afkoelen op de standaard voordat u hem opbergt.
Warmte-instellingen
Gebruik bij broos, jn, gebleekt of gekleurd haar, de lagere
warmtestanden. Gebruik voor dikker haar de hogere
warmtestanden. Test van tevoren welke temperatuur geschikt
is voor uw haartype. Begin met de laagste stand en verhoog de
temperatuur tot het gewenste resultaat bereikt is.
Hieronder vindt u een overzicht van de temperatuurinstellingen:
0 = UIT
I = 180°C
II = 210°C
Hittebestendig matje
Dit apparaat wordt geleverd met een warmtebestendig matje
voor gebruik tijdens en na het stylen. Plaats dit apparaat tijdens
gebruik niet op een hittegevoelige ondergrond, zelfs niet met
gebruik van het matje. Schakel het apparaat na gebruik uit en
haal de stekker uit het stopcontact. Wikkel het apparaat direct
in het meegeleverde warmtebestendige matje en laat het
apparaat volledig afkoelen voordat u hem opbergt. Houd hem
ook na gebruik nog buiten bereik van kinderen want hij blijft
nog enkele minuten warm.
Hittebestendige handschoen
BELANGRIJK! Om uw hand bij het omwikkelen van
het haar rond de warmtebuis te beschermen, is een
universele hittebestendige handschoen meegeleverd.
Deze hittebestendige handschoen beschermt alleen tegen
kortstondig contact met warmte. Langdurig contact met het
hete oppervlak kan zeer onprettig zijn.
Automatische uitschakeling
Dit apparaat is voorzien van een automatische uitschakelfunctie
voor extra veiligheid. Als de krultang langer dan 72 minuten
achter elkaar aan staat, schakelt hij automatisch uit. Als u het
apparaat langer wilt blijven gebruiken, schuift u de schakelaar
eerst naar de ‘0’-stand en vervolgens weer naar een gewenste
instelling om hem weer aan te zetten.
VERZORGING & ONDERHOUD
Volg onderstaande stappen om uw apparaat in optimale
conditie te houden:
• Wikkel het snoer niet om het apparaat heen maar rol het snoer
losjes op naast het apparaat.
• Gebruik het apparaat niet met een strakstaand snoer.
• Haal altijd de stekker uit het stopcontact na gebruik.
MS750E
Bitte zuerst die Sicherheitshinweise lesen.
HINWEISE ZUM GEBRAUCH
VORSICHT! Achten Sie darauf, dass die heiße Oberäche des
Gerätes nicht direkt mit der Haut, insbesondere den Ohren,
Augen, Gesicht und Hals in Berührung kommt.
VORSICHT! Die Stylingaufsätze und Metallteile nicht berühren,
solange das Gerät heiß ist.
GEBRAUCHSANLEITUNG
• Vergewissern Sie sich, dass das Haar trocken und
durchgekämmt ist, so dass es keine Knötchen mehr enthält.
Bereiten Sie das Haar auf das Stylen vor, indem Sie es in
Abschnitte aufteilen.
• Den gewünschten Aufsatz wie unten beschrieben befestigen
und dabei darauf achten, dass er sicher einrastet.
• Das Gerät an eine geeignete Steckdose anschließen und
den Schalter zum Einschalten auf die Position «I“ schieben.
Die Kontrollleuchte «ON» leuchtet auf und blinkt, bis die
gewählte Temperatur erreicht ist.
Anmerkung: Bevor Sie mit dem Stylen beginnen achten Sie
bitte darauf, dass der Universal-Hitzeschutzhandschuh an der
Hand getragen wird, mit der Sie das Haar um den Stab wickeln.
• Legen Sie das Gerät während des Gebrauchs nicht auf
einer hitzeempndlichen Oberäche ab, auch nicht mit der
mitgelieferten Hitzeschutzhülle.
• Lassen Sie das Gerät aufheizen.
• Nach dem Gebrauch den Regler auf ‘0’ schieben, um das Gerät
auszuschalten, und den Netzstecker ziehen.
• Vor dem Verstauen abkühlen lassen.
WICHTIG! Die Stylingaufsätze werden sehr heiß, sobald das
Gerät an den Netzstrom angeschlossen und eingeschaltet ist.
Vergewissern Sie sich, dass das Gerät vollständig abgekühlt,
ausgeschaltet und vom Stromnetz getrennt ist, bevor Sie die
Aufsätze anbringen oder entfernen.
3 STYLINGAUFSÄTZE
Zum Kreieren von Locken, Wellen und Struktur:
- Verwenden Sie den konischen Stylingstab, um weiche Locken
zu kreieren
- Verwenden Sie den ovalen Stylingstab für mehr Volumen und
lockere Wellen
- Verwenden Sie den gedrehten Stylingstab, um einen
Strandlook ins Haar zu bringen
Befestigen der Stylingaufsätze
WICHTIG! Vergewissern Sie sich vor dem Anbringen oder
Entfernen der Stylingaufsätze, dass das Gerät abgekühlt,
ausgeschaltet und der Netzstecker gezogen ist.
• Den Verriegelungsring am Gri so weit wie möglich nach
rechts auf die Position drehen, die mit dem Symbol
(Entriegeln) markiert ist.
• Den Aufsatz an dem den Verriegelungsring am Antriebsgri
ausrichten.
• Den Aufsatz in den Antriebsgri schieben, bis die
Wärmehalterung bündig am Verriegelungsring anliegt.
• Falls Sie auf Widerstand stoßen, prüfen Sie, ob
der Verriegelungsring so weit wie möglich in die
Entriegelungsposition gedreht wurde, die mit dem Symbol
(Entriegeln) gekennzeichnet ist.
• Dann den Sicherungsring so weit wie möglich nach links in
die mit
gekennzeichnete Verriegelungsposition drehen.
Entfernen der Stylingaufsätze
WICHTIG! Vergewissern Sie sich, dass das Gerät abgekühlt,
ausgeschaltet und der Netzstecker gezogen ist, bevor Sie
Stylingaufsätze befestigen oder entfernen.
• Den Verriegelungsring so weit wie möglich in die
Entriegelungsposition drehen, gekennzeichnet mit dem
Symbol
.
• Danach den Aufsatz vom Gri abziehen.
Gebrauchsanleitung - Ovaler und konischer Stylingaufsatz
• Vergewissern Sie sich, dass das Haar trocken und gut
durchgekämmt ist, so dass es keine Knötchen mehr enthält.
Das Haar für das Styling in Abschnitte aufteilen und das Gerät
aufheizen.
• Das Haar leicht schräg um den Stab wickeln, so dass es in
einer spiralförmigen Bewegung um den Stab liegt. Achten
Sie dabei darauf, das Haar gleichmäßig zu verteilen, so dass
die gesamte Strähne den Heizstab berührt, und versuchen
Sie, das Haar nicht übereinander zu legen. Wenn Sie den
konischen Aufsatz verwenden, beginnen Sie mit dem
Aufwickeln der Haare am dickeren Bereich des Stabs.
• 5 - 10 Sekunden dort halten, abhängig von der Dicke und
Länge der Haarsträhne.
• Dann das Gerät einfach wieder aus dem Haar ziehen.
• Die Locke vor dem Frisieren immer abkühlen lassen.
• Diesen Vorgang für jede Haarsträhne wiederholen.
• Das Gerät nach dem Gebrauch ausschalten und den
Netzstecker ziehen.
• Vor dem Verstauen abkühlen lassen.
Gebrauchsanleitung - Gedrehter Stylingaufsatz
• Vergewissern Sie sich, dass das Haar trocken und gut
durchgekämmt ist, so dass es keine Knötchen mehr enthält.
Das Haar für das Styling in Abschnitte aufteilen und das Gerät
aufheizen.
• Die einzelnen Strähnen gut über den gesamten Stylingaufsatz
verteilen und spiralförmig aufwickeln. Achten Sie immer
darauf, dass die heiße Oberäche des Stylingaufsatzes nicht
mit Kopfhaut, Gesicht, Augen und Hals in Berührung kommt.
• 5 - 10 Sekunden dort halten, abhängig von der Dicke und
Länge der Haarsträhne.
• Dann das Gerät mit einer Drehbewegung aus dem Haar
entfernen.
• Die Locke vor dem Frisieren immer abkühlen lassen.
• Diesen Vorgang für jede Haarsträhne wiederholen.
• Das Gerät nach dem Gebrauch ausschalten und den
Netzstecker ziehen.
• Vor dem Verstauen abkühlen lassen.
Temperatureinstellungen
Für empndliches, feines, gebleichtes oder koloriertes
Haar sollten Sie eine niedrige Temperaturstufe wählen. Für
dickeres Haar können Sie eine der höheren Temperaturstufen
wählen. Es ist ratsam, bei der ersten Anwendung immer einen
Test durchzuführen, um sicherzustellen, dass die richtige
Temperatur für den jeweiligen Haartyp verwendet wird. Mit der
niedrigsten Einstellung beginnen und danach die Temperatur
erhöhen, bis das gewünschte Ergebnis erreicht ist.
Nachfolgend nden Sie Hinweise zu den
Temperatureinstellungen:
0 = AUS
I = 180°C
II = 210°C
Hitzeschutzmatte
Dieses Gerät wird mit einer Hitzeschutzmatte geliefert,
die während und nach dem Styling verwendet werden
kann. Das Gerät während des Gebrauchs nicht auf einer
hitzeempndlichen Oberäche ablegen, auch nicht mit der
beiliegenden Hitzeschutzmatte. Nach dem Gebrauch das Gerät
ausschalten und den Netzstecker aus der Steckdose ziehen
Das Gerät sofort in die mitgelieferte Hitzeschutzmatte wickeln
und es vollständig abkühlen lassen, bevor Sie es wegräumen.
Halten Sie es weiterhin außerhalb der Reichweite von Kindern,
da es noch einige Minuten lang heiß bleibt.
Hitzeschutzhandschuh
WICHTIG! Zum Lieferumfang gehört ein Universal-
Hitzeschutzhandschuh, um Ihre Hand vor kurzen
Berührungen mit dem Heizstab zu schützen, während Sie
das Haar um das Gerät wickeln. Beachten Sie bitte, dass der
Hitzeschutzhandschuh nur für kurze Berührungen konzipiert
ist. Ein längerer Kontakt mit der heißen Oberäche ist trotzdem
unangenehm.
Automatische Abschaltfunktion
Dieses Gerät verfügt über eine automatische Abschaltfunktion
für zusätzliche Sicherheit. Wenn das Gerät länger als 72
Minuten kontinuierlich eingeschaltet bleibt, schaltet es sich
automatisch aus. Wenn Sie das Gerät nach dieser Zeit weiter
verwenden möchten, schieben Sie einfach den Regler auf ‘0’
und dann wieder auf die gewünschte Einstellung, um das Gerät
erneut einzuschalten.
REINIGUNG & PFLEGE
Um Ihr Gerät in bestmöglichem Zustand zu halten, beachten
Sie bitte die folgenden Hinweise:
• Das Kabel nicht um das Gerät wickeln, sondern stattdessen
locker neben dem Gerät aufrollen.
• Das Gerät nicht zu weit weg von der Steckdose verwenden,
um nicht am Kabel zu zerren.
• Nach dem Gebrauch immer den Netzstecker ziehen.
MS750E
Lisez d’abord les consignes de sécurité.
CONSEILS D’UTILISATION
AVERTISSEMENT ! Veillez à ce que la surface chaude de
l’appareil n’entre pas en contact direct avec la peau, en
particulier les oreilles, les yeux, le visage et le cou.
AVERTISSEMENT ! Ne touchez pas les cylindres et les pièces
métalliques de l’appareil quand il est chaud.
INSTRUCTIONS D’UTILISATION
• Assurez-vous que vos cheveux sont secs et parfaitement
démêlés. Séparez la chevelure en mèches prêtes à être mises
en forme.
• Fixez l’accessoire de votre choix sur l’appareil en suivant
les instructions ci-dessous et assurez-vous qu’il est bien
verrouillé.
• Branchez l’appareil dans une prise adéquate et allumez-le en
faisant coulisser l’interrupteur en position « I ». Le témoin «
ON » s’allumera et clignotera jusqu’à ce que la température
sélectionnée soit atteinte.
Remarque : avant d’utiliser l’appareil, veillez à enler le gant
de protection thermique sur la main qui enroule les mèches
sur l’onduleur.
• Pendant l’utilisation, ne déposez jamais l’appareil sur une
surface sensible à la chaleur, même si vous utilisez le tapis
thermorésistant fourni avec l’appareil.
• Laissez chauer l’appareil.
• Faites glisser l’interrupteur en position « 0 » an d’éteindre
l’appareil. Ensuite, débranchez l’appareil.
• Laissez l’appareil refroidir avant de le ranger.
IMPORTANT ! Lorsque l’appareil est branché et allumé, ses
cylindres deviennent très chauds. Avant de xer ou de retirer
un accessoire, assurez-vous que l’appareil est totalement
refroidi, éteint et débranché.
3 ACCESSOIRES
Pour boucler, onduler et texturiser :
- Utilisez le Conical Wand pour obtenir de jolies boucles.
- Utilisez l’Oval Wand pour donner du volume et créer un eet
wavy.
- Utilisez le Twisted Wand pour créer un look de plage à la
nition texturisée.
Assembler les accessoires
IMPORTANT ! Avant de xer ou de retirer un accessoire,
assurez-vous que l’appareil est bien froid, éteint et débranché.
• Tournez complètement la bague de verrouillage de la
poignée vers la droite jusqu’à la position ouverte indiquée par
le symbole
.
• Alignez l’accessoire avec la bague de verrouillage de la
poignée.
• Enfoncez l’accessoire sur la poignée jusqu’à ce que la
protection thermique soit bien à plat contre la bague de
verrouillage.
• Si vous sentez une résistance, vériez que la bague de
verrouillage est bien tournée au maximum vers la droite
jusqu’à la position ouverte indiquée par le symbole
.
• Une fois l’accessoire xé sur l’appareil, verrouillez-le en
tournant complètement la bague vers la gauche jusqu’à la
position indiquée par le symbole
.
Retirer les accessoires
IMPORTANT ! Avant de xer ou de retirer un accessoire,
assurez-vous que l’appareil est bien froid, éteint et débranché.
• Tournez complètement la bague de verrouillage jusqu’à la
position ouverte indiquée par le symbole
.
• Détachez l’accessoire de la poignée.
Instructions d’utilisation – Accessoires cylindriques Oval
Wand et Conical Wand
• Assurez-vous que vos cheveux sont secs et parfaitement
démêlés. Divisez la chevelure en mèches prêtes à être mises
en forme et laissez chauer l’appareil.
• Enroulez les cheveux autour du cylindre choisi en inclinant
légèrement l’appareil, dans un mouvement de spirale.
Lorsque vous enroulez les cheveux autour du fer, essayez de
ne pas les superposer et assurez-vous que les cheveux sont
répartis uniformément et que toute la mèche touche le tube.
Si vous utilisez l’accessoire conique, enroulez la mèche en
partant de la partie la plus large du cylindre.
• Maintenez pendant 5 à 10 secondes en fonction de la texture
et de la longueur de vos cheveux.
• Pour retirer l’appareil des cheveux, écartez l’appareil.
• Laissez la boucle refroidir avant de la mettre en forme.
• Répétez l’opération pour chaque mèche.
• Après utilisation, éteignez et débranchez l’appareil.
• Laissez l’appareil refroidir avant de le ranger.
Instructions d’utilisation – Accessoire cylindrique Twisted
Wand
• Assurez-vous que vos cheveux sont secs et parfaitement
démêlés. Divisez la chevelure en mèches prêtes à être mises
en forme et faites chauer l’appareil.
• Pour créer un eet texturisé sur toute la chevelure, enroulez
chaque mèche en spirale sur toute la longueur du cylindre.
Évitez que la surface chaude du cylindre ne touche le cuir
chevelu, le visage, les yeux ou le cou.
• Maintenez pendant 5 à 10 secondes en fonction de la texture
et de la longueur de vos cheveux.
• Pour retirer l’appareil des cheveux, écartez l’appareil dans un
mouvement de rotation.
• Laissez la boucle refroidir avant de la mettre en forme.
• Répétez l’opération pour chaque mèche.
• Après utilisation, éteignez et débranchez l’appareil.
• Laissez l’appareil refroidir avant de le ranger.
Réglages de température
Si vous avez des cheveux ns, délicats, colorés ou décolorés,
privilégiez les réglages de température plus faibles. Si vos
cheveux sont plus épais, utilisez les réglages plus intenses. Il est
recommandé de toujours eectuer un test lors de la première
utilisation pour s’assurer d’utiliser la température correcte en
fonction du type de cheveu. Commencez par le réglage le plus
bas, puis augmentez la température jusqu’à obtenir le résultat
souhaité.
Voici un guide des réglages de température :
0 = OFF
I = 180 °C
II = 210 °C
Tapis thermorésistant
Cet appareil est fourni avec un tapis thermorésistant à utiliser
pendant et après le coiage. Pendant l’utilisation, ne déposez
jamais cet appareil sur une surface sensible à la chaleur, même
si vous utilisez le tapis thermorésistant fourni avec l’appareil.
Après utilisation, éteignez et débranchez l’appareil. Emballez
immédiatement l’appareil dans son tapis thermorésistant et
laissez-le refroidir totalement avant de le ranger. Maintenez-le
hors de portée des enfants, car il restera très chaud pendant
plusieurs minutes.
Gant thermorésistant
IMPORTANT ! Cet appareil est fourni avec un gant
thermorésistant universel qui vous permet de protéger votre
main contre tout contact temporaire avec le cylindre lorsque
vous enroulez une mèche de cheveux autour de l’appareil.
Remarque : le gant thermorésistant a été conçu exclusivement
pour orir une protection de base contre un éventuel contact.
Un contact prolongé avec la surface chaude provoquera de
l’inconfort.
Arrêt automatique
Cet appareil a une fonction d’arrêt automatique pour plus de
sécurité. Si l’appareil reste allumé en continu pendant plus de
72 minutes, il s’éteindra automatiquement. Si vous souhaitez
continuer à utiliser l’appareil plus longtemps, il vous sut de
mettre l’interrupteur en position « 0 », puis de sélectionner le
réglage adapté an de remettre l’appareil en marche.
SOIN & ENTRETIEN
Pour garder votre appareil dans des conditions optimales,
veuillez suivre les instructions ci-dessous.
• N’enroulez pas le câble d’alimentation autour de l’appareil.
Enroulez plutôt celui-ci séparément, à côté de l’appareil.
• N’utilisez pas l’appareil avec le cordon d’alimentation tendu.
• Débranchez l’appareil après chaque utilisation.
MS750E
Read the safety instructions rst.
HOW TO USE
WARNING! Take care to avoid the hot surface of the appliance
coming into direct contact with the skin, in particular the ears,
eyes, face and neck.
WARNING! Do not touch the hot barrels or metal parts of the
appliance whilst hot.
INSTRUCTIONS FOR USE
• Ensure the hair is dry and combed through to remove any
tangles. Divide the hair into sections ready for styling.
• Fit the required attachment as described below, ensuring that
the attachment is locked into position.
• Plug the appliance into a suitable mains socket and slide the
switch to the ‘I’ position to turn on, the ‘ON’ indicator light will
illuminate and will ash until the heat setting selected has
been reached.
Please note: Before styling make sure the universal heat glove
is worn on the hand which is wrapping the hair around the
barrel.
• During use, do not place the appliance on any heat sensitive
surface, even when using the heat wrap provided.
• Allow the appliance to heat up.
• Slide the switch to ‘0’ position to turn o and unplug the
appliance.
• Allow to cool before storing away.
IMPORTANT! The barrels of the appliance will become
very hot when plugged in and switched on. Before xing or
removing any attachments, ensure the appliance is completely
cool, switched o and unplugged.
3 Barrel Attachments
To create curls, waves and texture:
- Use the conical wand to create smooth curls
- Use the oval wand to add volume and loose waves
- Use the twisted wand to create a beachy textured nish
Fitting the Attachments
IMPORTANT! Before xing or removing attachments, ensure
the appliance is cool, switched o and is unplugged.
• Turn the locking ring on the handle as far as possible to the
right to the release position marked with the unlock
symbol.
• Align the attachment to the locking ring on the power handle.
• Push the attachment into the power handle until the heat rest
is ush against the locking ring.
• If there is resistance, check the locking ring is rotated as far
as possible to the release position marked with the unlock
symbol.
• Once the attachment is in place, secure it by turning the
locking ring as far as possible to the left to the lock position
marked with the lock
symbol.
Removing the Attachments
IMPORTANT! Before xing or removing any attachments,
ensure the appliance is cool, switched o and unplugged.
• Turn the lock ring as far as possible to the release position
marked with the unlock
symbol.
• Pull the attachment away from the handle.
Instructions for use - Oval and Conical Wand barrel
attachments
• Ensure the hair is dry and combed through to remove any
tangles. Divide the hair into sections ready for styling and
allow the appliance to heat up.
• Wind the hair around the barrel at a slight angle, so the hair
wraps around the chosen barrel in a spiral motion. As you
wind the hair around the barrel, ensure the hair is distributed
evenly so the entire section is touching the barrel, try not to
overlay the hair. If using the conical barrel attachment, start
winding hair at the wider end of the barrel.
• Hold in place for 5-10 seconds depending on the texture and
length of your hair.
• To remove the appliance from the hair, pull appliance away.
• Allow the curl to cool before styling.
• Repeat on each hair section.
• After use, switch o and unplug the appliance.
• Allow to cool before storing away.
Instructions for use - Twisted Wand barrel attachment
• Ensure the hair is dry and combed through to remove any
tangles. Divide the hair into sections ready for styling and
allow the appliance to heat up.
• To create texture through the hair, wind each section around
the barrel spirally distributing over all sections of the barrel.
Take care to avoid the hot surface of the barrel touching the
scalp, face, eyes and neck.
• Hold in place for 5-10 seconds depending on the texture and
length of your hair.
• To remove the appliance from the hair, twist the appliance
away.
• Allow the curl to cool before styling.
• Repeat on each hair section.
• After use, switch o and unplug the appliance.
• Allow to cool before storing away.
Heat Settings
If you have delicate, ne, bleached or coloured hair, use the
lower heat settings. For thicker hair, use the higher heat
settings. It is suggested to always complete a test on initial
use to ensure the correct temperature is used on the hair type.
Start on the lowest setting and increase the temperature until
desired result is achieved.
Below is a guide of the temperature settings:
0 = OFF
I = 180°C
II = 210°C
Heat Protection Mat
This appliance comes with a heat protection mat for use during
and after styling. During use do not place this appliance on any
heat sensitive surface, even when using the heat mat provided.
After use, switch o and unplug the appliance. Immediately
wrap the appliance in the heat mat provided and allow the
appliance to fully cool down before storing away. Continue to
keep out of the reach of children as it will remain hot for several
minutes.
Heat Protective Glove
IMPORTANT! A universal heat protective glove has been
supplied to help protect the hand from temporary contact with
the barrel when wrapping the hair around the appliance. Please
note the heat protective glove is only designed to give initial
contact protection. Discomfort will be caused with prolonged
contact with the hot surface.
Auto Shut O
This appliance has an automatic shut o feature for added
safety. If the wand is switched on for more than 72 minutes
continuously, it will automatically switch o. If you wish to
continue using the appliance after this time, simply slide the
switch to the ‘0’ setting, then slide the switch to the relevant
setting to turn the power on again.
CARE & MAINTENANCE
To help keep your appliance in the best possible condition
follow the steps below:
• Do not wrap the lead around the appliance, instead coil the
lead loosely by the side of the appliance.
• Do not use the appliance at a stretch from the power point.
• Always unplug after use.

Joignez-vous à la conversation sur ce produit
Ici, vous pouvez partager ce que vous pensez du BaByliss MS750E Fer à boucler. Si vous avez une question, lisez d’abord attentivement le mode d’emploi. La demande d’un mode d’emploi peut être effectuée en utilisant notre formulaire de contact.