Mode d’emploi Caliber MCD370 Autoradio

Besoin d'un mode d’emploi pour votre Caliber MCD370 Autoradio ? Ci-dessous, vous pouvez consulter et télécharger gratuitement le mode d’emploi PDF en français. Ce produit a actuellement 4 questions fréquemment posées, 0 commentaires et 0 votes. Si ce n'est pas le mode d’emploi que vous souhaitez, veuillez nous contacter.

Votre produit est défectueux et le mode d’emploi n’offre aucune solution ? Rendez-vous à un Repair Café pour obtenir des services de réparation gratuits.

Mode d’emploi

Loading…
ENGLISH
7
ERASING MUSIC FILES FROM USB/SD- OR MMC-CARD
There are 2 different methods for erasing music files.
1. ERASING MUSIC FILES FROM THE MEDIA.
1.Press button (2) longer than 3 seconds to activate the ERASE mode.The unit will
display “ERASE 010”
2.Press the volume knob (8) to enter into the ERASE mode.
3.Now you can rotate the volume knob (8) to select “<-” to confirm erasing or ”X” to
cancel the erasing. Press the volume button (8) again to confirm. If no button is press
within 5 seconds time, the unit will automatically switch to the previous mode.
4.If you have pressing the volume knob (8) to start erase the present music file, the
music file will stop and the erasing will start at the same time.The unit will display
“ERASE V” after the music file erase is succesfull, the unit will automatically start
playback the next music file.
2. ERASE UNDER FILES NUMBER/FILES NAVIGATE SEARCH MODE
1.After select the file number/file name you want to erase press button (2) longer than
3 seconds to activate the ERASE mode.The unit will display “ERASE 010”
2.Press the volume knob (8) to enter into the ERASE mode.
3.Now you can rotate the volume knob (8) to select “<-” to confirm erasing or ”X” to
cancel the erasing. Press the volume button (8) again to confirm. If no button is press
within 5 seconds time, the unit will automatically switch to the previous mode.
4.If you have pressing the volume knob (8) to start erase the selected music file.The
unit will display “ERASE V” after the music file erase is succesfull, the unit will
automatically start playback the next music file.
WARNING:
1. Do not switch the power “OFF” during erasing
2. Do not change mode during erasing
3. Do not switch the ignition key “OFF” during erasing
4. Do not detach the face panel from the main unit
FILES MANAGER
With this “File management” function you can organize all the music files just like on a PC.
FOLDERS MANAGEMENT
This unit will automatically self-create the below default folders onto any USB/SD/MMC
media if these are inserted into the unit.
MY_CD: Folder for saving all the tracks source from CD.
MY_MP3: Folder for saving all the MP3 music files transfer from other device.
MY_WMA: Folder for saving all the WMA music files transfer from other device.
MY_FM: Folder for saving all the music files source from FM Program.
MY_AUX: Folder fo saving all the music files source from AUX Line In.
MY_iPod: Folder for saving all music files source from iPod Player.
FILES MANAGEMENT
This unit will automatically self-create the file name following with the folder name. For
example: Music file which recorded from CD, the file name “CD0001.MP3” will be
automatically created & saved in the respective folder.
IPOD OPERATIONS
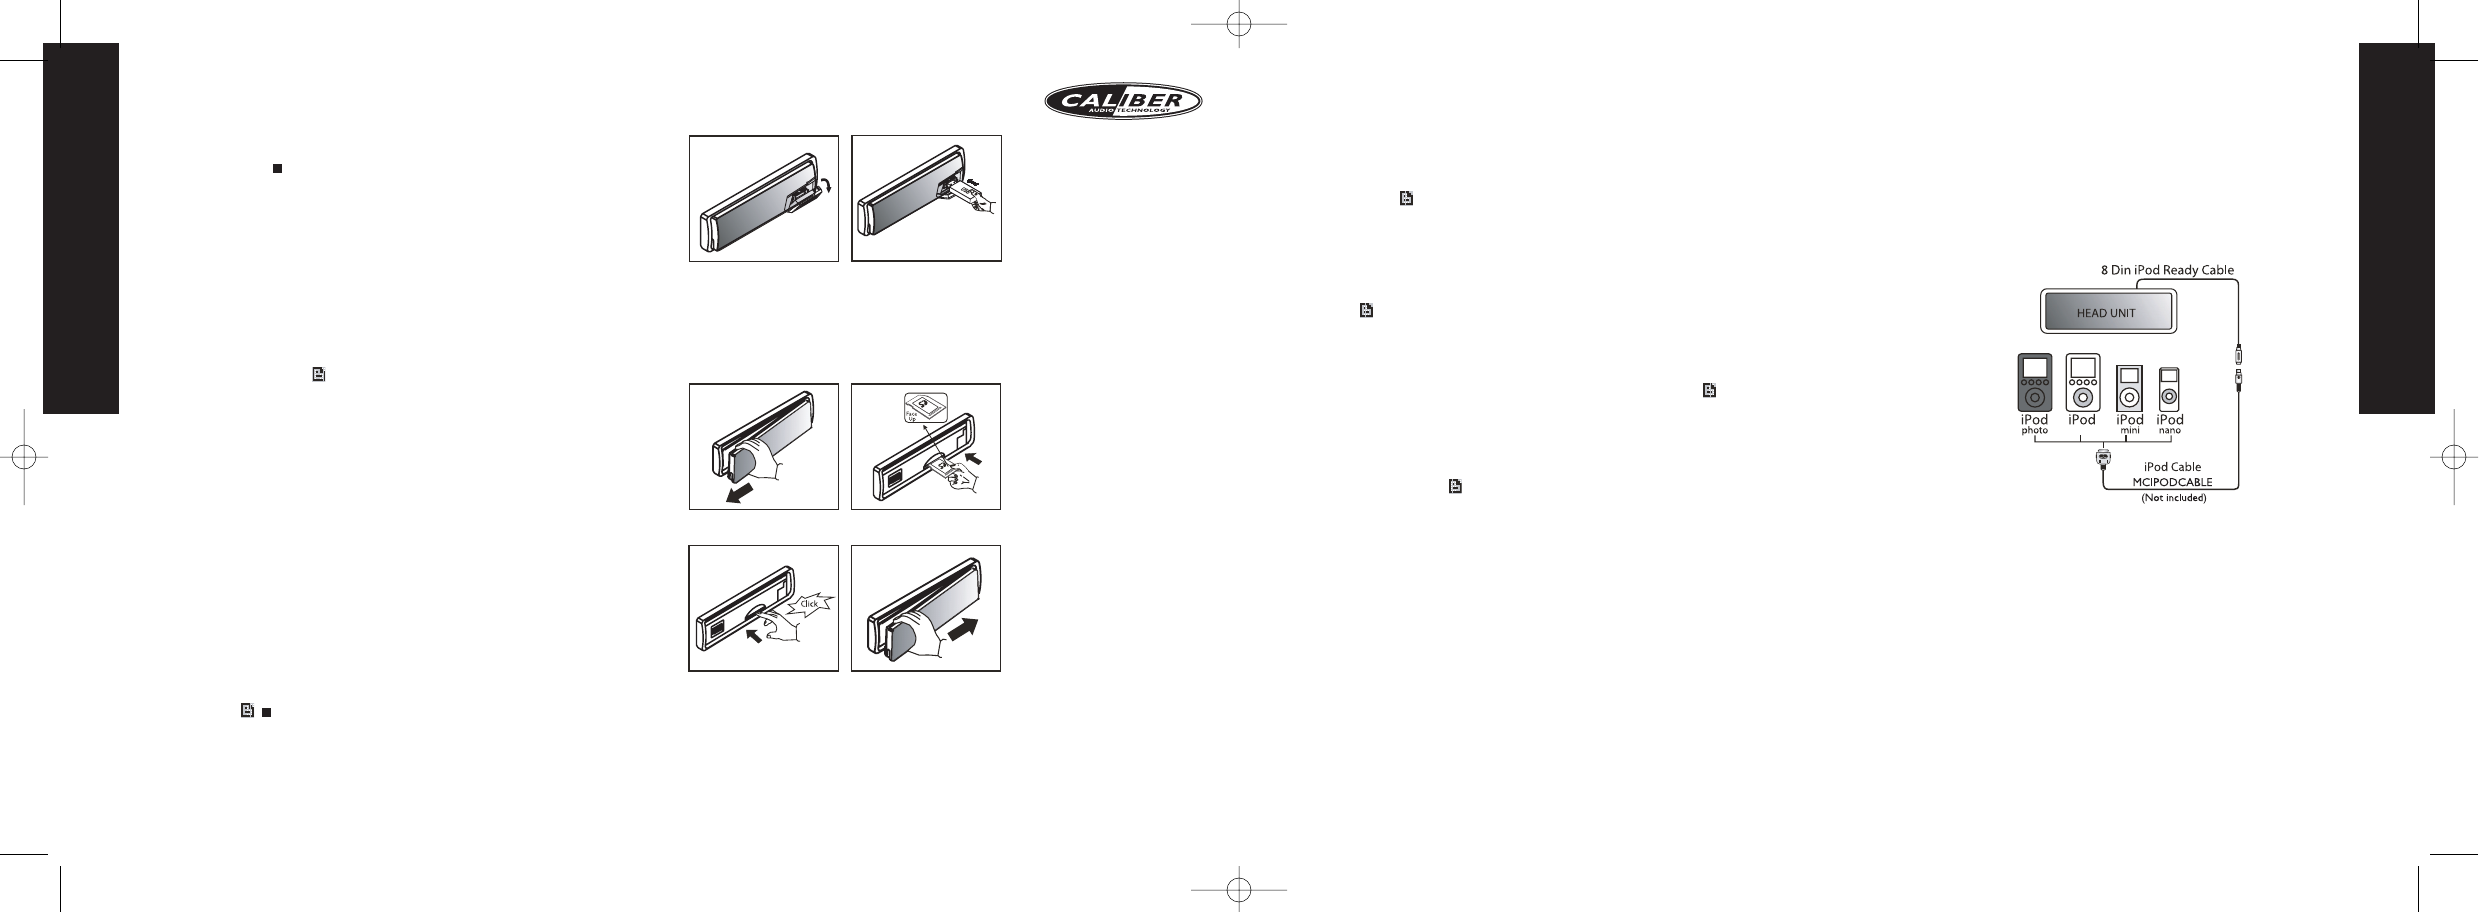
This unit is equipped with iPod Ready function.The user has direct control of the iPod
on the front panel.
CONNECT THE IPOD ->
TURNING IPOD POWER ON AND OFF
The iPod power turns automatically on when it is connected to the 30 Pin connector
and as long as the vehicle’s ignition is turned ON.The iPod power can be turnde OFF
by removing the iPod from the 30 Pins connector or the vehicle’s ignition is turned OFF.
The iPod will go into the pause mode and goes into sleep mode about 2 minutes later.
NOTE:While the iPod is connected, the power cannot be turned ON or OFF from the
iPod itself.
IPOD BATTERY CHARGING
The iPod will automatically start recharging as long as the vehicle’s ignition key is turned
to ACC or ON.
SWITCH TO IPOD MODE
When the Headunit is ON and the iPod is connected to the 30 pin connector, press
button (9) “MODE” to change to iPod mode and the unit will display “iPod” for a while.
The headunit will starts reading the music files on the iPod and the playback will
automatically start. Press button (9) “MODE” repeatedly to change to other modes or
switch back to iPod mode.
ENGLISH
6
CANCEL RECORDING
Press button (4) “COPY/RECORD” for more than 3 seconds to cancel recording.The unit
will display “REC USB”.The track that has been recorded incompletely will be deleted.
WARNING: The unit will cancel recording automatically if:
1.The power is switched to “OFF” mode
2.Change mode
3.Inserting a CD
4.Insert a USB
5.Detach the face panel from the main unit
TRANSFER MUSIC FILES
With this unit you can easily transfer music files between USB stick, SD or MMC card.
TRANSFER MP3 OR WMA MUSIC FILES
1.Playback a music file to be transferred, press button (4) “COPY/RECORD” longer
than 3 seconds to activate the Transfer mode.
2.The unit will display -> USB” as default, rotate the volume knob (8) to select the
storage media:“REC -> USB” or “REC -> CARD”.
3.Press button (8) to confirm to transfer the playing music file to the selected media. If
no button is press within 10 seconds time, the unit will automatically switch to the
previous mode.
4.If the selected storage media is full, the unit will display “Memory Full” then
automatically switch to the previous mode.
5.
After pressing button (8) to start the transfer, the playing music file will stop and the
transferring will start at the same time. (The following step is an example if USB is selected).
6.When the transfer is processing, the unit will display “10% >> USB”.
7.When the transfer is completed, the unit will display “100% >> USB” for a few
seconds and automatically playback the present music file which have been
transferred.The transferred music file is automatically saved as a file into the folder
“My_MP3” or “MY_WMA” by the advance “File management” system of this unit.
NOTE:
- While transferring, all the MP3/WMA operations like Track up/down, Repeat, Random
etc. can’t be used.
- The audio will remain transferring even MUTE function is activated.
- Transferring will automatically stop if the storage media memory is less than 2MB.
CANCEL TRANSFERRING
Press button (4) “COPY/RECORD” for more than 3 seconds to cancel transferring.The unit
will display USB”.The music file that has been transferred incompletely will be deleted.
WARNING: The unit will cancel transferring automatically if:
1.The power is switched to “OFF” mode
2. Change mode
3. Inserting a CD
4. Insert a USB
5. Detach the face panel from the main unit
SD/MMC OPERATIONS
USB DRIVE OPERATIONS
Flip open the USB cover.
Plug in the USB drive.The unit
automatically starts playing.
WARNING: Switch off the unit or switch to another mode before removing the USB
stick. Never try removing the USB stick while playing music from the USB stick. It
may damaged the USB stick.
Detach the control panel. Insert the SD/MMC Card
with Label up side.
Push in untill a “click”
sound is heard.
Close the control panel.
Press button (9) “MODE” after a SD or MMC card was inserted to select “SD/MMC”
mode.The unit automatically starts playing. If you want to select another source you
can use button (9) “mode” to select the desired source.You can leave the card in the
unit. Press button (20) “up/down” to go through the tracklist.
MCD 370 GB-PT werkdoc 18-12-2006 11:07 Pagina 6
Télécharger mode d’emploi en Français (PDF, 2.22 MB)
(Tenez compte de l’environnement et imprimez ce manuel uniquement si c’est vraiment nécessaire)

Loading…

Évaluation

Dites-nous ce que vous pensez du Caliber MCD370 Autoradio en laissant une note de produit. Vous voulez partager vos expériences avec ce produit ou poser une question ? Veuillez laisser un commentaire au bas de la page.
Etes-vous satisfait du Caliber MCD370 Autoradio ?
Oui Non
Soyez le premier à évaluer ce produit
0 évaluations

Joignez-vous à la conversation sur ce produit

Ici, vous pouvez partager ce que vous pensez du Caliber MCD370 Autoradio. Si vous avez une question, lisez d’abord attentivement le mode d’emploi. La demande d’un mode d’emploi peut être effectuée en utilisant notre formulaire de contact.

En savoir plus sur ce mode d’emploi

Nous comprenons qu’il est agréable d’avoir un mode d’emploi papier pour vos Caliber MCD370 Autoradio. Vous pouvez toujours télécharger le mode d’emploi depuis notre site Web et l’imprimer vous-même. Si vous souhaitez disposer d’un mode d’emploi original, nous vous recommandons de contacter Caliber. Ils pourront peut-être fournir un mode d’emploi original. Recherchez-vous le mode d’emploi de votre Caliber MCD370 Autoradio dans une autre langue ? Choisissez votre langue préférée sur notre page d’accueil et recherchez le numéro de modèle pour voir si nous l’avons disponible.

Caractéristiques

Marque Caliber
Modèle MCD370
Catégorie Autoradios
Type de fichier PDF
Taille du fichier 2.22 MB

Tous les modes d’emploi pour Caliber Autoradios
Plus de modes d’emploi de Autoradios

Foire aux questions sur Caliber MCD370 Autoradio

Notre équipe d’assistance recherche des informations utiles sur les produits et des réponses aux questions fréquemment posées. Si vous trouvez une inexactitude dans notre foire aux questions, veuillez nous le faire savoir en utilisant notre formulaire de contact.

Qu’est-ce que DAB+ ? Vérifié

DAB+ est le successeur du signal FM et signifie « Digital Audio Broadcasting. » (radiodiffusion numérique). Il s’agit d'un signal numérique autorisant plusieurs chaînes dans la même bande passante et permettant un changement plus facile entre les chaînes.

Cela a été utile (641) En savoir plus

Quelle est la différence entre FM et AM ? Vérifié

FM et AM sont deux formes de modulation utilisées pour transmettre un signal. FM signifie « Frequency Modulation » (modulation de fréquence) et « AM » signifie « Amplitude Modulation » (modulation d’amplitude. AM est la plus ancienne forme de modulation. La plus grande différence réside dans le fait que le signal FM est bien plus fort que le signal AM.

Cela a été utile (413) En savoir plus

Un CD est coincé dans mon autoradio, que dois-je faire ? Vérifié

Certains autoradios ont une fonction pour éjecter les CD coincés. Éteignez la voiture et appuyez simultanément sur les boutons « marche » et « éjection » pendant 10 secondes. Si cela ne fonctionne pas, démarrez la voiture et réessayez.

Cela a été utile (395) En savoir plus

Quelle taille d’autoradio convient à ma voiture ? Vérifié

Il existe deux tailles standard d’autoradio, 1-DIN et 2-DIN. 1-DIN est la version mince standard et 2-DIN est le double de cette hauteur. Les autoradios 2-DIN disposent souvent d’un écran pour afficher des informations de navigation ou lire des films.

Cela a été utile (332) En savoir plus
Mode d’emploi Caliber MCD370 Autoradio

Produits connexes

Catégories associées

×
Download