
Associer un autre émetteur / Associate another transmitter / Zuordnen eines weite-
ren Empfängers / Associare un altro emettitore / Asociar otro emisor / Powi¹zywa-
nie innego nadajnika / Een andere zender verbinden
Configuration / Configuration / Konfiguration / Configurazione / Configuración /
+ONµGURACJA / Configuratie
Utilisation / Use / Verwendung / Utilizzo / Utilización / U¿ytkowanie / Gebruik
Déverrouiller les touches / Unlock the buttons / Freischalten der Tasten / Sbloccare i
tasti / Desbloquear las teclas / Odblokowanie przycisków / Ontgrendelen van de
toetsen
Effacer les associations / Remove the associations / Zuordnungen löschen / Cancellare le associazioni / Borrar las asociaciones / Usuwanie powi¹zañ /
Verenigingen verwijderen
Changer les piles / Replace the batteries / Batterien ersetzen / Sostituire le pile /
Cambiar las pilas / Wymiana baterii / Batterijen vervangen
Associer le thermostat pour l’optimisation solaire / Associate the thermostat for solar
optimisation / Zuordnen des Raumthermostats für die Solaroptimierung / Associare
il termostato per l‘ottimizzazione solare / Asociar el termostato para la optimización
solar / Powi¹zywanie termostatu w celu optymalizacji s³onecznej / De thermo-
staat verbinden voor zonne-optimalisatie
4 6
7
8
10
9
5
>3s
... ... ...
OFF
230V~
50 Hz
ON
OFF
1 2 3
OK
Ex : TYBOX 2020 WT, TYDOM 4000,
apps TYDOM...
+ 5°C
- 5°C
>10s
mode
mode
mode
mode
mode
mode
1 2 3
mode
>10s
>20s
3s 7s
10s
.. .. ..... .. ..
... ... ...
... ... ...
RESET OK
RESET OK
>3s
>3s
mode
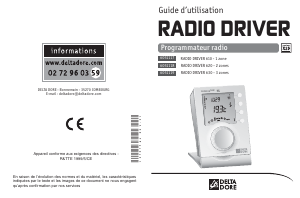
2 x 1,5V - AAA LR03
>3s
mode
>3s
1
2 3
4
CF01 : Correction de la température mesurée /
Correcting the measured temperature /
Korrektur der gemessenen Temperatur /
Correzione della temperatura misurata /
Corrección de la temperatura medida /
Korekta zmierzonej temperatury /
Correctie van de gemeten temperatuur
CF02 : Verrouillage des touches / Locking the
buttons / Tastensperrung / Blocco dei tasti
/ Bloqueo de teclas / Blokada przycisków /
Toetsenblokkering
CF03 : Ne pas modifier / Do not change /
Nicht ändern / Non modificare / No modificar /
Nie zmieniaæ / Niet wijzigen
FR
Ê Mettez l’installation sous tension.
Appuyez 3 secondes sur la touche
du récepteur jusqu’à ce que son
voyant clignote. Relâchez.
EN
Ê
Switch on the installation.
Press and hold the receiver button
for 3 seconds until the LED flashes.
Release.
DE
Ê
Schalten Sie die Anlage ein.
Drücken Sie 3 Sekunden lang die
Taste des Empfängers, bis dessen
Kontrollleuchte blinkt. Lassen Sie
die Taste los.
IT
Ê
Mettete sotto tensione l'installa-
zione. Premete per 3 secondi il
tasto del ricevitore fino a quando la
sua spia lampeggia. Rilasciate.
ES
Ê
Conecte la instalación a la red.
Pulse durante 3 segundos la tecla
del receptor hasta que el testigo
parpadee. Suelte.
PL
Ê
W³¹cz zasilanie instalacji.
.ACIÜNIJÒNAÒÒSEKUNDYÒPRZYCISKÒ
odbiornika do momentu, a¿ jego
lampka sygnalizacyjna zacznie
migaæ. Zwolnij.
NL
Ê
Zet de installatie onder spanning.
Druk gedurende 3 seconden op de
toets van de ontvanger tot het lamp-
je knippert. Laat de toets los.
Ë Sur l’émetteur, envoyez
l’ordre d’association
(voir sa notice).
Ë Send the association
command to the transmitter
(see user guide).
Ë Senden Sie am Empfänger
den Zuordnungsbefehl
(siehe Anleitung).
Ë Sull'emettitore, inviate l'ordi-
ne di associazione (vedere
le relative istruzioni).
Ë En el emisor, envíe la orden
de asociación (ver instruc-
ciones).
Ë .AÒNADAJNIKUÒWYÜLIJÒPOLECE-
nie powi¹zania
PATRZÒJEGOÒINSTRUKCJA
Ë Op de zender, stuur de
volgorde van het verbinden
(zie handleiding).
Ì Vérifiez que le voyant du
récepteur ne clignote plus.
Les produits sont associés.
Î Make sure that the receiver
LED has stopped flashing.
The products are now
associated.
Ì Stellen Sie sicher, dass die
Kontrollleuchte des Empfän-
gers nicht mehr blinkt. Die
Produkte wurden zugeordnet.
Ì Verificate che la spia del
ricevitore non lampeggi più.
I prodotti sono associati.
Í Compruebe que el testigo
del receptor ha dejado de
parpadear. Los productos
están asociados.
Ì 3PRAWDßÒCZYÒLAMPKAÒSY-
gnalizacyjna w odbiorniku
przesta³a migaæ. Urz¹dze-
nia s¹ powi¹zane.
Ì Controleer of het controle-
lampje van de ontvanger
niet meer knippert. De
apparaten zijn gekoppeld.
FR
Ê Mettez la centrale en
mode «Association d’un
capteur de type sonde
d’ambiance» (voir sa notice).
EN
Ê
Set the alarm control unit
to "Associate a room sensor"
mode (see user guide).
DE
Ê
Bringen Sie die Alarmzent-
rale in den Modus "Zuordnen
eines Fühlers vom Typ
Raumtemperaturfühler"
(siehe Anleitung).
IT
Ê
Mettete la centrale in
modalità "Associazione di un
sensore di tipo sonda
ambiente" (vedere le relative
istruzioni).
ES
Ê
Ponga la central en modo
«Asociación de un sensor de
tipo sonda de ambiente» (ver
instrucciones).
PL
Ê
5STAWÒCENTRALĂÒWÒTRYBIEÒ
„Powi¹zywanie czujnika typu
sonda temperatury otoczenia”
PATRZÒJEJÒINSTRUKCJA
NL
Ê
Zet de centrale in de
modus "Verbinden van een
sensor" (Zie handleiding).
Ë Sur le thermostat, appuyez
simultanément 3 secondes
sur les touches MODE et +
jusqu’à afficher rF01
Ë Press and hold the MODE
and + buttons on the ther-
mostat simultaneously for 3
seconds until it displays rF01
Ë Drücken Sie am Raumther-
mostat 3 Sekunden gleichzei-
tig die Tasten MODE und +,
bis rF01 angezeigt wird.
Ë Sul termostato, premete
simultaneamente per 3
secondi i tasti MODE e + fino
a visualizzare rF01
Ë En el termostato, pulse
simultáneamente durante 3
segundos las teclas MODE y
+ hasta visualizar rF01
Ë .AÒTERMOSTACIEÒNACIÜNIJÒRW-
NOCZEÜNIEÒNAÒÒSEKUNDYÒPRZY-
ciski MODE i + do momentu
WYÜWIETLENIAÒWSKAZANIAÒR&
Ë Op de thermostaat, druk 3
seconden gelijktijdig op de
toetsen MODE en + totdat
rF01 wordt weergegeven.
Ì Appuyez simultanément 3 secondes
sur les touches + et -.
L’écran affiche rF--.
Í Sortie automatique du mode.
Ì Press and hold the + and - buttons
simultaneously for 3 seconds.
The screen will display rF--.
Í The mode is automatically exited.
Ì Drücken Sie 3 Sekunden lang
gleichzeitig die Tasten + und -.
Auf dem Display erscheint rF--.
Í Automatisches Verlassen des
Modus.
Ì Premete simultaneamente per 3
secondi i tasti + e -.
Lo schermo indica rF--.
Í Uscita automatica dalla modalità.
Ì Pulse simultáneamente durante 3
segundos las teclas + y -.
Aparecerá rF-- en la pantalla.
Í Salida automática del modo.
Ì .ACIÜNIJÒRWNOCZEÜNIEÒNAÒÒSEKUNDYÒ
PRZYCISKIÒÒIÒÒ.AÒEKRANIEÒWYÜWIETLA-
NEÒJESTÒWSKAZANIEÒR&
Í !UTOMATYCZNEÒWYJÜCIEÒZÒTRYBU
Ì Druk 3 seconden gelijktijdig op de
toetsen + en -.
Op het scherm verschijnt rF--.
Í Automatisch verlaten van modus.
FR
Ê Appuyez sur une touche pour réveiller
l’affichage. Le mode en cours s’affiche :
ON = marche,
= Arrêt.
Pour le modifier, appuyez sur Mode.
EN
Ê
Press any button to activate the display
screen. The current mode will be
displayed: ON = activated,
= shut-
down. To change the mode, press Mode.
DE
Ê
Drücken Sie eine beliebige Taste, um
das Display einzuschalten. Der aktuelle
Modus wird angezeigt: ON = Ein,
= Aus.
Drücken Sie auf "Mode", um diesen zu
ändern.
IT
Ê
Premete un tasto per riattivare la
visualizzazione. La modalità in corso viene
visualizzata: ON = Funzionamento,
=
Arresto. Per modificarla, premete su Mode.
ES
Ê
Pulse una tecla para activar la
pantalla. Se muestra el modo en curso:
ON = marcha,
= parada.
Para modificarlo, pulse Modo.
PL
Ê
.ACIÜNIJÒJEDENÒZÒPRZYCISKWÒBYÒ
WZBUDZIĀÒEKRANÒ7YÜWIETLANYÒJESTÒBIEêæCYÒ
tryb: ON = w³¹czony,
= wy³¹czony. Aby
ZMIENIĀÒNACIÜNIJÒPRZYCISKÒ-ODE
NL
Ê
Druk op een toets om het scherm te
‘wekken’. De huidige modus wordt
weergegeven: ON = Aan,
= Uit.
Druk op Mode om te wijzigen.
Ë Appuyez sur + ou - pour
modifier la consigne.
Ë Press + or - to change the
setting.
Ë Drücken Sie auf + oder -, um
den Sollwert zu ändern.
Ë Premete su + o - per modifi-
care il valore di riferimento.
Ë Pulse + o - para modificar la
consigna.
Ë !BYÒZMIENIĀÒWARTOÜĀÒZADANæÒ
naciskaj przycisk + lub -.
Ë Druk op + of - om de instruc-
tie te wijzigen.
Ì Appuyez sur Mode
pour sortir.
Ì Press Mode to exit.
Ì Drücken Sie auf
"Mode", um den Mo-
dus zu verlassen.
Ì Premete su Mode
per uscire.
Ì Pulse Modo para
salir.
Ì !BYÒWYJÜĀÒNACIÜNIJÒ
przycisk Mode.
Ì Druk op Mode om te
verlaten.
Sur le récepteur / On the
receiver / Am Empfänger / Sul
ricevitore / En el receptor / Na
odbiorniku / Op de ontvanger
Sur le thermostat / On the thermostat / Am Raumthermostat / Sul termostato / En el termostato /
Na termostacie / Op de thermostaat


Joignez-vous à la conversation sur ce produit
Ici, vous pouvez partager ce que vous pensez du Delta Dore Tybox 5100 Thermostat. Si vous avez une question, lisez d’abord attentivement le mode d’emploi. La demande d’un mode d’emploi peut être effectuée en utilisant notre formulaire de contact.
répondre | Cela a été utile (20)
répondre | Cela a été utile (8)
répondre | Cela a été utile (2)
répondre | Cela a été utile (1)
répondre | Cela a été utile (0)
Loading…
répondre | Cela a été utile (0)
répondre | Cela a été utile (0)
répondre | Cela a été utile (0) En savoir plus
Cela a été utile (1)
répondre | Cela a été utile (0)
répondre | Cela a été utile (0)