
: Gegenwärtige Pulsschlag 30-240 BPM
Aktuelle Herzfrequenz während des Trainings anzeigen.
AVG H.R.
: Durchschnittlicher Pulsschlag 30-240 BPM
Berechnet den durchschnittlichen Pulsschlag beim Training.
MAX H.R.
: Maximaler Pulsschlag 30-240 BPM
Überwacht den maximalen Pulsschlag während des Trainings und zeichnet ihn auf.
CAL. H.R
: Kalorienverbrauch 0-9999.99 Kcal
Berechnet die Anzahl der während dem ganzen Trainierprozess verbrauchten Kalorien,
d.h. nicht nur durch das Trainieren alleine.
T.Z.HR.
: Zielbereich 30-240 BPM
1. 6 Sätze von programmierbaren Zielbereichen stehen zur Verfügung.
2. Obergrenze und Untergrenze des Zielbereichs anzeigen.
T.IN.Z.HR
:
Zeit Im Zielbereich
0H00M00S-99H59M59S
Berechnet und misst die Übungszeit innerhalb des Zielbereichs.
T.OVER.Z
: Zeit über Der Zielzone 0H00M00S-99H59M59S
Berechnet die Trainierdauer über der Zielzone und zeichnet diese auf.
/
: Zielzonen-Schrittmacher Compare With Target Zone
1. Der Schrittmacher-Pfeil zeigt den Vergleich zwischen der gegenwärtigen
Herzschlagrate und der durchschnittlichen Herzschlagrate.
2. Wenn die gegenwärtige Herzschlagrate höher ist als oder gleich der durchschnittli-
chen Herzschlagrate, blinkt das Aufwärtspfeilsymbol () im Display.
3. Ist die gegenwärtige Hrzschlagrate niedriger als die durchschnittliche
Herzschlagrate, blinkt das Abwärtspfeilsymbol () im Display.
CALORY/H
: Stündlichen Kalorienverbrauch 0-9999 Kcal
Calculates the expended calories per hour based on the current heart rate.
INTENSITY
: Herzschlag Intensität 0-99 %
Zeigt die gegenwärtige Intensität der Herzschlagrate an
HRM FUNKTIONEN
: UPM 0-199 RPM
1. Die UPM (Umdrehungen pro Minute) ist eine Messeinheit der Umdrehungsgeschwin-
digkeit. Sie wird alle Sekunde aktualisiert.
2. Wenn die Kurbel des Fahrrades länger als 4 Sekunden nicht betätigt wird, wird die
gegenwärtige UPM auf Null rückgesetzt.
AVG RPM
: Durchschnittliche UPM 0-199 RPM
1. Mit dieser Funktion zeigt der Computer die durchschnittliche Kadenz während der
Fahrt an. Diese wird alle Sekunde aktualisiert.
2. Bei jedem Rücksetzen des Computers oder Auswechseln der Batterie wird die
Aufnahme der durchschnittlichen Kadenz gelöscht.
MAX RPM
: Maximale UPM 0-199 RPM
1.
Mit dieser Funktion nimmt der Computer Ihre maximale Kadenz während der Fahrt auf.
2. Bei jedem Rücksetzen des Computers oder Auswechseln der Batterie wird die
Aufnahme der maximalen UPM einer Fahrt gelöscht.
RPM LIMIT
: UPM-Grenze 0-199 RPM
Den UPM-Wert einstellen. Das Schrittmacher-Symbol () wird angezeigt, um Sie nur
dann zu ermahnen, wenn die UPM den Grenzwert überschreitet. Auf diese Weise kann
für ein leichteres Fahren in einen höheren Gang geschaltet werden.
REVOLUT: Pedalumdrehungen Während Einer Fahrt
0-999999 RPM
1. Das zählen die Pedalumdrehungen zusammen, solange Sie mit dem Fahrrad fahren.
2. Die Daten des können durch das Rücksetzen der Daten auf Null rückgesetzt werden.
ODOMETER
: Gesamtkilometerstand
0-999999 Km / 0-999999 Mile
1. Con questa funzione, il computer somma la distanza totale della bicicletta che si sta guidando.
2. I dati dell'odometro non possono essere azzerati tramite l'operazione di ripristino.
T.RIDETIME
: Gesamtfahrtdauer
0H00M-9999H59M
1. Mit dieser Funktion zählt der Computer die gesamte Fahrtdauer mit einem Fahrrad zusammen.
2. Die Daten der Gesamtfahrtdauer können durch das Rücksetzen nicht gelöscht werden.
T.REVOLUT
:
Gesamtanzahl der Pedalumdrehungen
0-999999 *100 RPM
1. Der Computer zählt die Gesamtanzahl der Pedalumdrehungen zusammen, solange
Sie mit dem Fahrrad fahren.
2. Die Daten des können durch das Rücksetzen der Daten nicht gelöscht werden; sie
werden nur durch das Löschen aller Daten gelöscht.
3. Der tatsächliche Wert beträgt zehn Mal die Anzahl, die auf dem Bildschirm angezeigt
wird (z.B. steht 38 für 3800 Drehungen).
T.CALORY
: T
Gesamtanzahl Kalorien Herzschlagrate
0-999999 Kcal
Records the total (cumulative) calories expended.
SUM DATA FUNCTIONS
:
Gegenwärtige Geschwindigkeit
0-199.9 Km/h / 0-120.0 M/h
1. Die Geschwindigkeitsdaten werden jede Sekunde aktualisiert.
2. Wenn Sie das Fahrrad während länger als 4 Sekunden nicht fahren, werden die Daten
der Geschwindigkeit auf Null rückgesetzt.
AVG SPEED
:
Durchschnittsgeschwindigkeit
0-199.9 Km/h / 0-120.0 M/h
1. Mit dieser Funktion wird der Computer Ihre Durchschnitts geschwindigkeit während der
Fahrt anzeigen.
2. Bei jedem Rücksetzen des Computers oder Auswechseln der Batterie wird die
Aufnahme der Durchschnittsgeschwindigkeit gelöscht.
3. Der Computer setzt die folgenden Daten automatisch auf Null zurück, wenn die
Fahrtdauer länger als 100 Stunden oder die zurückgelegte Distanz mehr als 1000 km
(oder Meilen) beträgt : Fahrtdauer, Fahrtdistanz, Durchschnittsgeschwindigkeit.
MAX SPEED
: Höchstgeschwindigkeit 0-199.9 Km/h / 0-120.0 M/h
1. Mit dieser Funktion wird der Computer die Höchstgeschwindigkeit, die Sie während der
Fahrt erreichen, aufnehmen.
2. Bei jedem Rücksetzen des Computers oder Auswechseln der Batterie wird die
Aufnahme der Höchstgeschwindigkeit gelöscht.
DISTANCE
: Fahrtdistanz 0-999.99 Km / 0-999.99 Mile
1. Die Fahrtdistanz bezieht sich auf die während einer Fahrt zurückgelegte Distanz.
2. Bei jedem Rücksetzen des Computers oder Auswechseln der Batterie wird die
Aufnahme der Fahrtdistanz gelöscht.
RIDE TIME
: Fahrtdauer 0H00M00S-99H59M59S
1. Die Fahrtdistanz bezieht sich auf die während einer Fahrt zurückgelegte Distanz.
2. Bei jedem Rücksetzen des Computers oder Auswechseln der Batterie wird die
Aufnahme der Fahrtdistanz gelöscht.
/
: Schritthalter-Pfeil Compare With Average Speed
1. Der Schritthalter-Pfeil zeigt den Vergleich zwischen der gegenwärtigen Geschwindigkeit
und der Durchschnittsgeschwindigkeit an.
2. Falls die gegenwärtige Geschwindigkeit höher als oder gleich ist wie die Durchschnitts-
geschwindigkeit, blinkt der aufwärts zeigende Pfeil () in der Anzeige.
3. Wenn jedoch die gegenwärtige Geschwindigkeit niedriger ist als die Durchschnitts-
geschwindigkeit, blinkt der abwärts zeigende Pfeil ().
FUNKTIONEN
RPM FUNKTIONEN
: Cadenza Attuale (RPM) 0-199 RPM
1. Con questa funzione, il computer mostrerà la cadenza media durante l'esercizio. Il
valore è aggiornato ogni secondo.
2. Il valore della cadenza media si azzererà ogni volta che si effettua il ripristino del
computer o il cambio della batteria.
AVG RPM
: Cadenza Media 0-199 RPM
1. Con questa funzione, il computer mostrerà la cadenza media durante l'esercizio. Il
valore è aggiornato ogni secondo.
2. Il valore della cadenza media si azzererà ogni volta che si effettua il ripristino del
computer o il cambio della batteria.
MAX RPM
: Cadenza Massima 0-199 RPM
1.
Con questa funzione, il computer registrerà la cadenza massima durante l'esercizio.
2. Il valore di RPM massimi per il tragitto si azzererà ogni volta che si effettua il
ripristino del computer o la sostituzione della batteria.
RPM LIMIT
: Limite RPM 0-199 RPM
Configurare il valore RPM, il simbolo () indicatore verrà mostrato come promemoria
solamente quando il valore RPM supera il limite. In questo modo è possibile passare
ad una marcia più alta per pedalare con maggiore facilità.
REVOLUT
:
Rivoluzioni Pedale Tragitto
0-999999 RPM
1.
La bicicletta accumulano le rivoluzioni del pedale quando la bicicletta è in movimento.
2.
I dati di bicicletta non possono essere azzerati tramite l'operazione di Ripristino dei Dati.
ODOMETER
: Odometro
0-999999 Km / 0-999999 Mile
1. Con questa funzione, il computer somma la distanza totale della bicicletta che si sta
guidando.
2. I dati dell'odometro non possono essere azzerati tramite l'operazione di ripristino.
T.RIDETIME
: Tempo di Allenamento Totale
0H00M-9999H59M
1. Con questa funzione, il computer accumula il tempo totale di guida di una bicicletta.
2. I dati del tempo totale di guida non possono essere azzerati tramite l'operazione di
ripristino.
T.REVOLUT.
: Rivoluzioni Pedale Totali
0-999999 *100 RPM
1. Il computer somma il totale delle rivoluzioni pedale quando la bicicletta è in movimento.
2. I dati di bicicletta non possono essere azzerati tramite l'operazione di Ripristino dei
Dati, ma solo tramite l'operazione "cancella tutto".
3. Il valore reale è dieci volte il numero mostrato sullo schermo. (es. 1 indica 100 giri)
T.CALORY
:
Calorie Totali per Frequenza Cardiaca
0-999999 Kcal
Registra il totale (cumulativo) delle calorie spese.
: Velocità Attuale 0-199.9 Km/h / 0-120.0 M/h
1. I dati sulla velocità sono aggiornati ogni secondo.
2. Quando la bicicletta non è in movimento per più di 4 secondi, i dati della velocità
saranno ripristinati al valore zero.
AVG SPEED
: Velocità media 0-199.9 Km/h / 0-120.0 M/h
1. Con questa funzione, il computer mostrerà la velocità media durante l'allenamento.
2. Ogni volta che il computer viene riavviato o viene cambiata la batteria, il valore della
velocità media verrà azzerato.
3. Il computer ripristinerà automaticamente i seguenti dati al valore zero una volta che il
tempo di allenamento supera le 100 ore o la distanza supera i 1000KM (o miglia):
tempo di allenamento, distanza tragitto, velocità media.
MAX SPEED
: Velocità Max. 0-199.9 Km/h / 0-120.0 M/h
1. Con questa funzione, il computer registrerà la velocità massima che viene raggiunta
durante l'allenamento.
2. Ogni volta che il computer viene ripristinato o viene sostituita la batteria, il valore della
velocità massima verrà azzerato.
DISTANCE
: Trip Distance 0-999.99 Km / 0-999.99 Mile
1. La distanza tragitto si riferisce alla distanza accumulata durante il tragitto.
2. Ogni volta che il computer viene riavviato o viene cambiata la batteria, il valore della
distanza verrà azzerato.
RIDE TIME
: Tempo di allenamento 0H00M00S-99H59M59S
1. Il tempo di allenamento si riferisce al tempo di allenamento accumulato durante il tragitto.
2. Ogni volta che il computer viene riavviato o viene cambiata la batteria, il valore della
distanza verrà azzerato.
3. Il computer inizia a misurare automaticamente il tempo di allenamento non appena
riceve il segnale dalla ruota.
/
: Freccia Indicatrice Compare With Average Speed
1. La freccia indicatrice mostra il paragone tra la velocità corrente e la velocità media.
2. Se la velocità attuale è pari o superiore alla velocità media, la freccia in su ()
lampeggerà sul display.
3. Al contrario, se la velocità attuale è inferiore alla velocità media, la freccia in giù ()
lampeggerà.
: Frequenza cardiaca Attuale 30-240 BPM
Visualizza il battito cardiaco (BPM) durante l'attività fisica.
AVG H.R.
: Frequenza cardiaca media 30-240 BPM
Calcola la frequenza cardiaca media durante lo sforzo.
MAX H.R.
: Frequenza cardiaca massi 30-240 BPM
Monitora e registra la frequenza cardiaca massima durante l'esercizio.
CAL. H.R
: Calorie Consumption 0-9999.99 Kcal
Calculates the calories expended for the whole exercise process, not only from exercise.
T.Z.HR.
: Zona target 30-240 BPM
1. Ci sono 6 impostazioni programmabili per la zona target.
2. Visualizza il limite superiore (UP) e il limite inferiore (LOW) della zona target.
T.IN.Z.HR
: Tempo in zona target 0H00M00S-99H59M59S
Calcola e registra il tempo di esercizio entro la zona target.
T.OVER.Z
: Tempo Oltre Zona Target 0H00M00S-99H59M59S
Calcola e registra il tempo in cui l'esercizio è svolto al di fuori della zona target.
/
: Indicatore Zona Target Compare With Target Zone
1. La freccia indicatrice mostra il paragone tra la frequenza cardiaca attuale e la
frequenza cardiaca media.
2. Se la frequenza cardiaca attuale è pari o superiore alla frequenza cardiaca media, la
freccia in su () lampeggerà sul display.
3. Al contrario, se la frequenza cardiaca attuale è inferiore alla frequenza cardiaca
media, la freccia in giù () lampeggerà.
CALORY/H
: Calorie all'ora 0-9999 Kcal
Calcola il dispendio calorico orario basato sulla frequenza cardiaca attuale.
INTENSITY
: Intensità Frequenza Cardiaca 0-99 %
Mostra l'intensità della frequenza cardiaca attuale.
FUNZIONI
HRM
FUNZIONI
RPM
FUNZIONI
SOMMA DEI DATI FUNZIONI
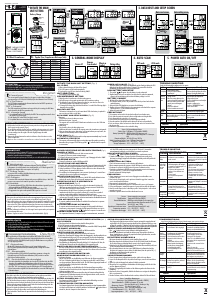
Important :
Be sure to operate “all clear” before using the device for the first time
or every time for battery replacement, otherwise it may run errors.
ALL CLEAR : Press and hold the 3 buttons of “L” ,“M” and “S” at the same
time for 1 sec to activate the device.
The LCD segments will be tested automatically after the device is activated.
UNIT SET:
UNIT SELECTION
1. Press the button "R" to enter “
UNITS SET
” Setting Mode.
2. Press the button "L" to select
KM/H
or
M/H
.
HR T.ZONE:
HR(HEART RATE) TARGET ZONE SETTING
1. Press the button “M” to enter the “
HR T.ZONE
” setting mode.
2.
Press the button “R” to set the first Target Zone. (There are 6 sets of settings)
3. Press the button “R” to set the “
LOW LIMIT
” and “
UP LIMIT
” of Target
Zone .(”
LOW LIMIT
”: 30 - 235 bpm; “
UP LIMIT
”: 35 - 240 bpm)
4. Default Target Zone: 90 - 120 bpm.
5.
Please refer to the “Buttons Operation in Data Setting Mode
”
to finish the setting.
RPM LIMIT:
CADENCE (RPM) REMINDER SETTING
Set your Cadence (RPM) reminder, it will show arrow to remind you when your
Cadence over reminding limit.
1. Press the button “M” to select “
RPM LIMIT
”.
2. Press the button “R” to enter Cadence (RPM) reminder Setting Mode.
Operation Reference "Buttons Operation in Data Setting Mode "
CLOCK SET :
CLOCK SETTING
1. Press the button “M” to select “
CLOCK SET
”.
2. Press the button “R” to enter Clock Setting Mode.
3. Press the button “L” to select 12 hours of AM or PM or 24 hours.
4. Then press the button “R” to setting hour, minute and seconds.
5. Press the button “L” to setting digital.(seconds set to zero)
Operation Reference "Buttons Operation in Data Setting Mode "
USER DATA:
USER DATA SETTING
1. Enter the data of your gender, age, weight and height.
2. Personal data is an important reference for calculating the consumption of calories.
3. Age Range: 5 ~ 99.
4. Height :100~230CM ; 3.28~7.55 feet.
5. Weight : 15-200 Kg
6. Units Weight: 15~200 Kg; 33~441 Ib. .
Operation Reference "Buttons Operation in Data Setting Mode "
CMM SET :
WHEEL CIRCUMFERENCE SETTING
A correct wheel circumference setting makes data more accurate. You can
measure the wheel circumference according to the Fig. A of Measuring Wheel
Circumference or refer to the quick table provided in the manual for your bike.
1. Press the button “M” to select “
CMM SET
” wheel circumference setting.
2. Press the button “R” to enter wheel circumference setting mode.
Operation Reference "Buttons Operation in Data Setting Mode "
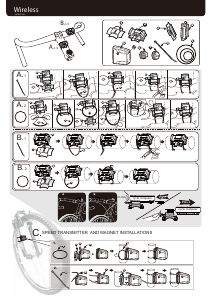
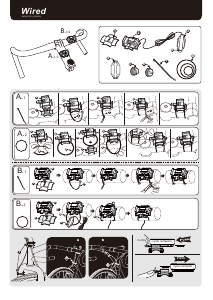
Precise Measurement:
(Fig. A)
1. Roll the wheel until the valve stem at its lowest point close to the ground,
mark this first point on the ground.
2. Get on the bike and have a helper to push you until the valve stem returns
to its lowest point. Mark the second point on the ground. (Sitting on the
bike achieves a more accurate reading since the weight of the rider
changes the wheel circumference slightly).
3. Measure the distance between the 2 marks in millimeters. Enter this value
to set the wheel circumference.
Quick Table :
Get a suitable wheel circumference value.(Fig. B)
DATA SETTING FOR
“
ODOMETER
”/“
T.REVOLUT
“ and “
T.CALORY
“
1. A new user does not need to set these data, you can skip it.
2. “
ODOMETER
, ”
T.REVOLUT
”and “
T.CALORY
” These functions data can
be adjusted or reset to zero.
Operation Reference "Buttons Operation in Data Setting Mode "
Press the button "S" to quit data setting mode after setting finished.
DEMO MODE
:
FOR PRODUCT DISPLAY
This feature is designed for product display in showroom or event.
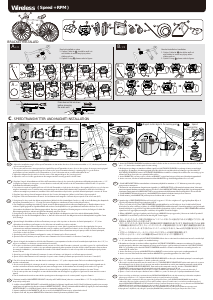
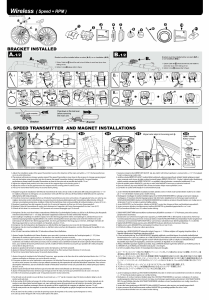
GENERAL MODE (Fig 2)
How To Start Speed, RPM, And Heart Rate Measurement?
The device will auto start to measure speed and RPM after put it on the bracket.
For Heart Rate measurement, you need to put on the chest belt.
Buttons operation in general mode
Button “L”: Press to advance to the next mode display.
Hold 1's to change screen display (Fig 2.1)
Button “R”: Press to view the function display in each mode.
Button “S”: Press to enter or quit the setting mode.
Buttons “L”+“R”: Press and hold for 3 seconds to data reset.
“
LIGHT
”
BRIGHTNESS SETTING
1. Press the button "L" to find the “
LIGHT
” setting in the general mode.
2. Press the button "R" to enter “
LIGHT
” setting.
There are 6 options for "
LIGHT
" setting:
“
LIGHT AUTO
”: The backlight will light for 4 seconds after pressing any button.
“
LIGHT ON
”: 4 levels of brightness to adjust. (level 4~1).
"
LIGHT ON
": Backlight flashes after choosing "
Level 1
" of brightness.
“
LIGHT OFF
”: Turn off the backlight
3. Press "R" button to select brightness.
4. Press "L" button to confirm setting.
5. The LED backlight will be ON when the symbol " " appears .
DATA REST OPERATION
(Fig. 5)
1. Press and hold the both button "L" and button "R" for 3 second to enter data
reset mode, “
RESET
?” .
2. Press and hold the button "L" for 1 second to select the reset YES “
RST
YES?
” or NO “
RST NO?
”.
3. Press the button "R" to return to normal mode.
4. You will reset the data to zero by pressing "
Yes
".
5. It cannot reset
CLOCK
and
SUMDATA
(
ODOMETER
,
T.RTDETIME
,
T.REVOLUT
and
T.CALORY
).
AUTO START/STOP
The device will automatically begin counting upon riding and stop counting
when stop riding.
POWER AUTO ON/OFF
(Fig. 6)
The device will automatically Power Off for battery saving when non-used over
15 minutes, and only display CLOCK.
The device will automatically Power On by bike-moving.
* If the device is non-used over 15 minutes, but less than 48 hrs, it will
automatically Power On in 30 seconds after bike-moving again. If the device
is over 48 hrs in standby mode, it will automatically Power On in 2 minutes
after bike-moving again.
Buttons Operation in Data Setting Mode
Button “S”: Press to enter or quit the setting mode.
Button “M”: Press to advance to the next data setting.
Button “R”: Press to change the setting digit.
Button “L”: Press to increase the digit value, press and hold the button for 1
second for fast increase of the value.
DATA SETTING MODE
: Current Cadence (RPM) 15-199 RPM
1. RPM (Revolutions Per Minute) is a measure of rotational speed. It's updated every
second.
2. If the crank is non-used over 4 seconds, the current RPM will be reset to zero.
AVG RPM
: Average Cadence 15-199 RPM
1. The device will display the Average Cadence during riding. It's updated every second.
2. The record of Average Cadence will be cleared whenever device reset or battery
replacement.
MAX RPM
: Maximum Cadence 15-199 RPM
1. The device will record your Maximum Cadence during riding.
2. The record of MAX. RPM will be cleared whenever device reset or battery
replacement.
RPM LIMIT
: RPM Limiet 15-199 RPM
Set up the RPM value, the pacer symbol () will appear to remind you when RPM is
over limit. You can also set up higher RPM limit for more easy riding.
REVOLUT
:
TRIP Pedal Revolutions
0-999999 RPM
1. The device starts to accumulate the TRIP Pedal Revolutions once bike is moving.
2. The bike data can be cleared to zero by Data Reset.
ODOMETER
: Odometer
0-999999 Km / 0-999999 Mile
1. The device accumulates the total distance of the bike you ride.
2. The odometer data cannot be cleared by reset.
T.RIDETIME
: Total Riding Time
0H00M-9999H59M
1. The device accumulates the total riding time of a bike.
2. The data of total riding time cannot be cleared by reset.
T.REVOLUT.
: Total Pedal Revolutions
0-999999 *100 RPM
1. The RPM starts to accumulate the total pedal revolutions once bike-riding.
2. The RPM data cannot be cleared to zero by reset, but can be reset by the operation
of "all clear".
3. The real value is one hundred times of the number on the screen. (ex. 1 means 100
turns)
T.CALORY
: Total Calorie Consumption
0-999999 Kcal
Records the total (cumulative) Calories Consumed.
FUNCTIONS
: Current Heart Rate 30-240 BPM
Displays the Current Heart Rate (BPM) during exercise.
AVG H.R.
: Average Heart Rate 30-240 BPM
Calculates the Average Heart Rate during exercise.
MAX H.R.
: Maximum Heart Rate 30-240 BPM
Monitors and records the Maximum Heart Rate during exercise.
CAL. H.R
: Calorie Consumption 0-9999.99 Kcal
Calculates the Calories Consumption is not only for a short time of temporary
exercise, but for a complete cycle of exercise.
T.Z.HR.
: Target Zone Heart Rate 30-240 BPM
1. There are 6 sets of programmable target zones.
2. Displays the Target Zone upper limit (UP) and lower limit (LOW).
T.IN.Z.HR
: Time In Target Zone 0H00M00S-99H59M59S
Calculates and records the exercise time within the Heart Rate Target Zone, and
remind you to slow down once heart rate is over the target zone.
T.OVER.Z
: Time Over Target Zone 0H00M00S-99H59M59S
Calculates and records exercise time when heart rate is over target zone.
/
: Heart Rate Pacer Compare With Target Zone
1. The pace arrow shows the comparison between the Current Heart Rate and Average
Heart Rate.
2. If the Current Heart Rate is above or equal to the Average Heart Rate, the upward
arrow () will flash on the display.
3. On the contrary, if the Current Heart Rate is under the Average Heart Rate, the
downward arrow() will flash.
CALORY/H
: Calorie Per Hour 0-9999 Kcal
Calculates the Calories Consumed per hour based on the Current Heart Rate.
INTENSITY
: HR Intensity 0-99 %
Displays the intensity of Current Heart Rate.
HEART RATE FUNCTIONS
CADENCE FUNCTIONS
SUM DATA FUNCTIONS
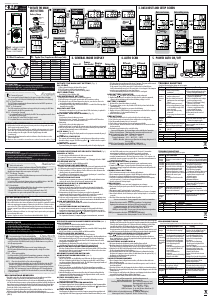
Sensor :
Operation Temperature:
Storage Temperature:
Battery Life CR2032 :
Dimensions and Weight:
Wireless Transmitter (Speed / Cadence / Heart rate)
0°C ~ 50°C (32°F ~ 122°F)
- 10°C ~ 60°C (14°F ~ 140°F)
About 8 months (1hr/Day/AVG Riding Time - No
continuous backlight).
Device:42 x 58 x 22 mm/ 36g
TROUBLE SHOOTING
Problem Probable Causes Remedy
1. Is the battery dead?
2. Is there incorrect battery installation?
1. Is the computer in the setting mode?
2. Are the magnet and the Sensor/ Transmitter in the correct position?
Is the gap between both parts correct?
3. Is the wheel circumference setting correct?
4. Is the sensing distance too long between the device and the sensor?
5. Is it low battery of sensor?
6. Is there any strong interference source nearby?
1. Is the relative positions and gap between RPM transmitter and
magnet correct?
2. Is the sensing distance too long or the installation angle of the RPM
transmitter incorrect?
3. Is it low battery of the RPM transmitter?
4. Is any strong interference source nearby?
1. Is the chest belt correct putting on with sensor to touch the skin?
2. Is it low battery of the Heart Rate Monitor?
Did you leave the device under direct sunlight when bike
non-used for a long time?
Is the temperature below 0°C (32°F)?
Main unit
No display
No current
Speed or
incorrect data
No current RPM
or Incorrect data
No Heart Rate or
Incorrect data
Irregular display
Black Screen
Slow Display
1. Replace the battery.
2. Make sure that the positive pole of the battery is toward the battery
cap.
1. Refer to the setting procedures to finish the setting.
2. Refer to the installation manual and correct the positions and gap.
3. Refer to "Wheel Circumference Measurement and Setting" and enter
a correct value.
4. Refer to the installation manual and adjust the distance between the
main unit and the sensor or adjust the angle of the sensor.
5. Replace the battery with a new one.
6. Stay away from the strong interference source.
1. Refer to the installation manual and correct the positions and gap.
2. Refer to the installation manual and adjust the distance between the
main unit and the sensor or adjust the angle of the sensor.
3. Replace the battery with a new one.
4. Stay away from the strong interference source.
1. Refer to "How to put on the chest belt" to re-adjust for the correct
position.
2. Replace the battery with a new one.
Do not use any sharp object to clean the hole.
Refer to the "Main unit data setting" and activate the device again.
Keep the device to avoid directly sunlight.
No effect on the data.
The device will automatically recover when temperature rises.
: Current Speed 0-199.9 Km/h / 0-120.0 M/h
1. The speed data is updated every second.
2. The Speed Data will be reset to zero when the bike is non-used over 4 seconds.
AVG SPEED
: Average Speed 0-199.9 Km/h / 0-120.0 M/h
1. The device will automatically calculate and display your Average Speed during
riding.
2. The record of Average Speed will be cleared whenever device reset or battery
replacement.
3. The device will automatically reset to zero once the riding time is over 100 hrs or
the distance is over 1000KM (or miles): Riding Time, Trip Distance and Average
Speed.
MAX SPEED
: Maximum Speed 0-199.9 Km/h / 0-120.0 M/h
1. The device will automatically record your Maximum Speed during riding.
2. The record of Max Speed will be cleared whenever device reset or battery
replacement.
DISTANCE
: Trip Distance 0-999.99 Km / 0-999.99 Mile
1. The Trip Distance refers to the accumulated distance during a trip.
2. The record of Trip Distance will be cleared whenever device reset or battery
replacement.
RIDE TIME
: Trip Riding Time 0H00M00S-99H59M59S
1. The Riding Time refers to the accumulated riding time of a trip.
2. The record of Riding Time will be cleared whenever device reset or battery
replacement.
3. The device will automatically start to measure the riding time once receive the
signal from the wheel of bike.
/
: Speed Pacer Compare With Average Speed
1. The pace arrow shows the comparison between the Current Speed and Average
Speed.
2. If the Current Speed is above or equal to the Average Speed, the upward arrow
() will flash on the display.
3. On the contrary, if the Current Speed is under the Average Speed, the downward
arrow () will flash.
LOW BATTERY INDICATOR AND BATTERY REPLACEMENT
(Fig. 7)
1. The symbol " " will be displayed as reminder for battery replacement when
the battery capacity is low.
2. Suggest to replace a new one in few days once symbol " " displayed to
avoid the data lost.
3. Replace with a new one on the back of the device with the positive (+) pole
toward the battery cap and activate again. (Battery Model: CR2032)
PRECAUTIONS
1. The device can be used in raining day, but forbid to be used under water.
2. Keep the device to avoid direct sunlight when bike non-used.
3. Do not disassemble the device and accessories.
4. Check relative position and gap of sensor and magnet periodically.
5. Do not use the sharp objects, liquids with alcohol or benzene to clean the
device and accessories.
6. Suggest to not to use near those environments where with transformers,
high-voltage of electrical appliances or objects with strong magnetic...etc.
English
Wichtig : Starten Sie den Computer, bevor Sie ihn erstmals benutzen.
Andernfallskönnen Fehler auftreten.
ALLE LÖSCHEN :“L” +“M” + “S” 1 Sekunden halten
Die LCD-Segmente werden automatisch nach dem Start getestet.
UNIT SET:
EINHEITSAUSWAHL
1. Drücken Sie die "R" Taste eingeben „
UNIT SET
“ Modus Einstellung.
2. Drücken Sie den Taste "L" , um zwischen KM/H und Meilen zu wählen.
HR T.ZONE:
HF-ZIELBEREICH EINSTELLEN
1. Drücken Sie die “M” Taste , um die Eingabe „
HR T.ZON
E “ Einstellungsmodus.
2. Drücken Sie die “R” Taste , um die erste Zielzone einzustellen. (Es werden
6 Sätze von Einstellungen)
3. Drücken Sie die “R” Taste , um die setzen “
LOW LIMIT
” und “
UP LIMIT
”
der Zielzone. ( “
LOW LIMIT
”Untere grenze: 30 - 235 bpm. ‚“
UP LIMIT
”
Obergrenze : 35 - 240 BPM oder )
4. Standard - Zielzone: 90 - 120 bpm.
5. Drücken Sie die „ L “ Taste , um digitale Einstellung.
Siehe "Tastenbedienung im Dateneinstellungsmodus"
RPM LIMIT:
TRITTFREQUENZ (U/MIN) BEGRENZEN EINSTELLUNG
Richten Sie Ihre Trittfrequenz (u/min) zu begrenzen, wenn u/min über es
begrenzen zeigt Pfeil, um Sie daran zu erinnern.
1. Drücken Sie die Taste "M", “RPMLIMIT” begrenzen Einstellung auszuwählen.
2. Drücken Sie die Taste "R", Trittfrequenz (u/min) Grenzwert Setup-Modus.
Siehe "Tastenbedienung im Dateneinstellungsmodus"
CLOCK SET:
EINSTELLEN DER UHRZEIT
1. Drücken Sie die “M” - , um “
CLOCK SET
”.
2. Drücken Sie die ”R” Taste Clock eingeben Modus einstellen.
3. Drücken Sie die ”L ” Taste 12H am oder pm oder 24H auszuwählen.
4. Dann drücken Sie die ”R” Taste Einstellung Stunde, Minute und Sekunde.
5. Drücken Sie die ”R” Taste , um digitale Einstellung. (Sekunden werden auf
Null gesetzt)
Siehe "Tastenbedienung im Dateneinstellungsmodus"
USER DATA:
BENUTZERDATEN-MODUS
1.
Eingabe von Daten wie Geschlecht, Alter, Gewicht und Körpergröße des Benutzers.
2.
Die persönlichen Daten sind wichtig für die Berechnung des Kalorienver brauchs.
3. Alter-Bereich: 5 bis 99.
4. Hoogte :100~230CM ; 3.28~7.55 feet.
5. Gewicht: 15-200 Kg
6. Units of weight : kg from 15 to 200 ; lb from 33 to 441.
Siehe "Tastenbedienung im Dateneinstellungsmodus"
CMM SET:
EINSTELLUNG DES RADUMFANGES IM EINSTELLUNGSMODUS
Die Richtigen Räder Umfang kann die Daten genauer erhalten.
Sie können tatsächlich Wert Radumfang messen oder beziehen sich auf die
schnelle Tabelle im Handbuch für Ihr Fahrrad.
1. Drücken Sie die Taste “M”, um “
CMM SET
” Radumfanges auswählen.
2. Drücken Sie die Taste “R”, um den Einstellung Des Radumfanges im
Einstellungsmodus
Siehe "Tastenbedienung im Dateneinstellungsmodus"
Genaue Abmessung (Abb. A)
1. Drehen Sie das Rad so, daß sich das Ventil am untersten Punkt am Boden
befindet. Markieren Sie diesen Punkt am Boden.
2. Setzen Sie sich auf das Fahrrad und lassen Sie sich von einem Helfer soweit
nach vorne schieben bis das Ventil sich wieder am untersten Punkt am Boden
befindet. Markieren sie diesen Punkt ebenfalls. (Dadurch daß Sie auf dem
Fahrrad sitzen, erreichen Sie eine genauere Messung, denn das Gewicht des
Fahrers beeinflußt in geringem Ausmaß den Umfang des Rades).
3. Messen Sie in Millimetern die Entfernung zwischen den beiden Punkten.
Geben Sie diesen Wert ein, um den Radumfang zu bestimmen.
Schellzugriffstabelle: Wählen Sie aus der Tabelle einen passenden Wert aus. (Abb. B)
DATEN EINSTELLUNG FÜR
“
ODOMETER
”/“
T.REVOLUT
“/“
T.CALORY
“
1. Der Erstbenutzer braucht diese Daten nicht eingeben.
2. “
ODOMETER
, ”
T.REVOLUT
”and “
T.CALORY
” Diese Funktionen Daten
können ändern oder Einstellung auf Null.
Siehe "Tastenbedienung im Dateneinstellungsmodus"
Wenn Sie fertig sind einstellen, Taste "S" Taste, um Daten-Modus zu beenden.
DEMO MODE
:
FÜR PRODUKTDEMO
ALLGEMEINMODUS
(Fig 2)
Beginn Der Messung Der Geschwindigkeit, Upm Und Der
Herzschlagrate?
Das Hauptgerät auf den Träger setzen.
Das Hauptgerät beginnt danach mit dem Messen der Geschwindigkeit und RPM.
Zum Messen der Herzschlagrate ziehen Sie sich den Brustgürtel an.
Tastenbedienung im Allgemeinmodus
Taste “L”: Springt weiter zur nächsten Modusanzeige.
1 Sekunde lang gedrückt halten, um den Bildschirm umzuschalten.
Taste “R”: Zeigt die Funktionen jedes einzelnen Modus an.
Taste “S”: Ruft den Einstellungsmodus auf oder beendet ihn.
Tasten “L + R”: Für ein Datenreset 3 Sekunden lang gedrückt halten.
“
LIGHT
”
:
EINSTELLUNG DER HELLIGKEIT
1. Drücken Sie die Taste „L“ und suchen Sie die Einstellung für „LIGHT“ im
Allgemeinmodus.
2. Rufen Sie die ”
LIGHT
“-Einstellung durch Drücken der Taste „R“ auf.
Für die ”
LIGHT
“-Einstellung gibt es 6 Optionen:
”
LIGHT AUTO
”: Beim Drücken einer beliebigen Taste schaltet sich das
Hintergrundlicht 4 Sekunden lang ein.
"
LIGHT ON
": Es können 4 Helligkeitsstufen eingestellt werden.
(Stufen 4 – 1).
"
LIGHT ON
":
Bei Wahl von
"
Level 1
"
für die Helligkeit blinkt das Hintergrundlicht.
"
LIGHT OFF
": Das Hintergrundlicht schaltet sich aus.
3. Wählen Sie die gewünschte Helligkeit durch Drücken der Taste „R“ aus.
4. Drücken Sie die Taste „L“, um die Einstellung zu bestätigen.
5. Das LCD-Hintergrundlicht schaltet sich ein, wenn sich das Symbol " "
einblendet.
RESET-OPTIONEN
(Fig. 3)
1. Halten Sie die Taste "L" und "R" Taste 3 sec auf "
RESET?
" Daten
zurücksetzen Modus.
2. Wählen Sie mit der ”L” -Taste Ja “
RST YES?
”
oder Nein
“
RST NO?
”
.
3. Durch Auswahl von Ja, werden die Daten (auf null) rückgesetzt..
4. Die Werte von CLOCK und SUMDATA (
ODOMETER
,
T.RTDETIME
,
T.REV-
OLUT
.,
T.CALORY
) können nicht auf Null gesetzt werden.
AUTOMATISCHER START / STOPP
Der Computer fängt automatisch an zu zählen, sobald Sie losfahren und hört
auf zu zählen, wenn Sie ihre Fahrt beenden.
AUTOMATISCHES EIN-UND AUSSCHALTEN (Abb. 4)
Um die Batterie zu schonen, schaltet der Computer sich automatisch aus,
wenn er länger als 15 Minuten nicht benutzt wird, und zeigt nur das CLK an.
* Falls das Computermessgerät länger als 15 Minuten, jedoch weniger als
48 Stunden nicht genutzt wird, schaltet es sich automatisch nach 30
Sekunden ein, nachdem eine Eingabe erfolgt ist.
Falls sich das Computermessgerät mehr als 48 Stunden im Energiesparmo-
dus befindet, schaltet sich das Gerät automatisch innerhalb von 2 Minuten
ein, nachdem eine Eingabe erfolgt ist.
BATTERIEANZEIGE UND BATTERIEWECHSEL
(Fig. 5)
1.
Das Symbol " " leuchtet auf, um anzuzeigen, das die Batterie fast verbraucht ist.
2. Ersetzen Sie die Batterie innerhalb von wenigen Tage nachdem das Symbol
aufgeleuchtet ist. Andernfalls konnen, wenn die Batteriespannung zu gering
ist, die gespeicherten Daten verloren gehen.
DATA EINSTELLMODUS
(Fig .1)
3. Die neue CR2032 Batterie tuen Sie in das Batteriefach mit dem Pluspol (+)
zum Deckel hin.
4. Starten Sie das Hauptteil wieder.
VORSICHTSMASSNAHMEN
1.
Dieser Computer kann im Regen benutzt werden, jedoch nicht unter Wasser.
2. Lassen Sie das Hauptteil nicht in der prallen Sonne liegen, wenn Sie nicht
am fahren sind.
3. Bauen Sie nicht das Hauptteil oder anderes Zubehör auseinander.
4. Überprüfen Sie in regelmäßigen Zeitabständen die Befestigung und Größe
der Lücke zwischen Magnet und Sensor.
5. Benutzen Sie keine Lösungsmittel, Alkohol oder Benzin zum reinigen des
Hauptteiles, falls es verschmutzt ist.
6. Vermeiden Sie es, den Computer in der Nähe von Straßenbahnen,
Straßenbahnhaltestellen, Transformatoren, elektrischen Trafostationen und
Hochspannungs-Verteilerleitungen usw. zu bedienen, da das Funksignal in
solchen Umgebungen wegen Hochspannungen und starken Magnetfeldern
gestört wird.
Deutsch
FEHLERBESEITIGUNG
1. Ist die Batterie aufgebraucht?
2. Wurde die Batterie falsch eingesetzt?
1. Ist der Computer im Einstellmodus?
2. Befinden sich das Magnet und der Sensor / Sender in
der richtigen Position? Stimmt die Lücke zwischen den
beiden Komponenten?
3. Ist die Einstellung des Radumfangs richtig?
4. Ist der Meßabstand zwischen dem Hauptgerät und dem
Sensor zu gross?
5. Ist die Batterie des Sensors bald aufgebraucht?
6. Befindet sich in der Nähe ein starkes Störfeld?
1. Ist die relativen Positionen und Spalt zwischen RPM
Sender und Magnet korrekt?
2. Ist der Schaltabstand zu lang oder der
Installationswinkel des RPM - Sender nicht richtig?
3. Ist der RPM - Senderakku fast erschöpft?
4. Ist jede starke Störquelle in der Nähe?
Keine Anzeige auf
dem Hauptgerät
Keine oder
falsche
Anzeige der
Gesch-windigkeit
Unregelmäßige
Anzeige
Schwarze
LCD-Anzeige
Langsame Reaktion
des LCD-Displays
URSACHE
Wurde das Hauptgerät bei Nichtgebrauch über eine lange
Zeit an direktes Sonnenlicht ausgesetzt?
Bringen Sie das Hauptgerät in den Schatten und lassen
Sie es in den Normalzustand zurückkehren.
Beim Ansteigen der Temperatur wird der Normalzustand des
Gerätes wiederhergestellt.
Beträgt die Temperatur unterhalb 0°C (32°F)?
MÖGLICHE URSACHEN
Siehe “Dateneinstellmodus” und initialisieren Sie den Computer erneut.
1. Die Batterie auswechseln.
2.
Sicherstellen, dass der positive Pol der Batterie auf die Batteriekappe zeigt.
1. Zum Beenden der Einstellung finden Sie die Anweisung in den Einstellungsvorgängen.
2. Schauen Sie im Installationshabduch nach und berichtigen Sie die Positionen
und die Lücke.
3. Siehe "Messung des Radumfangs und Einstellung" und geben Sie einen
richtigen Wert ein.
4. Siehe Installationshandbuch und stellen Sie den Abstand zwischen dem
Hauptgerät und dem Sensor oder den Winkel des Sensors ein.
5. Ersetzen Sie die verbrauchte Batterie mit einer neuen.
6. Halten Sie das Gerät fern von starken Störfeldern.
1. Siehe Installationshandbuch und korrigieren , die die Positionen und die Lücke.
2. Siehe Installationshandbuch , und stellen den Abstand zwischen der
Haupteinheit und dem Sensor oder dem Winkel des Sensors einzustellen.
3. Setzen Sie den Akku durch einen neuen.
4. Bleiben Sie weg von der starken Störquelle.
ABHILFE
Keine aktuellen
RPM oder
falsche Daten
Keine Herzfrequenz
oder falsche Daten
1.sie tragen brust gürtel korrekt mit sensor an die haut?
2.die herzfrequenz batterie fast erschöpft.
1. Siehe „ Wie Sie den Brustgurt tragen “ re - richtig positioniert adjust
2. die Batterie durch einen neuen ersetzen.
Importante :
Accertarsi di eseguire le operazioni di avviamento del computer
prima di utilizzarlo, altrimenti potrà fornire risultati errati.
CANCELLA TUTTO :
Premere “L” +“M” + “S” per 3 secondi.
I segmenti LCD verranno testati automaticamente dopo l'avvio dell'unità.
UNIT SET:
SELEZIONE UNITÀ
1. Premere il pulsante "R" per accedere alla modalità di impostazione "
UNIT
SET
".
2.Premere il pulsante “L” per selezionare KM/H (chilometri all’ora) o M/H
(miglia all’ora).
HR T.ZONE:
IMPOSTAZIONE DELLA ZONA TARGET DELLA FREQUENZA CARDIACA
1. Premere il “ M ” tasto per accedere al “
HR T.ZONE
” modalità di impostazione.
2. Premere il “ R ” pulsante per impostare la prima Target Zone. (Ci sono 6 gruppi
di impostazioni)
3. Premere il “ R ” pulsante per impostare il “
LIMIT LOW
” e “
UP LIMIT
” di
Target Zone. ( ”
LOW LIMIT
” limite inferiore: il 30 - 235 bpm. “
UP LIMIT
”
limite superiore : 35 - 240 bpm)
4. default Target Zone: 90-120 bpm.
5. Premere il “ L ” pulsante per l'impostazione digitale.
Riferimento per l'uso"Funzionamento dei pulsanti in modalità di impostazione dati"
RPM LIMIT:
CADENZA (RPM) LIMITE DI IMPOSTAZIONE
Imposta il tuo limite di cadenza (RPM), mostrerà freccia per ricordarvi quando
RPM oltre il limite.
1. Premere il pulsante "M" per selezionare Limitazione RPM "
RPMLIMIT
" .
2. Premere il pulsante "R" per entrare in modalità di impostazione del limite di
cadenza (RPM).
Riferimento per l'uso"Funzionamento dei pulsanti in modalità di impostazione dati"
CLOCK SET :
OROLOGIO
1. Premere il “ M ” per selezionare “
CLOCK SET
” .
2. Premere il “ R ” pulsante per entrare Clock modalità Impostazioni.
3. Premere il “ L ” per selezionare 12 ore di AM o PM o 24 ore.
4. Poi premere il “ R ” pulsante per impostare ora, minuti e secondi.
5.
Premere il “ L ” pulsante all'impostazione digitale. (Secondi impostati a zero.)
Riferimento per l'uso"Funzionamento dei pulsanti in modalità di impostazione dati"
USER DATA:
MODALITÀ DATI UTENTE
1. Inserimento dei dati utenti quali sesso, età, peso e altezza.
2. I dati personali sono riferimenti importanti per calcolare il consumo di calorie.
3. L’età può variare da 5 a 99 anni.
4. Altezza :100~230CM ; 3.28~7.55 feet.
5. Peso : 15-200 Kg
6. Unità di peso: da 15 a 200 kg ; da 33 a 441 libbre.
Riferimento per l'uso"Funzionamento dei pulsanti in modalità di impostazione dati"
CMM SET :
CIRCONFERENZA DELLA RUOTA
La circonferenza ruote corretti possibile ottenere i dati più accurati.
In realtà si può misurare il valore della circonferenza della ruota o fare
riferimento alla tabella rapida fornita nel manuale per la vostra bicicletta.
1. Premere il pulsante "M" per selezionare"
CMM SET
" impostazione
circonferenza della ruota.
2. Premere il pulsante "R" per accedere alla modalità di impostazione.
Riferimento per l'uso"Funzionamento dei pulsanti in modalità di impostazione dati"
Misurazione precisa : (Fig. A)
1. Posizionare la ruota di modo che la valvola si trovi nel punto più basso
perpendicolare al terreno e segnare per terra questo primo punto di contatto.
2. Salire sulla bicicletta e farsi spingere leggermente in avanti finche la ruota
non compie un giro completo e la valvola non torna nel punto di
partenza. Segnare questo secondo punto di contatto sul terreno.
(Sedendo sulla bicicletta si ottiene una lettura più precisa, in quanto il
peso della persona modifica leggermente la circonferenza della ruota).
3. Misurare la distanza tra i due punti in millimetri. Inserire questo valore
come circonferenza della ruota.
Tabella rapida :
Rilevare una circonferenza adeguata dalla tabella di riferimento. (Fig. B)
IMPOSTAZIONE DEI DATI PER
“
ODOMETER
”/“
T.REVOLUT
“/“
T.CALORY
“
1. Un nuovo utilizzatore non ha bisogno di inserire questi dati.
2. “
ODOMETER
, ”
T.REVOLUT
” e “
T.CALORY
” Questi dati di funzioni può
essere modificare o impostare a zero.
Riferimento per l'uso"Funzionamento dei pulsanti in modalità di impostazione dati"
Quando si completare l'impostazione, premere "S" il tasto per uscire dati
impostazione modalità.
DEMO MODE
:
SOLO PER LA DEMO DEL PRODOTTO
MODALITÀ GENERALE (Fig 2)
Come Avviare la Misurazione di Velocita', RPM, e Frequenza Cardiaca?
Posizionare l'unità principale sul supporto, ed essa inizierà automaticamente
la misurazione della velocità e RPM.
misurazione della Frequenza Cardiaca, è necessario indossare la fascia toracica
.
Descrizione di pulsanti in modalità generale
Pulsante
"L": Premere per avanzare alla successiva schermata di modalità.
Tenere premuto per 1 secondo per cambiare schermata.
Pulsante
"R":
Premere per visualizzare la schermata di funzione in ogni modalità.
Pulsante
"S": Premere per accedere o uscire dalla modalità di impostazione.
Pulsanti
"L + R": Tenere premuto per 3 secondi per ripristinare i dati.
“
LIGHT
”
IMPOSTAZIONE LUMINOSITÀ
1. Premere il pulsante "L"per trovare l'impostazione "
LIGHT
" in modalità generale.
2. Premere il pulsante "R" per accedere all'impostazione "
LIGHT
".
Vi sono 6 opzioni per l'impostazione "
LIGHT
":
”
LIGHT AUTO
”: La retroilluminazione si accende per 4 secondi dopo aver
premuto un pulsante.
"
LIGHT ON
": 4 livelli di illuminazione da regolare (livello 4~1).
"
LIGHT ON
": La retroilluminazione lampeggia dopo aver scelto "
Level 1
" di
luminosità.
"
LIGHT OFF
": Spegnere la retroilluminazione.
3. Premere il pulsante "R" per selezionare la luminosità.
4. Premere il pulsante "L" per confermare l'impostazione.
5. La retroilluminazione LCD si accende quando appare il simbolo " ".
OPERAZIONE RESET (AZZERAMENTO)
(Fig. 5)
1. Premere il tasto “L” e il tasto “R” e tenere premuto per 3 secondi per
"RESET?" ripristinare i dati.
2. Premere il tasto “L” per selezionare il ripristino SÌ “RST YES?” o NO “RST NO?”.
3. Premendo Sì, i dati saranno azzerati.
4. Il pulsante RESET non può azzerare i dati “
CLOCK
”e “
SUMDATA
”
(
ODOMETER
,
T.RTDETIME
,
T.REVOLUT.
,
T.CALORY
)
START / STOP AUTOMATICO
Il computer comincerà automaticamente il suo conteggio nel momento in cui
si inizia la corsa, mentre smetterà di conteggiare appena ci si ferma.
ACCENSIONE/SPEGNIMENTO AUTOMATICO
(Fig. 6)
Per non consumare la batteria, il computer si spegne automaticamente e mostra
solo l’orologio CLK quando non viene utilizzato per circa 15 minuti.
* Se il contatore per computer non viene utilizzato per oltre 15 minuti, ma meno di
48 ore, verrà automaticamente attivato in 30 secondi una volta utilizzato di nuovo.
Se il contatore per computer entra in modalità di risparmio energetico per oltre
48 ore, verrà automaticamente attivato in 2 minuti una volta utilizzato di nuovo.
INDICATORE DI BATTERIA SCARICA E SOSTITUZIONE DELLA BATTERIA
(Fig. 7)
1. Il simbolo " " apparira per indicare che la batteria e quasi esaurita.
2. Sostituire la batteria vecchia con una nuova entro pochi giorni da quando e
comparso il suddetto simbolo, altrimenti i dati memorizzati potrebbero
MODALITÀ IMPOSTAZIONE DATI
Il display dell'unità
principale non
funziona
Velocità non sono
visualizzate o la
visualizzazione
presenta errori
1. Sostituire la batteria.
2. Assicurarsi che il polo positivo della batteria sia rivolto verso il tappo
della batteria.
Errore nella
visualizzazione
1. La batteria è completamente scarica?
2. La batteria non è stata installata correttamente?
1. Il computer si trova in modalità impostazioni?
2.
Il magnete e il Sensore/Trasmettitore
si trovano in posizione corretta?
La fessura tra le due parti è corretta?
3. L'impostazione della circonferenza della ruota è corretta?
4. La distanza tra l'unità principale ed il sensore è troppo ampia?
5. La batteria del sensore è quasi completamente scarica?
6. E' presente una qualche fonte di interferenze nelle vicinanze?
LCD è spento
a visualizzazione
è lenta
L'unità principale è stata esposta alla luce solare diretta per molto tempo
mentre non era in uso?
Posizionare il computer all'ombra e aspettare che ritorni a condizioni di normalità.
La temperatura è inferiore a 0°C (32°F)?
L'unità ritornerà a condizioni di normalità una volta che la temperatura si sarà
alzata nuovamente.
Fare riferimento alla "Modalità di Impostazione Dati" e riavviare il computer.
1. Fare riferimento alle procedure di configurazione per terminare la configurazione.
2. Fare riferimento al manuale di installazione e correggere la posizione e la
fessura come da istruzioni.
3. Fare riferimento a "Misurazione e Impostazione della Circonferenza della
Ruota" e inserire un valore corre
4. Fare riferimento al manuale di installazione e regolare la distanza tra l'unità
principale e il sensore, oppure regolare l'angola
5. Sostituire la batteria con una nuova.
6. Allontanarsi dalla fonte di interferenze.
1. È la posizione relativa e la distanza tra trasmettitore e magnete RPM corretto?
2. La distanza di rilevamento l'angolo di installazione del trasmettitore
RPM errato troppo a lungo o?
3. La batteria del trasmettitore RPM quasi esaurita?
4. qualsiasi fonte di interferenza forte nelle vicinanze?
Nessun RPM
corrente o di dati
non corretto
1. Fare riferimento al manuale di installazione e correggere le posizioni e gap.
2. Fare riferimento al manuale di installazione e regolare la distanza tra l'unità
principale e il sensore o regolare l'angolo del sensore.
3. Sostituire la batteria con una nuova.
4. Stare lontano dal forte fonte di interferenza.
1. fare riferimento alla "Come indossare la fascia toracica" ri-regolare
correttamente la posizione
2. sostituire la batteria con una nuova.
Nessun dato di
frequenza cardiaca
o non corretto
1. nota di indossare la fascia toracica corretta con sensore tocca la pelle?
2. la batteria di frequenza cardiaca è quasi esaurita?
andare perduti nel caso in cui il voltaggio della batteria raggiunga un livello
troppo basso.
3. Sostituire la batteria vecchia con una nuova batteria CR2032 e collocarla nel
vano situato nella parte posteriore del computer con il polo positivo (+) verso
il coperchio del vano batteria.
4. Avviare di nuovo l'unita principale.
PRECAUZIONI
1. Questo computer può essere usato in caso di pioggia ma non dovrebbe
essere utilizzato sott cqua.
2. Non lasciare l nità principale sotto l sposizione diretta dei raggi solari a
meno che non si stia utilizzando la bicicletta.
3. Non smontare l nità principale o i suoi accessori.
4. Controllare periodicamente la posizione e la distanza del sensore e del magnete.
5. Non fare uso di diluenti, alcool o benzina per pulire l nità principale o i suoi
accessori quando sono sporchi.
6. Evitare di utilizzare il computer in prossimità di tram elettrici, fermate del
tram, trasformatori, sottostazioni elettriche e linee di distribuzione di alta
tensione ecc., perché la presenza di forti campi magnetici e dell'alto
voltaggio influenza il segnale radio.
RISOLUZIONE DEI PROBLEMI
SOLUZIONE
ELEMENTI DA VERIFICAREPROBLEMA
Italiano
Tastenbedienung im Dateneinstellungsmodus
Taste “S” : Ruft den Einstellungsmodus auf oder beendet ihn.
Taste “M” : Springt weiter zur nächsten Dateneinstellung.
Taste “R” : Ändert den eingestellten Wert.
Taste “L” : Erhöht den Zahlenwert; und wenn Sie diese Taste 1 Sekunde
lang gedrückt halten, erhöht sich der Wert schnell.
Funzionamento dei pulsanti in modalità di impostazione dati
Pulsante
"S": Premere per accedere o uscire dalla modalità di impostazione.
Pulsante
"M": Premere per avanzare alla successiva impostazione dati.
Pulsante
"R": Premere per cambiare la cifra di impostazione.
Pulsante
"L": Premere per aumentare il valore, tenere premuto il tasto
per 1 secondo per aumentare rapidamente il valore.
Sensor :
Betriebstemperatur:
Lagertemperatur:
CR2032 im Hauptgerät:
Abmessungen und Gewicht:
Sender (Geschwindigkeits / Trittfrequenz / Herzfrequenz)
0° C ~ 50° C (32° F ~ 122° F)
- 10° C ~ 60° C (14° F ~ 140° F)
Ca. 8 Monate (basierend auf den durchschnittlichen
Fahrzeit von 1 Stunde pro Tag. (ohne kontinuierliche
Hintergrundbeleuchtung)
Main Unit: 42 x 58 x 22 mm / 36g
Sensore con trasmettitore:
Temperatura di funzionamento:
Temperatura di stoccaggio:
CR2032 in unità principale:
Dimensioni e peso:
Nessun sensore di contatto magnetico con
trasmettitore Wireless.
0° C ~ 50° C (32° F ~ 122° F)
- 10° C ~ 60° C (14° F ~ 140° F)
Circa 8 mesi (basati sulla media tempo di 1 ora al
giorno di guida. (senza uso continuo retroilluminazione)
Unità principale: 42 x 58 x 22 mm / 36g
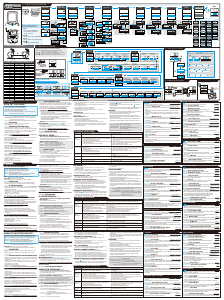
Button Operation in
Data Setting Mode:
Button
L
:
Press to increase the digit value.
Press and hold 1 second for fast
increase of the value
Button
R
:
Press to advance to the next digit setting.
Button
M
:
Press to advance to the next data setting.
Button
S
:
Press to quit the data setting mode
Sleep Mode
L
0~3
L
Up > Low+5
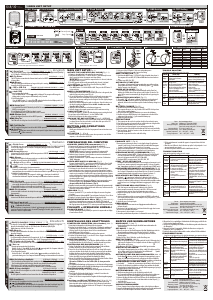
A. Wheel Circumference
1
2
16x1.5
16x1.75
16x2.00
16x1
⅛
16x1⅜
18x1.5
18x1.75
20x1.25
20x1.35
20x1.5
20x1.75
20x1.95
20x1
⅛
20x1
⅜
22x1
⅜
22x1
½
24x1.75
24x2.00
24x2.125
24x1(520)
24x
¾
Tubular
24x1
⅛
24x1
¼
26x1(559)
26x1.25
26x1.40
26x1.50
26x1.75
26x1.95
26x2.10
26x2.125
26x2.35
26x3.00
26x1⅛
26x1⅜
26x1½
27x1(630)
27x1⅛
27x1¼
27x1⅜
27.5x1.50
27.5x1.95
27.5x2.1
27.5x2.25
29x2.1
29x2.2
1210
1220
1270
1315
1325
1365
1375
1475
1485
1515
1564
1590
1570
1640
1780
1795
1888
1929
1969
1757
1789
1799
1909
1909
1946
1995
2030
2045
2070
2088
2090
2103
2190
1990
2088
2120
2165
2175
2181
2189
2099
2110
2168
2202
2292
2302
Tire Size
Circumference
Number
Tire Size
L R
M
S
All Clear
1s
L
R
+ +
S
L
Unit Setting
1. Data Setting Mode
Clock Setting
M
User Data
Cmm Setting
M
ODO
Setting
Total RIDE TIME
Setting
TOTAL PEDAL
REVOLUTION setting
M
M
DEMO MODE
2. General mode
Cadence (RPM)
limit Setting
R
Stop riding
3. Data Reset Mode
L
+
R
3s
L
1s
R
R
5. Battery Replacement
Low battery indicator
R
HR Target
Zone Setting
R
R
L
R
R
R
M
M
Total CALORY
setting
M
R
R
Auto demo mode display 3 sec
M
M
1~6
L
R
R
L
R
R
L
R
R
L
L
L
R
R
L
R
R
R
R
R
R
R
L
B.
Popular Tires Circumference Reference Table
R
29x2.3
650C
Tubular
650x20C
650x23C
650x25C
650x38A
650x38B
700x18C
700x19C
700x20C
700x23C
700x25C
700x28C
700x30C
700x32C
700C
Tubular
700Cx35C
700Cx38C
700Cx40C
700x42C
700x44C
700x45C
700x47C
2330
1926
1944
1950
1958
2131
2111
2076
2086
2092
2112
2124
2136
2152
2155
2136
2164
2174
2206
2230
2241
2248
2274
26x1(571)
26x⅞
Circumference
Number
Tire Size
Circumference
Number
valve
stem
start
point
end
point
valve
stem
R
35~240
R
M
L
S
OK!
quit the
setting
Start
cycle computer
Instructions
H30
4. Power Auto On/off
Press the
any
button.
L
30~235
00
1~12
0~24
R
R
L
R
R
L
L
L
R
L
L
M
ex.
Reset to Zero ”0”
AVG SPEED MAX SPEED DISTANCE RIDE TIME
AVG H.R. MAX H.R.
CAL.H.R. T.IN.Z.HR
T.OVER.Z. CALORY/H INTENSITY
AVG RPM MAX RPM REVOLUT
[SPEED]
[PULSE]
[CADENCE]
2.1 Display(Switchable)
L
L
L
1s 1s
1s
1s
L
Calory
Consumption
Target Zone 1~6
Time In
Target Zone
Time Over
Target Zone
Calory/hour
Intensity
Average
Cadence
Trip Pedal
Revolution
Speed
mode
Pulse
mode
Cadence
mode
Maximum
Cadence
Maximum
Speed
Average
Speed
Distance
Ride Time
Cadence limit
L
L
L
R
R
R
R
R
R
R
R
R
R
R
R
R
R
R
R
R
Total Calory
Sum Data
Mode
Odometer
Total Pedal
Revolution
Total
Ride Time
L
R
R
R
R
R R R R
R
R
R
R
L
Light Off
L
Speed+HR+RPM Display(Switchable)
Mount on the bracket
Light Auto
Light on Lever 4 Lever 3
Lever 2
Lever 1
R
1s
L
L
L
L
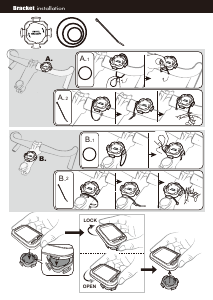
Bracket
Maximum
Pulse
Average
Pulse
R
R
R
Bracket
Clock
mode
0~199
L
1s
Press
any
button
Backlight
Setting
If you confirm " RST YES " by pressing the
button "R", the following data will be cleared.
Mounted on the bracket
The digit “ ”is
displayed.
Removed from
the bracket
“ ”
is displayed.
Button Operation in General Mode
Button
L
: Press to advance to the next mode display.
Hold 1's to change screen display
Button
R
: Press to view the function display in each mode.
Button
S
: Press to enter or quit the setting mode.
Buttons
L
+ R : Press and hold for 3 seconds to data reset.
4403012100

Joignez-vous à la conversation sur ce produit
Ici, vous pouvez partager ce que vous pensez du Echowell H30 Compteur vélo. Si vous avez une question, lisez d’abord attentivement le mode d’emploi. La demande d’un mode d’emploi peut être effectuée en utilisant notre formulaire de contact.