4. Appuyer sur au milieu du clavier pour
démarrer l’irrigation. Le robinet s’ouvre
et l’irrigation commence conformément à la
duréeetaucyclecongurés.Lorsquele
robinet s’ouvre, un clic se fait entendre et le
symbole apparaît à l’écran.
Programme d’irrigation normale
1. Ouvrir le contrôleur en faisant pivoter le corps
du contrôleur.
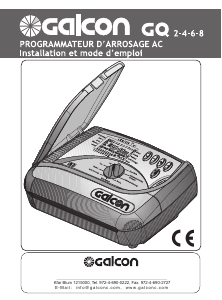
2. Sélectionner la durée de l’irrigation à l’aide
desboutonsenformedeèchesitués
ducôtégaucheduclavierand’augmenter
ou de diminuer la durée de l’irrigation. Une
ècheapparaîtrasurl’écranenregardde
la durée sélectionnée.
3. Sélectionner la durée du cycle d’’irrigation
(intervalle entre les irrigations) à l’aide
desboutonsenformedeèchesitués
ducôtédroitduclavier.Uneèche
apparaîtra sur l’écran en regard de la durée
de cycle sélectionnée.
Exemple de programmation :
• Réglerladuréeirrigationsur“Min15”et
laduréeducycled’irrigationsur“1Day”.
• Lorsquevousappuyezsur,lerobinet
s’ouvre immédiatement et reste ouvert
pendant15minutes.Lavannes’ouvriratous
lesjoursàlamêmeheurepouruneduréede
15minutes.
• L’irrigationcommenceratouslesjoursà
l’heureàlaquellevousavezappuyésurle
bouton le premier jour.
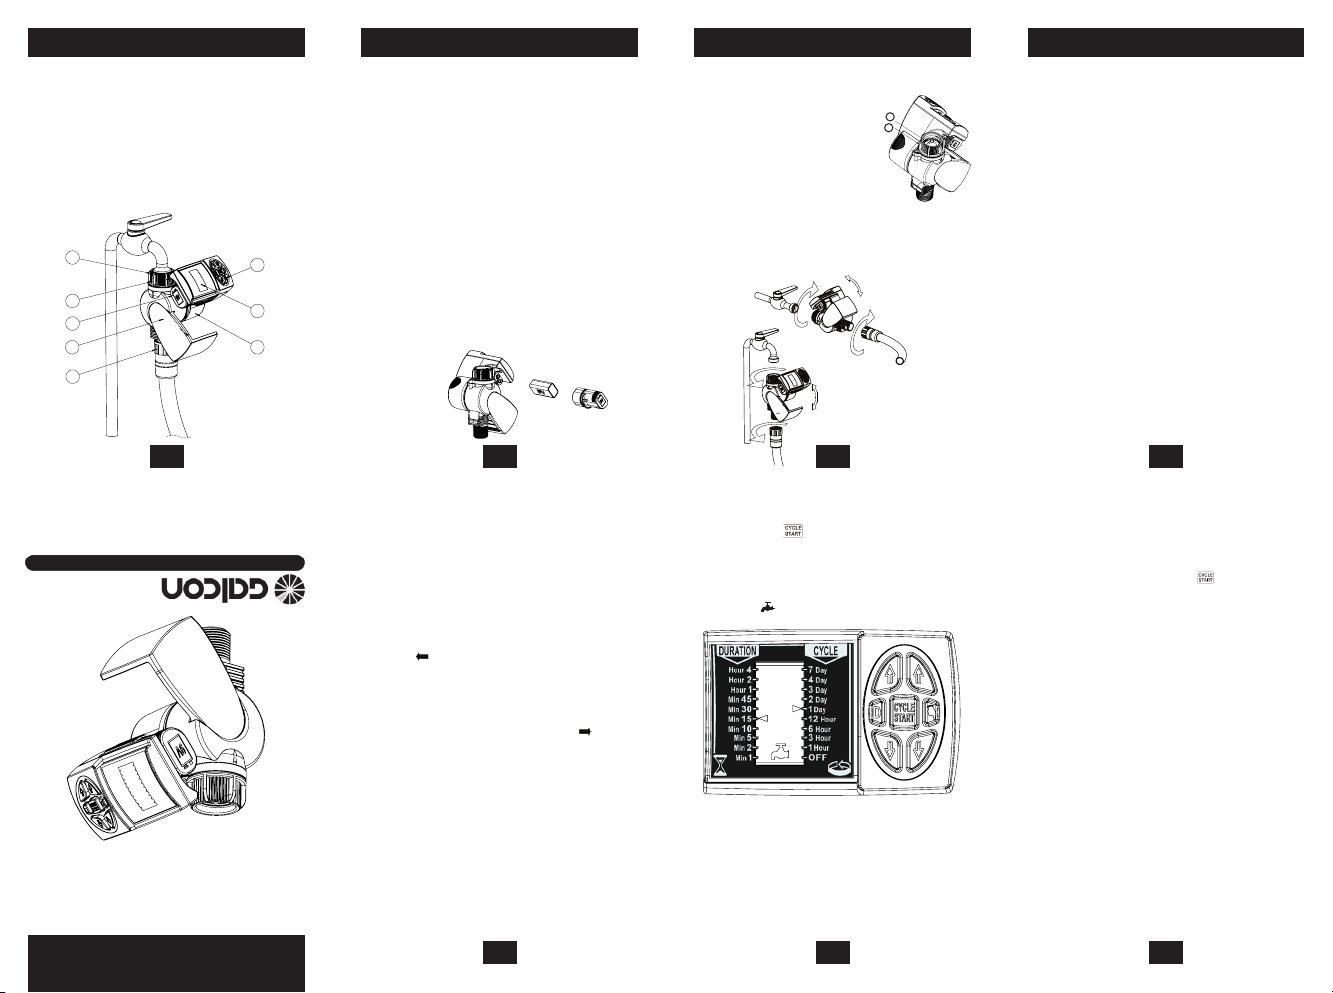
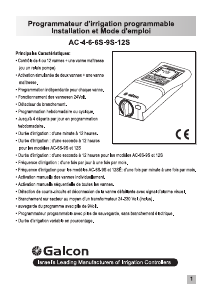
1.Raccordfemellepivotant.
2. Filtre intérieur
3. Capot du contrôleur.
4.EcranLCD.
5.Corpsducontrôleur.
6. Boutons de commande et de programmation.
7.Raccorddetuyauletémâle.
8. Compartiment de la pile.
1 2
5 6
4
7
1. IDENTIFICATION DES COMPOSANTS
1. Ouvrir le capot du contrôleur en faisant
pivoter le corps du contrôleur.
2.Tenirlecontrôleurdesortequele
compartiment de la pile soit face à vous.
3. Tirer sur le couvercle du compartiment de la
pileandel’ouvrir.
4.Raccorderunepilealcalinede9Vau
connecteur de pile.
5.Insérerlapiledanslecompartimentdela
pile et fermer ce dernier en appuyant sur son
couvercle.
Avantderemplacerlapile,s’assurerquele
compartimentdelapilen’estpashumide.
Une fois le compartiment de la pile fermé et
aussitôtquevousaveznideprogrammer
le contrôleur, tourner à nouveau le contrôleur
desortequ’ilrevienneàsapositioninitiale,
etquel’écranLCDsoitcouvertparlacapot
du contrôleur.
2. INSTALLATION DE LA PILE
3. INSTALLATION DU CONTROLEUR
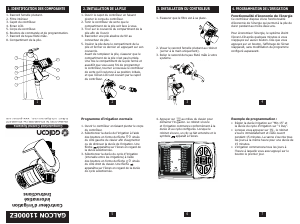
1.S’assurerqueleltreestàsaplace.
4. PROGRAMMATION DE L’IRRIGATION
Fonctionnalité d’économie de l’énergie
Ce contrôleur dispose d’une fonctionnalité
d’économiedel’énergiequipermetàlapilede
durer pendant au moins deux ans.
Pouréconomiserl’énergie,lesystèmeéteint
l’écranLCDaprèsquelquesminutessivous
n’appuyezsuraucunbouton.Dèsquevous
appuyezsurunbouton,l’afchagedel’écran
réapparaît,sansmodicationduprogramme
conguréauparavant.
1
2
3
4
6
7
8
5
Programming example:
• Set the irrigation duration to “Min 15” and the
irrigation cycle time to “1 Day”.
• When you press
the faucet/tap opens
immediately, and remains open for 15 minutes.
The valve will open at the same time every day for
a duration of 15 minutes.
• Irrigation will start every day at the time you pressed
the button on the rst day.
1. Make sure the lter is in place.
2. Screw the female swivel connector to the faucet/
tap (hand tighten only).
3. Connect the controller male hose thread connection
to your system.
4. Press
in the middle of the keypad to start
irrigation. The faucet/tap opens and irrigation will
commence for the congured duration and cycle
times. When the faucet/tap opens you will hear a
click and will appear on the screen.
Computerized Control Systems
Kfar-Blum 12150, Tel. 972-4-690-0222, Fax. 972-4-690-2727
GALCON 11000EZ
Computerized
Irrigation Controller
Instructions
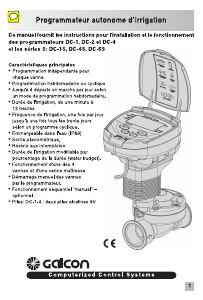
1. Female swivel connector.
2. Interior lter.
3. Controller cover.
4. LCD screen.
5. Controller body.
6. Programming and operation buttons.
7. Male hose thread connection.
8. Battery compartment.
1. Open the controller cover by rotating the controller
body.
2. Hold the controller with the battery compartment
facing you.
3. Pull the battery compartment cover to open the
compartment.
4. Connect an alkaline 9V battery to the battery
connector.
5. Insert the battery into the battery compartment
and close the compartment by pressing its cover.
Before changing a battery, make sure the battery
compartment is dry.
After the battery compartment is closed and you
nish programming the controller, rotate the controller
back to its original position, so that the LCD screen is
covered by the controller’s cover.
Regular irrigation program
1. Open the controller by rotating the controller body.
2. Select the irrigation duration using the arrow
buttons
on the left side of the keypad to
increase or decrease irrigation time. An arrow
will appear on the screen next to the selected
duration.
3. Select the irrigation cycle time (time between
irrigation starts) using the arrow buttons
on
the right side of the keypad. An arrow
will
appear on the screen next to the selected cycle
time.
Energy saving feature
This controller has an energy saving feature which
enables the battery to last for at least two years.
To save energy, the display on the LCD screen
disappears after a few minutes if no buttons are
pressed. Pressing any button causes the display to re-
appear, without changing the congured program.
1. COMPONENTS IDENTIFICATION 2. BATTERY INSTALLATION 3. CONTROLLER INSTALLATION 4. IRRIGATION PROGRAMMING
3
GALCON 11000EZ
Contrôleur d’irrigation
informatisé
Instructions
Programming example:
• Set the irrigation duration to “Min 15” and the
irrigation cycle time to “1 Day”.
• When you press
the faucet/tap opens
immediately, and remains open for 15 minutes.
The valve will open at the same time every day for
a duration of 15 minutes.
• Irrigation will start every day at the time you pressed
the button on the rst day.
1. Make sure the lter is in place.
2. Screw the female swivel connector to the faucet/
tap (hand tighten only).
3. Connect the controller male hose thread connection
to your system.
4. Press
in the middle of the keypad to start
irrigation. The faucet/tap opens and irrigation will
commence for the congured duration and cycle
times. When the faucet/tap opens you will hear a
click and will appear on the screen.
Computerized Control Systems
Kfar-Blum 12150, Tel. 972-4-690-0222, Fax. 972-4-690-2727
GALCON 11000EZ
Computerized
Irrigation Controller
Instructions
1. Female swivel connector.
2. Interior lter.
3. Controller cover.
4. LCD screen.
5. Controller body.
6. Programming and operation buttons.
7. Male hose thread connection.
8. Battery compartment.
1. Open the controller cover by rotating the controller
body.
2. Hold the controller with the battery compartment
facing you.
3. Pull the battery compartment cover to open the
compartment.
4. Connect an alkaline 9V battery to the battery
connector.
5. Insert the battery into the battery compartment
and close the compartment by pressing its cover.
Before changing a battery, make sure the battery
compartment is dry.
After the battery compartment is closed and you
nish programming the controller, rotate the controller
back to its original position, so that the LCD screen is
covered by the controller’s cover.
Regular irrigation program
1. Open the controller by rotating the controller body.
2. Select the irrigation duration using the arrow
buttons
on the left side of the keypad to
increase or decrease irrigation time. An arrow
will appear on the screen next to the selected
duration.
3. Select the irrigation cycle time (time between
irrigation starts) using the arrow buttons
on
the right side of the keypad. An arrow will
appear on the screen next to the selected cycle
time.
Energy saving feature
This controller has an energy saving feature which
enables the battery to last for at least two years.
To save energy, the display on the LCD screen
disappears after a few minutes if no buttons are
pressed. Pressing any button causes the display to re-
appear, without changing the congured program.
1. COMPONENTS IDENTIFICATION 2. BATTERY INSTALLATION 3. CONTROLLER INSTALLATION 4. IRRIGATION PROGRAMMING
2.Visserleraccordfemellepivotantaurobinet
(serreràlamainuniquement).
3.Relierleraccorddetuyauletémâleàvotre
système.
1
2


Joignez-vous à la conversation sur ce produit
Ici, vous pouvez partager ce que vous pensez du Galcon 11000 EZ Programmateur d’arrosage. Si vous avez une question, lisez d’abord attentivement le mode d’emploi. La demande d’un mode d’emploi peut être effectuée en utilisant notre formulaire de contact.