
INSTRUCTION MANUAL ALARM CLOCK KA6039
Product Specification:
Power Supply: DC 5V / 2A, AC100-240V 50/60Hz (not included), 3 x LR1130 (not
included), 1 x USB cable (1.5m 2A included).
Requirements: To ensure charging speed and product function stability, the product
requires a USB cable with a 2A electric current and DC 5V/2A power adaptor.
Power: 5W.
Charging Distance: 2-10mm (the closer the distance between the mobile phone and
the product, the faster the charging).
Phone Charging Time: Approximately one hour longer compared to plug-in charging.
Usage: When the clock is plugged in, place the phone on top of the clock to charge.
Note that phone covers may interfere with charging, and not all phones support
wireless charging.
Features:
Display Modes: DP-1/DP-2:
DP-1: Time and date displayed in sequence (carousel mode).
DP-2: Fixed time display.
Calendar: Covers 1 January 2000 to 31 December 2099 (default: 1 January 2016).
12/24-Hour Format Selection: Default 24-hour format, 12:00.
Alarms: Set up to 3 alarms, each lasting 1 minute, with the sound “Beep Beep
Beep”.
Night Mode: Automatic dimming from 18:00 to 6:59.
Brightness Levels: 4 adjustable levels (L0 to L3, where L3 is the brightest and L0
the dimmest).
Sound Control Mode (Power-Saving Mode): Activates the display upon sound or
touch.
Time Memory: Powered by 3 x LR1130 button cells (not included). These maintain
the internal time program, but the display will not be visible externally.
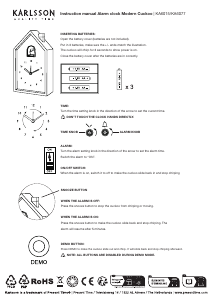
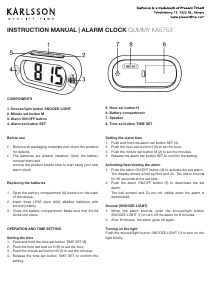
Packing List:
Ensure all items are present upon opening the packaging:
Digital wooden clock: 1pc.
User Manual: 1pc.
USB cable (2A, 1.5m): 1pc.
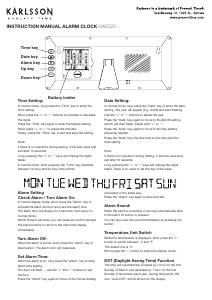
Keys: SET, UP, DOWN.
Functions:
Display Mode:
Press the “SET” button to change between:
DP-1: Time and date displayed in sequence (carousel mode).
DP-2: Fixed time display.
Sound Mode (Power-Saving Mode):
Press the “DOWN” button to toggle between:
“ON: Sd” (sound mode activated): The display will turn off after a few seconds. The
display will wake up if the sound is louder than 60 decibels or if the clock is tapped.
“--: Sd” (sound mode deactivated): The constant light function will be activated.
Brightness Setting:
Hold the “UP” button for 2 seconds to enter brightness adjustment mode.
Adjust brightness using the “UP” button (brighter) or the “DOWN” button (dimmer):
L3: Brightest.
L2: Less bright.
L1: Weak brightness.
L0: Dimmest.
Alarm Setting:
Set up to 3 alarms daily, each lasting 1 minute with the sound “Beep Beep Beep”.
To stop the alarm, press any key on the back of the clock.
Setting Instructions:
Hold the “SET” button for 2 seconds to enter setting mode. The setting order is as
follows:
Date Setting: Year → Month → Date (use the “UP” or “DOWN” button to change values).
12/24-Hour Format Setting: After setting the date, press “SET” to toggle between
12-hour and 24-hour formats using the “UP” and “DOWN” buttons. In 12-hour format,
“PM” will be displayed for the afternoon.
Time Setting: After setting the format, press “SET” again to adjust the time.
Alarm Setting: After setting the time, press “SET” again to set the alarms. Use the “UP”
and “DOWN” buttons to toggle alarms (ON:A1, ON:A2, ON:A3). Press “SET” to adjust
each alarm’s hour and minute.
Reset Function:
If the functions or display do not work properly, press the “RESET” button using a thin
object (e.g., a needle) located on the back of the product.
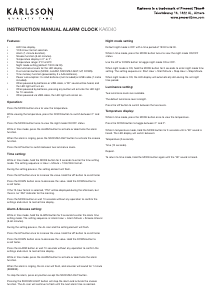
Precautions:
Use the clock in a dry area. Prolonged exposure to moisture, vibration, high tempera-
tures, or uctuating temperatures may damage the product.
Avoid dropping the clock to prevent damage.
Use a compatible 5V/2000mA AC adapter for optimal performance.


Joignez-vous à la conversation sur ce produit
Ici, vous pouvez partager ce que vous pensez du Karlsson KA6039OR Réveil. Si vous avez une question, lisez d’abord attentivement le mode d’emploi. La demande d’un mode d’emploi peut être effectuée en utilisant notre formulaire de contact.