Mode d’emploi Kichler 2347NI Circolo Lampe

Besoin d'un mode d’emploi pour votre Kichler 2347NI Circolo Lampe ? Ci-dessous, vous pouvez consulter et télécharger gratuitement le mode d’emploi PDF en français. Ce produit a actuellement 7 questions fréquemment posées, 0 commentaires et 0 votes. Si ce n'est pas le mode d’emploi que vous souhaitez, veuillez nous contacter.

Votre produit est défectueux et le mode d’emploi n’offre aucune solution ? Rendez-vous à un Repair Café pour obtenir des services de réparation gratuits.

Mode d’emploi

Loading…

Date Issued: 11/21/17
IS-2347-CB
We’re here to help 866-558-5706
Hrs: M-F 9am to 5pm EST
CAUTION – RISK OF SHOCK –
Disconnect Power at the main circuit breaker panel or main fuse
box before starting and during the installation.
INSTRUCTIONS
For Assembling and Installing Fixtures in Canada
Pour L’assemblage et L’installation Au Canada
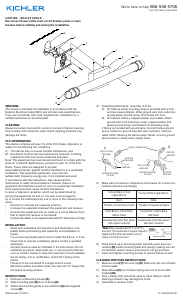
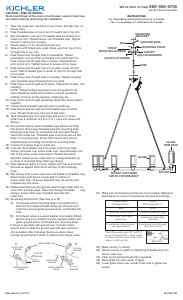
1) Take one loose arm, slip hook at end of arm through loop on
fixture body.
2) Pass threaded pipe on top of arm through hole in top trim.
3) Slip lockwasher over end of threaded pipe protruding from
inside top trim. Thread hexnut onto threaded pipe. Tighten
hexnut to secure arm in place.
4) Repeat steps 1-4 for remaining loose arm.
5) Take arm with fixture wire, pass fixture wire from top of arm
through hole in top trim.
6) Pass fixture wire through hole in lockwasher. Thread
lockwasher onto end arm protruding from inside top trim.
Pass fixture wire through hole in hexnut. Thread henxut
onto end of arm. Tighten hexnut to secure arm in place.
7) Pass fixture wire through hole in top plate. Lower top trim
down. Pass threaded pipe in center of top trim through hole
in top plate.
8) Pass fixture wire through hole in coupling. Thread coupling
onto threaded pipe protruding from top plate.
9) Pass fixture wire through end of stem. Thread end of stem into
coupling.
NOTE: Thread locking compound must be applied to all
stem threads as noted with symbol to prevent accidental
rotation of fixture during cleaning, relamping, etc.
10) Pass fixture wire through remaining stems and screw stems
together.
11) Thread small threaded pipe into end of small loop.
12) Pass fixture wire through end of threaded pipe on small
loop. Thread small loop onto end of last stem.
13) Take threaded pipe from parts bag and screw in screw
collar loop a minimum of 6 mm (1/4”). Lock into place with
hexnut.
14) Run another hexnut down threaded pipe almost touching
first hexnut. Now screw threaded pipe into mounting strap.
Mounting strap must be positioned with extruded thread
faced into outlet box. Threaded pipe must protrude out the
back of mounting strap. Screw third hexnut onto end of
threaded pipe protruding from back of mounting strap.
15) Connect mounting strap to outlet box.
16) Unscrew the threaded ring from screw collar loop. Take
canopy and pass over screw collar loop. Approximately one
half of the screw collar loop exterior threads should be
exposed. Adjust screw collar loop by turning assembly up
or down in mounting strap. Remove canopy.
17) After desired position is found, tighten both top and bottom
hexnuts up against the bottom and top of the mounting
strap.
18) Slip canopy over screw collar loop and thread on threaded ring.
Attach chain (with fixture connected) to bottom of
screw collar loop. Unscrew threaded ring, let canopy and
threaded ring slip down.
19) Weave electrical wire and ground wire through chain links no
more than 3 inches apart. Pass wire through threaded ring,
canopy, screw collar loop, threaded pipe and into
outlet box.
20) Grounding instructions: (See Illus. A or B).
A) On fixtures where mounting strap is provided with a
hole and two raised dimples. Wrap ground wire from
outlet box around green ground screw, and thread into
hole.
B) On fixtures where a cupped washer is provided. Attach
ground wire from outlet box under cupped washer and
green ground screw, and thread into mounting strap.
If fixture is provided with ground wire. Connect fixture
ground wire to outlet box ground wire with wire connector
(not provided.) after following the above steps. Never
connect ground wire to black or white power supply wires.
GREEN GROUND
SCREW
CUPPED
WASHER
OUTLET BOX
GROUND
FIXTURE
GROUND
DIMPLES
WIRE CONNECTOR
OUTLET BOX
GROUND
GREEN GROUND
SCREW
FIXTURE
GROUND
A
B
MOUNTING
BRACKET
GROUND WIRE
BALL
MOUNTING STRAP
STRAP
MOUNTING SCREWS
CANOPY
(2)LOCKWASHERS
(2)LOCK-UP KNOBS
TUBE
GLASS
TRIM PACK
GLASS
SOCKET
SOCKET CUP FINISH
MATCH FIXTURE BODY
21) Make wire connections (connectors not provided). Reference
chart below for correct connections and wire accordingly.
22) Raise canopy to ceiling.
23) Secure canopy in place by tightening threaded ring onto
screw collar loop.
24) Insert recommended bulbs (Not supplied).
25) Place glass trim into center of glass.
26) Lower glass down over socket. Pass hole in glass over
socket.
Connect Black or
Red Supply Wire to:
Connect
White Supply Wire to:
Black White
*Parallel cord (round & smooth)
*Parallel cord (square & ridged)
Clear, Brown, Gold or Black
without tracer
Clear, Brown, Gold or Black
with tracer
Insulated wire (other than green)
with copper conductor
Insulated wire (other than green)
with silver conductor
*Note: When parallel wires (SPT I & SPT II)
are used. The neutral wire is square shaped
or ridged and the other wire will be round in
shape or smooth (see illus.)
Neutral Wire
Télécharger mode d’emploi en Français (PDF, 0.18 MB)
(Tenez compte de l’environnement et imprimez ce manuel uniquement si c’est vraiment nécessaire)

Loading…

Évaluation

Dites-nous ce que vous pensez du Kichler 2347NI Circolo Lampe en laissant une note de produit. Vous voulez partager vos expériences avec ce produit ou poser une question ? Veuillez laisser un commentaire au bas de la page.
Etes-vous satisfait du Kichler 2347NI Circolo Lampe ?
Oui Non
Soyez le premier à évaluer ce produit
0 évaluations

Joignez-vous à la conversation sur ce produit

Ici, vous pouvez partager ce que vous pensez du Kichler 2347NI Circolo Lampe. Si vous avez une question, lisez d’abord attentivement le mode d’emploi. La demande d’un mode d’emploi peut être effectuée en utilisant notre formulaire de contact.

En savoir plus sur ce mode d’emploi

Nous comprenons qu’il est agréable d’avoir un mode d’emploi papier pour vos Kichler 2347NI Circolo Lampe. Vous pouvez toujours télécharger le mode d’emploi depuis notre site Web et l’imprimer vous-même. Si vous souhaitez disposer d’un mode d’emploi original, nous vous recommandons de contacter Kichler. Ils pourront peut-être fournir un mode d’emploi original. Recherchez-vous le mode d’emploi de votre Kichler 2347NI Circolo Lampe dans une autre langue ? Choisissez votre langue préférée sur notre page d’accueil et recherchez le numéro de modèle pour voir si nous l’avons disponible.

Caractéristiques

Marque Kichler
Modèle 2347NI Circolo
Catégorie Lampes
Type de fichier PDF
Taille du fichier 0.18 MB

Tous les modes d’emploi pour Kichler Lampes
Plus de modes d’emploi de Lampes

Foire aux questions sur Kichler 2347NI Circolo Lampe

Notre équipe d’assistance recherche des informations utiles sur les produits et des réponses aux questions fréquemment posées. Si vous trouvez une inexactitude dans notre foire aux questions, veuillez nous le faire savoir en utilisant notre formulaire de contact.

Tous les éclairages LED sont-ils gradables ? Vérifié

Non, toutes les lumières LED ne sont pas gradables. Ceci est indiqué sur l’emballage ou sur la lampe elle-même.

Cela a été utile (462) En savoir plus

J'ai inséré une nouvelle ampoule dans ma lampe mais elle ne s'allume pas, pourquoi ? Vérifié

Certaines lampes sont conçues pour des sources lumineuses d'une puissance spécifique. Lorsqu'on insère une source de lumière qui nécessite une puissance supérieure à celle que la lampe peut fournir, il est possible que la lumière ne s'allume pas. Si la lampe fournit une puissance beaucoup plus élevée que celle pour laquelle la source lumineuse est conçue, la source lumineuse peut griller.

Cela a été utile (315) En savoir plus

Pourquoi la couleur de la lumière est-elle importante ? Vérifié

Cela a été utile (255) En savoir plus

Qu’est-ce que le lumen ? Vérifié

Le lumen est une unité de mesure pour la quantité totale de lumière visible émise par une source.

Cela a été utile (190) En savoir plus

Quelles bases de vis existent ? Vérifié

Dans le monde entier, il existe de nombreux types de douilles, mais la plupart d’entre elles sont basées sur la vis Edison, indiquée par la lettre E. Dans la plupart des pays, les bases de vis E27 et E14 sont standard. Aux États-Unis, les normes E26, E17, E12 et E10 sont standard.

Cela a été utile (142) En savoir plus

Que disent les watts de ma lampe ? Vérifié

Le watt est une unité de mesure de la consommation d’électricité. Les lampes qui produisent plus de lumière utilisent généralement plus de watts, mais pour comparer le rendement lumineux, vous devriez toujours utiliser le lumen.

Cela a été utile (113) En savoir plus

Que signifie « LED » ? Vérifié

« LED » signifie « Light-Emitting Diode » (diode électroluminescente). De la lumière est émise en faisant passer du courant à travers un semi-conducteur dans la bonne direction.

Cela a été utile (98) En savoir plus
Mode d’emploi Kichler 2347NI Circolo Lampe

Produits connexes

Catégories associées