Mode d’emploi Kichler 84314CH Jovian Lampe
Besoin d'un mode d’emploi pour votre Kichler 84314CH Jovian Lampe ? Ci-dessous, vous pouvez consulter et télécharger gratuitement le mode d’emploi PDF en français. Ce produit a actuellement 7 questions fréquemment posées, 0 commentaires et 0 votes. Si ce n'est pas le mode d’emploi que vous souhaitez, veuillez nous contacter.
Votre produit est défectueux et le mode d’emploi n’offre aucune solution ? Rendez-vous à un Repair Café pour obtenir des services de réparation gratuits.
Mode d’emploi
Loading…


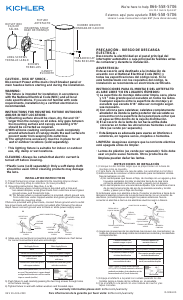
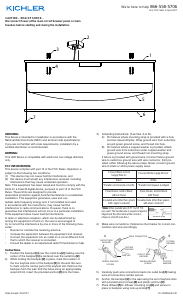
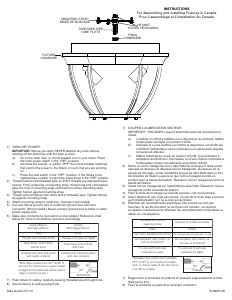
Loading…
Évaluation
Dites-nous ce que vous pensez du Kichler 84314CH Jovian Lampe en laissant une note de produit. Vous voulez partager vos expériences avec ce produit ou poser une question ? Veuillez laisser un commentaire au bas de la page.En savoir plus sur ce mode d’emploi
Nous comprenons qu’il est agréable d’avoir un mode d’emploi papier pour vos Kichler 84314CH Jovian Lampe. Vous pouvez toujours télécharger le mode d’emploi depuis notre site Web et l’imprimer vous-même. Si vous souhaitez disposer d’un mode d’emploi original, nous vous recommandons de contacter Kichler. Ils pourront peut-être fournir un mode d’emploi original. Recherchez-vous le mode d’emploi de votre Kichler 84314CH Jovian Lampe dans une autre langue ? Choisissez votre langue préférée sur notre page d’accueil et recherchez le numéro de modèle pour voir si nous l’avons disponible.
Caractéristiques
| Marque | Kichler |
| Modèle | 84314CH Jovian |
| Catégorie | Lampes |
| Type de fichier | |
| Taille du fichier | 0.42 MB |
Tous les modes d’emploi pour Kichler Lampes
Plus de modes d’emploi de Lampes
Foire aux questions sur Kichler 84314CH Jovian Lampe
Notre équipe d’assistance recherche des informations utiles sur les produits et des réponses aux questions fréquemment posées. Si vous trouvez une inexactitude dans notre foire aux questions, veuillez nous le faire savoir en utilisant notre formulaire de contact.
Tous les éclairages LED sont-ils gradables ? Vérifié
Non, toutes les lumières LED ne sont pas gradables. Ceci est indiqué sur l’emballage ou sur la lampe elle-même.
Cela a été utile (462) En savoir plusJ'ai inséré une nouvelle ampoule dans ma lampe mais elle ne s'allume pas, pourquoi ? Vérifié
Certaines lampes sont conçues pour des sources lumineuses d'une puissance spécifique. Lorsqu'on insère une source de lumière qui nécessite une puissance supérieure à celle que la lampe peut fournir, il est possible que la lumière ne s'allume pas. Si la lampe fournit une puissance beaucoup plus élevée que celle pour laquelle la source lumineuse est conçue, la source lumineuse peut griller.
Cela a été utile (315) En savoir plusPourquoi la couleur de la lumière est-elle importante ? Vérifié
Cela a été utile (255) En savoir plus
Qu’est-ce que le lumen ? Vérifié
Le lumen est une unité de mesure pour la quantité totale de lumière visible émise par une source.
Cela a été utile (190) En savoir plusQuelles bases de vis existent ? Vérifié
Dans le monde entier, il existe de nombreux types de douilles, mais la plupart d’entre elles sont basées sur la vis Edison, indiquée par la lettre E. Dans la plupart des pays, les bases de vis E27 et E14 sont standard. Aux États-Unis, les normes E26, E17, E12 et E10 sont standard.
Cela a été utile (142) En savoir plusQue disent les watts de ma lampe ? Vérifié
Le watt est une unité de mesure de la consommation d’électricité. Les lampes qui produisent plus de lumière utilisent généralement plus de watts, mais pour comparer le rendement lumineux, vous devriez toujours utiliser le lumen.
Cela a été utile (113) En savoir plusQue signifie « LED » ? Vérifié
« LED » signifie « Light-Emitting Diode » (diode électroluminescente). De la lumière est émise en faisant passer du courant à travers un semi-conducteur dans la bonne direction.
Cela a été utile (98) En savoir plus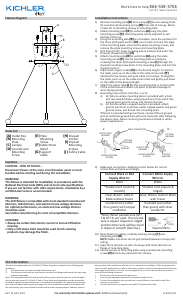
Joignez-vous à la conversation sur ce produit
Ici, vous pouvez partager ce que vous pensez du Kichler 84314CH Jovian Lampe. Si vous avez une question, lisez d’abord attentivement le mode d’emploi. La demande d’un mode d’emploi peut être effectuée en utilisant notre formulaire de contact.