
Controls
iPod 3Gen 10GB
iPod 3Gen 20GB
iPod 4Gen 20GB
iPod Photo 30GB
20 & 30gig
Bracket
iPod 3Gen 15GB
iPod Video 60GB
Video
60gig
Bracket
Video
30gig
Bracket
iPod Video 30GB
iPod 3Gen 30GB
All iPod mini
iPod nano 1GB
iPod 3Gen 40GB
iPod nano 2GB
iPod 4Gen 40GB
iPod nano 4GB
iPod Photo 40GB
iPod Photo 60GB
Color
40 & 60gig
Bracket
mini
Bracket
nano
Bracket
The normal function of this product may be disturbed by Strong Electro Magnetic
Interference. If so, simply reset this Unit to resume normal operation by following
the procedures listed in this instruction manual. In case the function could not be
resumed, please use this product in other location.
Model : IPD - 3000
ENGLISH
If at any time in the future you should need to dispose of this product please note
that : Waste electrical products should not be disposed of with household waste.
Please recycle where facilities exist. Check with your Local Authority or retailer for
recycling advice.
(Waste Electrical and Electronic Equipment Directive)
DUTCH
Indien u zich in de toekomst van dit toestel wenst te ontdoen, let er dan op dat
elektrisch afvalmateriaal niet met het huishoudelijk afval mag worden verwijderd.
Breng het toestel naar een kringloopwinkel of anderevoorziening voor recycling. Neem
contact op met uw plaatselijke autoriteit of winkelier indien u meer informatie wenst
over recycling.
(Richtlijn voor Afval van Elektrische en Elektronische Apparaten, AEEA)
ESPAÑOL
Si en el futuro necesita deshacerse de este producto, tenga en cuenta lo siguiente :
no debe deshacerse de los residuos de productos eléctricos como si fueran residuos
domésticos. Por favor, recicle en los sitios en los que esto sea posible. Acuda a las
autoridades locales o al vendedor en busca de asesoramiento sobre reciclaje.
(Directiva sobre residuos eléctricos y equipos electrónicos)
FRANÇAIS
Si vous souhaitez vous débarrasser ultérieurement du produit, veuillez noter que les
déchets électriques ne doivent pas être jetés avec les déchets domestiques. Veuillez
les faire déposer dans les centres de recyclage existants. Contactez les autorités
locales ou distributeurs pour obtenir de plus amples informations.
(Directive de l' équipement électronique et des déchets électriques)
DEUTSCH
Sollten Sie irgendwann zu späterer Zeit dieses Produkt entsorgen wollen, beachten
Sie bitte Folgendes : Elektroschrott sollte nicht mit dem Haushaltsmüll entsorgt
werden. Bitte recyceln Sie ihn, sofern Ihnen entsprechende Möglichkeiten zur
Verfügung stehen. Setzen Sie sich mit Ihren kommunalen Behörden oder Ihrem
Einzelhändler in Verbindung und fragen Sie diese um Rat bezüglich der
Wiederverwertung.
(Elektro-und Elektronik-Altgeräte-Richtlinie (WEEE))
ENGLISH
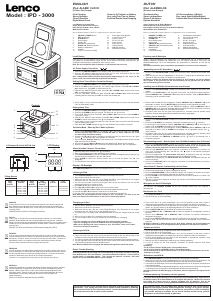
1
2 SET / VII Button
3 ALARM Button
4 Clock Display
5 Power LED
6 UP / vvI (Forward) Button
7 DOWN / Icc (Backward) Button
8 Battery Compartment
9 Speaker
10 iPod Pin Connector Docking
SNOOZE / POWER Button
11 Removable Fitting Bracket
12 3.5mm AUX IN Jack
13 Volume Control
14 DC IN 7.5V Jack
15 Alarm On Icon
16 Alarm Set Icon
17 HOUR Indicator
18 MINUTE Indicator
19 WEEKDAY Indicator
iPod ALARM CLOCK
(24 Hour For Europe)
iPod Charging Power by AC Adaptor or Battery
Stereo Speakers Very Long Play Time by Battery
Class D Amplifier Excellent Stereo Sound Imaging
Digital Alarm Clock
Local Buttons to Control iPod
Single Alarm with Snooze Function
Easy Set Day of Week / Hour / Minute
Wake by iPod / Buzzer
iPod is a trademark of Apple Computer, Inc., registered in the U.S. and other countries.
FRI SAT SUNTHUWEDTUEMON
AL
16
15
17
18
19
LCD Display
1
2
3
4
5
6
7
8
9
11
10
AC Adaptor IN Jack & AUX IN Jack
Set
Alarm Mode - Wake by iPod / W
ake by Buzzer
12
13
14
Fitting Bracket
1
2 INSTELLING / VII Toets
3 ALARM-teots
4 Klok Uitleesvenster
5 Stroom LED
6 OMHOOG / vvI (Voorwaarts)-toets
7 OMLAAG / Icc (Achterwaarts)-toets
8 Batterijhouder
9 Luidspreker
10 iPod Pinaansluiting
SNOOZE / POWER-toets
11 Verwijderbare Aansluitsteu
12 3.5mm AUX IN Ingang
13 Volumecontrole
14 DC IN 7.5V Ingang
15 Alarm Aan Icoon
16 Alarminstelling Icoon
17 UUR Aanduiding
18 MINUUT Aanduiding
19 WEEKDAG Aanduiding
iPod ALARMKLOK
(24-uurs voor Europa)
iPod Aansluiting AC Stroomadapter of Batterij
Stereo Luidsprekers Zeer Lange Speeltijd Met Batterij
Klasse D Versterker Uitstekende Stereo-Geluid Weergave
Digitale Alarmklok
Lokale Toetsen om de iPod te Bedienen
Afzonderlijk Alarm met Snoozefunctie
Eenvoudige Instelling van Dag van de Week/Uur/Minuut
Wordt Wakker door iPod/Zoemer
iPod is een handelsmerk van Apple Computer, Inc., Geregistreerd in de V.S. en andere landen.
AC Power Supply Connection
Insert 4 pcs of `AA` size batteries (not included) into the battery compartment at the bottom of the
unit (Alkaline is recommended for longer life). Be sure to observe the polarity markings which are
engraved inside the battery compartment, then close the cover.
Note: Do not mix different types of batteries, or old batteries with new ones.
1. Press & hold SNOOZE/POWER till LCD displays “oFF” and Power LED turns off.
2. Press & hold SET for about 2 seconds. The `HOUR` digits will flash. Press UP / vvI or DOWN /
Icc to set the hour. Press SET to confirm the hour set.
3. After this, the `MINUTE`digits will flash. Press UP / vvI or DOWN / Icc to set the minute. Press
SET to confirm the minute set.
4. Then, the `WEEKDAY` Indicator will flash. Press UP / vvI or DOWN / Icc to select the desired
weekday (MON to SUN) and press SET to confirm the weekday set.
1. Press & hold SNOOZE/POWER till LCD displays “oFF” and Power LED turns off.
2. Insert the AC adaptor’s cable plug tip into the DC IN 7.5V Jack at the back of the unit, then
insert the moulded plug (with blades) into the wall outlet.
Note: Always Power off the unit before switching to AC adaptor supply. In the event of AC
power cut/off, user need to manually readjust the Time & Alarm.
Setting Clock Time (24 Hour Format for Europe)
Install Battery
1. When the alarm time is reached, the ` ` icon flashes.
2. Either iPod or Buzzer is sounded according to prior selection.
3. Press SNOOZE/POWER to silent the iPod/Buzzer temporarily for approximately 9 minutes. The
Snooze function is repeatable in the next 120 minutes.
4. Press ALARM to cancel the Snooze function and or to reset the Alarm. The ` ` icon
disappears.
5. The iPod/Buzzer alarm will be reset automatically after 120 minutes even if no key is pressed.
1. Press & hold SNOOZE/POWER till LCD displays “oFF” and Power LED turns off. The Alarm
Function will only work if the unit is in Power Off state (i.e. Power LED turns off). It will
not work if iPod or AUX IN is playing.
2. Press & hold UP / vvI for about 2 seconds to activate the Alarm, the Alarm Set icon `AL` lights
up. The ` ` icon and the Alarm Time appears for 2 seconds.
3. If iPod is docked, Wake by iPod will be the default mode. The last played track will be sounded
when the alarm time is reached.
4. If iPod is not docked, Wake by Buzzer will be the default mode. Buzzer will be sounded.
5. Press & hold DOWN / Icc for about 2 seconds to deactivate Alarm Set, `AL` icon disappears.
1. Press & hold SNOOZE/POWER till LCD displays “oFF” and Power LED turns off.
2. Press & hold ALARM for about 2 seconds. The Alarm On icon ` ` turns on.
3. The `HOUR` digits will flash. Press UP / vvI or DOWN / Icc to set the hour. Press ALARM to
confirm the hour set.
4. After this, the `MINUTE` digits will flash. Press UP / vvI or DOWN / Icc to set the minute. Press
ALARM to confirm the minute set. The ` ` icon disappears.
5. At any stage, if no key is pressed within the next 5 seconds (time out period), the last selected
value is automatically saved.
6. Short press UP / DOWN displays the ` ` icon and the Alarm Time for about 2 seconds.
Alarm Sounded / Snooze / Reset Alarm
Settin
g
Alarm
Time
1. Connect the AC adaptor to this unit as mentioned before.
2. Dock the iPod into the Pin Connector.
3. Make sure that you are using the correct Fitting Bracket for your iPod and that it is properly
docked into this unit. Failure to do so may damage your iPod.
4. The iPod will go to charging mode automatically. Make sure that the charging symbol is turned
on.
5. While your iPod is docked in, it recharges (until fully charged).
6. You can navigate, select or play the content on your iPod while it is recharging.
Note:
- If you are charging your iPod in STOP mode, the recharging time is shorter.
- If you are charging your iPod in PLAYBACK mode, the recharging time is longer.
- While you are playing back videos contents on your “iPod Video”, there is no surplus
power left to charge up the battery.
Listening to iPod
1. Press SNOOZE/POWER for about 2 seconds till the Power LED turns on.
2. Dock the iPod into the Pin Connector.
3. Make sure that you are using the correct Fitting Bracket for your iPod and that it is properly
docked into this unit. Failure to do so may damage your iPod.
4. You can use the control on the iPod to navigate, select or play the content or you can use the
buttons on this device to control the iPod.
5. Press SET / VII to play / pause the music.
6. Press Up / vvI or Down / Icc to jump to the next or previous track.
7. Press & hold Up / vvI or Down / Icc to skip forward and backward within a track.
8. Press & hold SET / VII for about 2 seconds to turn off the iPod.
9. Roll the volume control knob at the back of this unit to adjust the volume level.
Note: While you are playing back video contents on your “iPod Video”, you have to use the
iPod scroll wheel but not the buttons on this unit to control the playback.
1. Press SNOOZE/POWER for about 2 seconds till the Power LED turns on.
2. Plug-in one end of the Aux Line Cord into the AUX IN Socket of this unit and the other to the
Headphone Jack of the iPod Shuffle, Mp3 Player, Discman or other music source.
3. You can only use the controls located on the external device to navigate, select or play the content.
4. You can adjust the volume level primarily by the volume control on the external device and use the
volume control knob of this unit as an auxiliary control.
Note: When the AUX IN Jack is engaged, the output audio signal from the iPod is muted.
Listening to AUX IN
Display LCD Backlight
Press SNOOZE/POWER turns on the LCD backlight for about 7 seconds.
Reset / Trouble Shooting
In the event that this device hangs and is not responding to any button command, unplug the
iPod, AUX IN device, AC Power Adaptor, and remove all batteries. Wait for 1 minutes until all
residual power is completely drained. Then reinstall the batteries, reconnect AC Power
Adaptor and press SNOOZE/POWER to power up again.
5. At any stage, if no key is pressed within the next 5 seconds (time out period), the last selected
value is automatically saved.
DUTCH
De normale functie van dit product kan worden verstoord door Strong Electro
Magnetic Interference (Sterke Elektromagnetische Storing). In dit geval, herstart
eenvoudig deze Eenheid volgens de beschreven procedures in deze handleiding
om normale werking te hervatten. Als de functie niet kan worden hervat, gelieve
dit product op een andere lokatie te gebruiken.
Aansluiting van de AC Krachtbron
Plaats 4 stuks AA batterijen (niet bijgeleverd) in de batterijhouder aan de onderkant van het
apparaat (Alkalische batterijen zijn aanbevolen voor een langere levensduur). Zorg ervoor de
polariteitsmarkeringen, die in de batterijhouder zijn gegraveerd, te controleren en sluit dan de
afdekking.
Opmerking: Combineer geen verschillende type batterijen of oude met nieuwe batterijen.
1. Druk en houd SNOOZE/POWER in totdat het LCD-scherm “oFF” aanduidt en de Stroom LED
uitgaat.
2. Druk en houd INSTELLING in voor ongeveer 2 seconden. De UUR-cijfers zullen knipperen.
Gebruik OMHOOG / vvI of OMLAAG / Icc om de uurtijd in te stellen. Druk op INSTELLING ter
bevestiging van de ingestelde uurtijd.
1. Druk en houd SNOOZE/POWER in totdat het LCD-scherm “oFF” aanduidt en de Stroom LED
uitgaat.
2. Steek de plug van het AC Adaptersnoer in de DC IN 7.5 Ingang aan de achterkant van het
apparaat en steek vervolgens de stekker in het stopcontact.
Opmerking: Schakel het apparaat altijd uit alvorens op de krachtbron van de AC adapter
over te gaan. In het geval van een AC stroomuitvalling, zal de gebruiker de Tijd & Alarm
opnieuw handmatig moeten instellen.
Instelling van de Kloktijd (24-uursformaat voor Europa)
Plaatsing van de Batterijen
1. Wanneer de alarmtijd is bereikt, zal het ` `-icoon knipperen.
2. Of iPod of de zoemer gaat af volgens voorafgaande selectie.
3. Druk op SNOOZE/POWER om de iPod/Zoemer tijdelijk voor ongeveer 9 minuten uit te zetten.
De Snooze-functie is herhaalbaar gedurende de volgende 120 minuten.
4. Druk op ALARM om de Snoozefunctie te annuleren en/of het alarm opnieuw in te stellen. Het
` ` -icoon verdwijnt.
5. Zelfs als er geen toets is ingedrukt, wordt na 120 minuten het iPod/Zoemer-alarm automatisch
opnieuw ingesteld.
1. Druk en houd SNOOZE/POWER in totdat het LCD-scherm “oFF” aanduidt en de Stroom LED
uitgaat. De Alarmfunctie werkt alleen als het apparaat uitstaat (m.a.w. als de Stroom LED
uitstaat). Het zal niet werken als een iPod of de AUX IN wordt afgespeeld.
2. Druk en houd OMHOOG / vvI in voor ongeveer 2 seconden om het Alarm te activeren, het
Icoon voor de Alarminstelling “AL” licht dan op. Het ` `-icoon en de Alarmtijd verschijnen
gedurende 3 seconden.
3. Als iPod is aangesloten, zal “Wordt wakker door iPod” de standaard mode zijn. Het laatst
afgespeelde nummer zal worden afgespeeld wanneer de alarmtijd is bereikt.
4. Als iPod niet is aangesloten, zal “Wordt wakker door de Zoemer” de standaard mode zijn. De
zoemer zal klinken.
5. Druk en houd OMLAAG / Icc in voor ongeveer 2 seconden om de Alarminstelling te annuleren,
het “AL”-icoon verdwijnt.
1. Druk en houd SNOOZE/POWER in totdat het LCD-scherm “oFF” aanduidt en de Stroom LED
uitgaat.
2. Druk en houd ALARM in voor ongeveer 2 seconden. Het Alarm Aan-icoon ` ` verschijnt.
3. De UUR-cijfers zullen knipperen. Gebruik OMHOOG / vvI of OMLAAG / Icc om de uurtijd in te
stellen. Druk op ALARM ter bevestiging van het ingestelde uur.
4. Hierna zullen de MINUUT-cijfers knipperen. Gebruik OMHOOG / vvI of OMLAAG / Icc om de
minuuttijd in te stellen. Druk op ALARM ter bevestiging van de ingestelde minuten. Het ` `-
icoon verdwijnt.
5. Als tijdens welke fase dan ook geen toets gedurende 5 seconden (time-out periode) wordt
ingedrukt, wordt de laatst geselecteerde waarde automatisch opgeslagen.
6. Het kort indrukken van OMHOOG of OMLAAG zal het ` `-icoon en de Alarmtijd voor 2
seconden weergeven.
Alarm Gaat Af / Snooze / Herinstelling van het Alarm
Instelling van de Alarm
tijd
Beluisteren van iPod
1. Druk SNOOZE/POWER voor ongeveer 2 seconden in tot de Stroom LED aangaat.
2. Sluit de iPod aan op de Pinaansluiting.
Weergave van het LCD Backlight
Het indrukken van SNOOZE /POWER zet het LCD backlight (zwart licht) voor ongeveer 7
seconden aan.
Opladen van Uw iPod
1. Sluit de AC adapter aan op dit apparaat zoals vooraf is beschreven.
2. Sluit de iPod aan op de Pinaansluiting.
3. Zorg ervoor dat U de juiste Aansluitsteun voor Uw iPod gebruikt en dat deze correct is
aangesloten op dit apparaat. Het nalaten dit te doen kan schade aan Uw iPod veroorzaken.
4. De iPod wordt aangezet. Na een tijdje zal het automatisch in oplaadmode schakelen. Zorg
ervoor dat het oplaadsymbool aanstaat.
5. Wanneer Uw iPod is aangesloten, laadt het op (tot volledig opgeladen).
6. U kunt de inhoud van Uw iPod navigeren, selecteren en afspelen wanneer deze wordt
opgeladen.
Opmerking:
- Als U de iPod oplaadt in STOP-mode, is de oplaadtijd korter.
- Als U de iPod oplaadt in AFSPEEL-mode, is de oplaadtijd langer.
- Als U Video-inhoud op Uw Pod Video fspeelt, is er geen overschot aan stroom over om de
batterijen op te laden.
1, Druk SNOOZE/POWER voor ongeveer 2 seconden in tot de Stroom LED aangaat.
2. Steek het ene eind van het Aux Verbindingssnoer in het AUX IN Contact en het andere in de
Hoofdtelefoon Ingang van de iPod Shuffle, Mp3-speler, Discman of andere muziekbron.
3. U kunt alleen de bedieningen van het externe apparaat gebruiken om te navigeren, te selecteren of
de inhoud af te spelen.
4. U kunt het volumeniveau hoofdzakelijk aanpassen via de volumecontrole op het externe apparaat
en de knop voor de volumecontrole van dit apparaat als hulpcontrole te gebruiken.
Opmerking: Wanneer de AUX IN Ingang is verbonden, staat het uitgaande audiosignaal van de
iPod uit.
Beluisteren van AUX IN
Probleemoplossing / Herstarten van het apparaat.
In het geval dat dit apparaat hangt en niet reageert op enige toetsenbediening, koppel de iPod,
AUX IN apparaat en de AC Stroomadapter af en verwijder alle batterijen. Wacht voor 3 minuten
lang totdat alle overige stroom is uitgeput. Herplaats dan de batterijen, sluit de AC
Stroomadapter opnieuw aan en druk op SNOOZE/POWER om het apparaat weer aan te zetten.
3. Hierna zullen de MINUUT-cijfers knipperen. Gebruik OMHOOG / vvI of OMLAAG / Icc om de
minuuttijd in te stellen. Druk op INSTELLING ter bevestiging van de ingestelde minuuttijd.
4. Vervolgens zal de aanduiding voor de WEEKDAG knipperen. Gebruik OMHOOG / vvI of
OMLAAG / Icc om de gewenste weekdag (MON tot SUN (MA tot ZO) te selecteren en druk op
INSTELLING ter bevestiging van de ingestelde weekdag.
5. Als tijdens welke fase dan ook geen toets gedurende 5 seconden (time-out periode) wordt
ingedrukt, wordt de laatst geselecteerde waarde automatisch opgeslagen.
Alarminstell
ingsmode – Wordt wakker door i
Pod/W
ordt w
akker door d
e Zoem
er
3. Zorg ervoor dat U de juiste Aansluitsteun voor Uw iPod gebruikt en dat deze correct is
aangesloten op dit apparaat. Het nalaten dit te doen kan schade aan Uw iPod veroorzaken.
4. U kunt de bedieningen van de iPod gebruiken om te navigeren, te selecteren of de inhoud af te
spelen, of U kunt de toetsen op dit apparaat gebruiken om de iPod te bedienen.
5. Druk op INSTELLING/ VII om de muziek af te spelen of te pauzeren.
6. Druk op OMHOOG / vvI of OMLAAG / Icc om naar het volgende of voorafgaande nummer te
springen.
7. Druk en houd OMHOOG / vvI of OMLAAG / Iccin om binnen een nummer voorwaarts of
terugwaarts te springen.
8. Druk en houd INSTELLING / VII voor ongeveer 2 seconden in om de iPod uit te schakelen.
9. Draai de knop voor het volumecontrole aan de achterkant van dit apparaat om het volume aan
te passen.
Opmerking: Wanneer U Video-inhoud op Uw “iPod Video” afspeelt, zult U het draaiwiel van
de iPod en niet de toetsen op dit apparaat moeten gebruiken om het afspelen te bedienen.
Charging your iPod

Joignez-vous à la conversation sur ce produit
Ici, vous pouvez partager ce que vous pensez du Lenco IPD-3000 Station d’accueil. Si vous avez une question, lisez d’abord attentivement le mode d’emploi. La demande d’un mode d’emploi peut être effectuée en utilisant notre formulaire de contact.