USER MANUAL
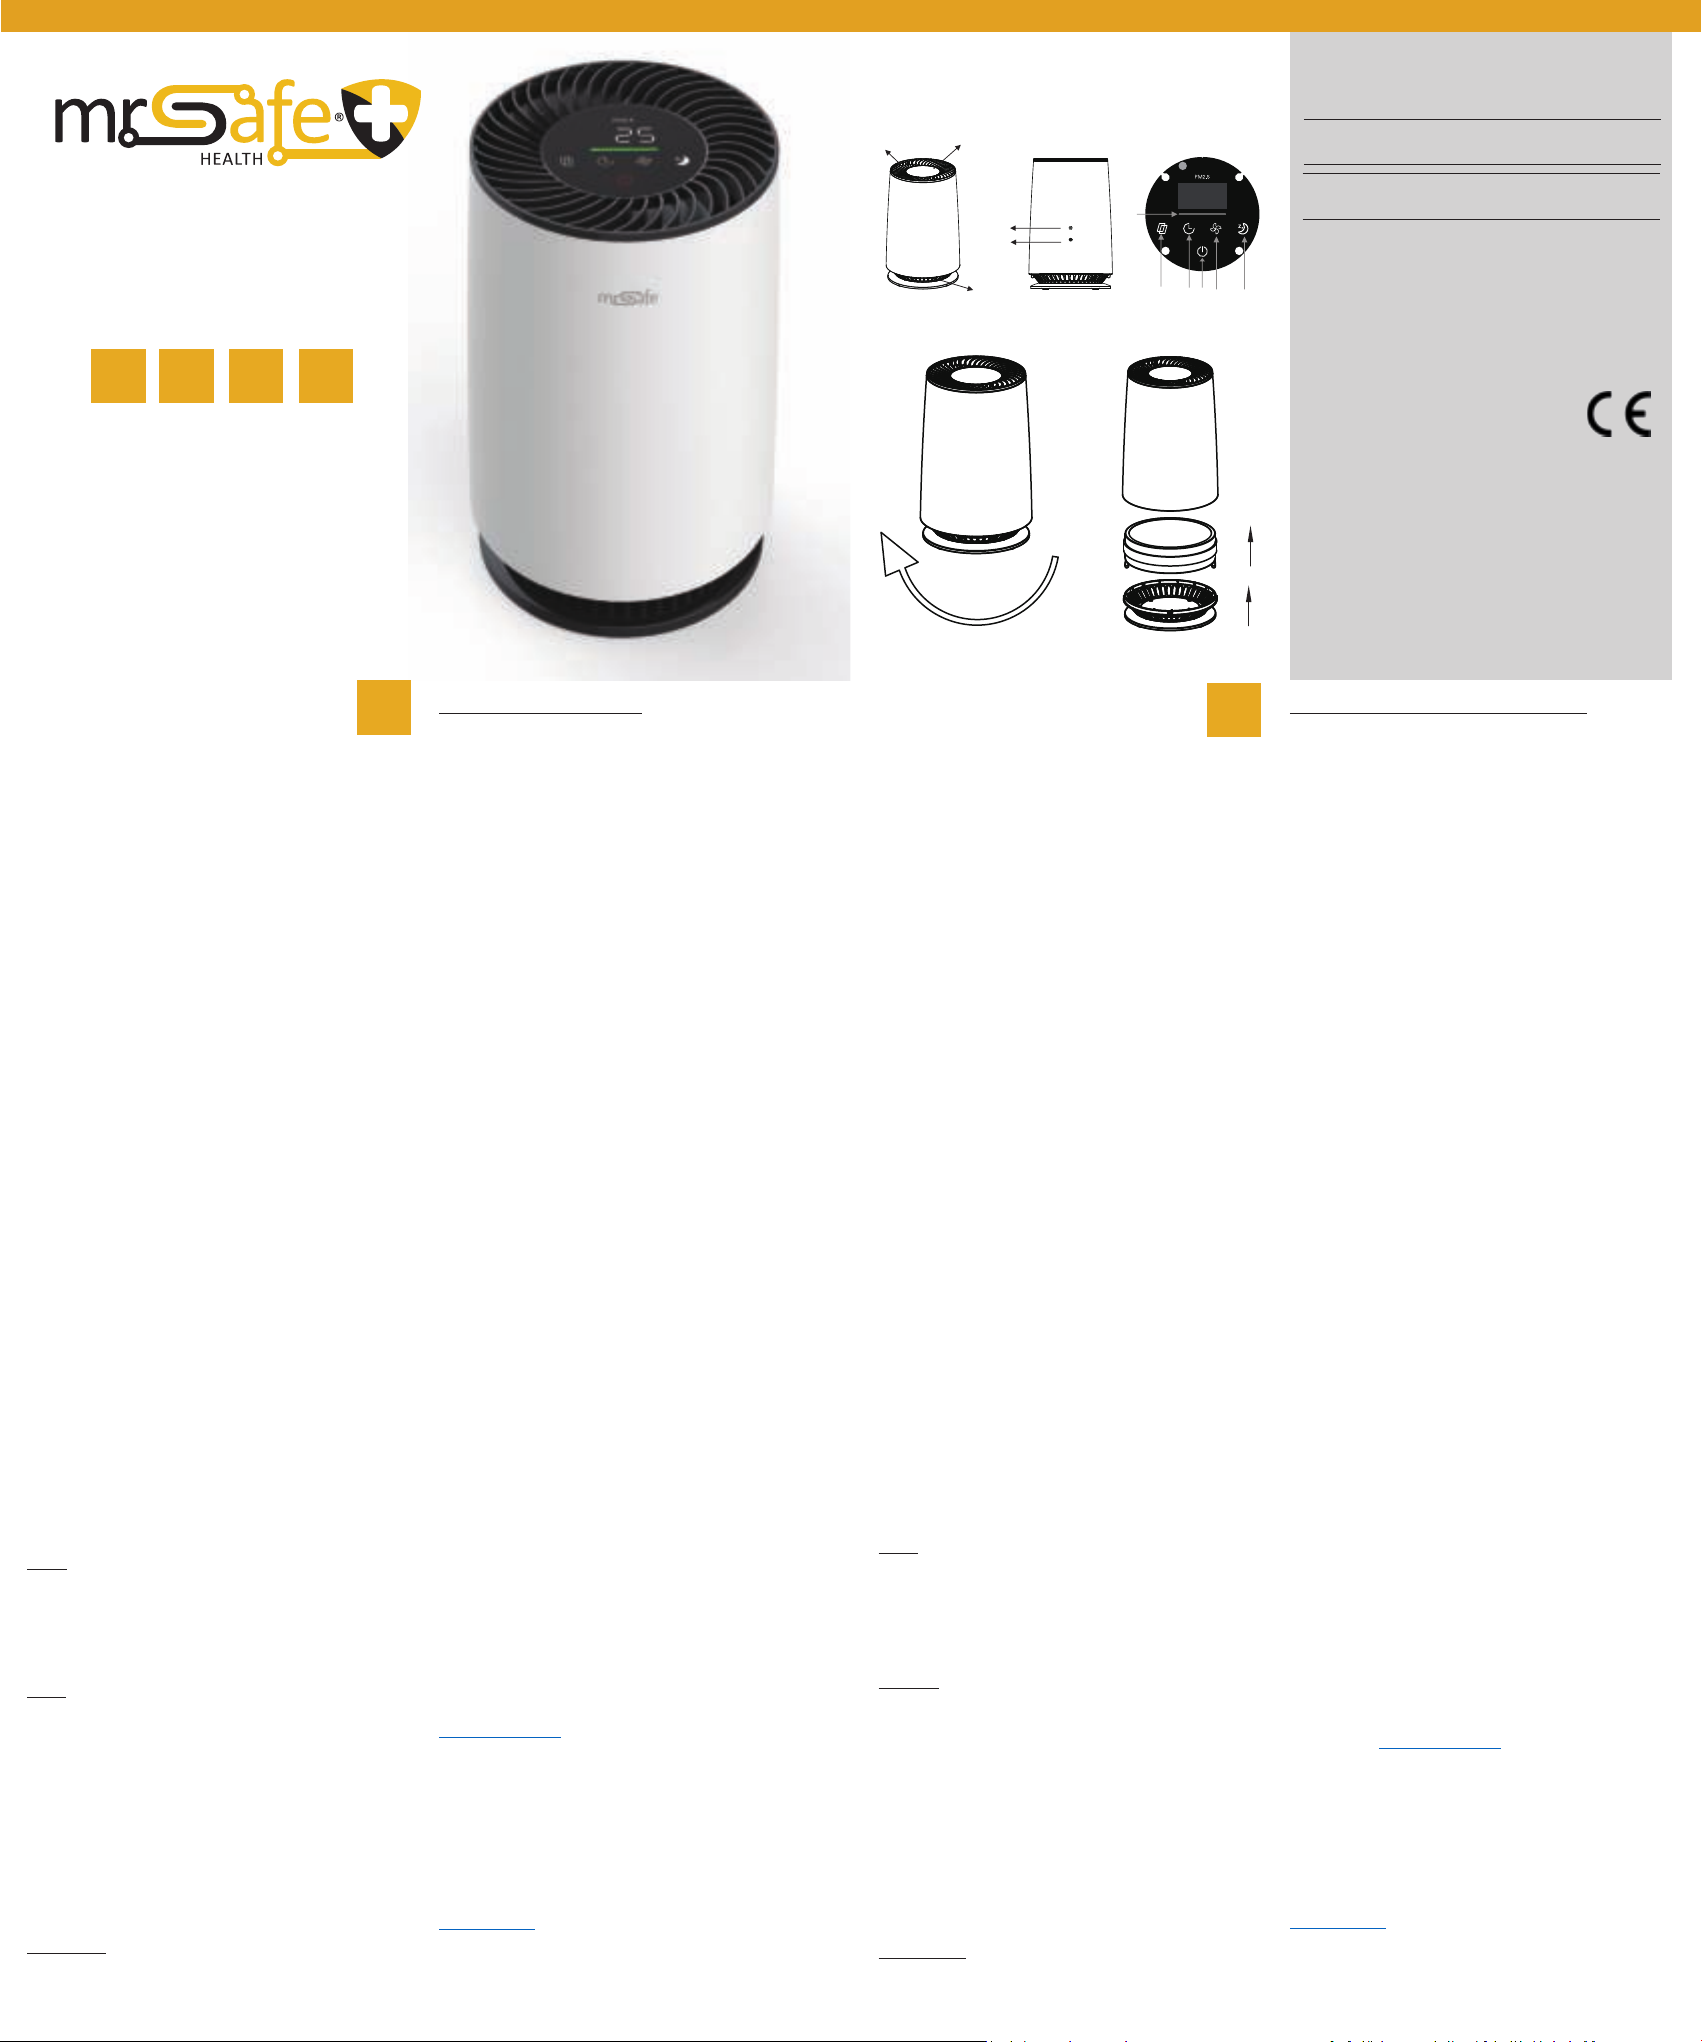
PARTS & FUNCTIONS
See illustraon I
1. Air outlet
2. Operaon panel
A. Air quality indicaon light
B. Filter replacement reminder
C. Timer buon
D. Power buon
E. Speed buon
F. Sleep buon
3. Sensor inlet
4. Power adapter socket
5. Air inlet
INSTALLATION
See illustraon II
The air purier has a lter installed.
To remove and replace the lter, please follow these steps:
1. Disassemble the base with the air inlet by rotang it
counter-clockwise.
2. Take out the lter from the inside of the air purier.
3. Take the replacement lter and remove the plasc bag.
4. Install the replacement lter without the plasc bag into
the air purier.
Note: The white straps of the lter shall face toward the base.
5. Assemble the base with the air inlet by rotang it clockwise.
Important:
• When replacing the lter, please turn o the power rst.
Do not operate with the lter removed (no dust removal
eect, and the dust that is inhaled may cause equipment
failure).
• Place the lter in a venlated place so that the harmful
gases and bacteria on the surface of the lter can be
volalized. Do not expose it to excessive sunlight.
• Do not wash the lter with water.
OPERATION
1. Aer plugging in the power, you will hear a sound and the
air purier enters standby mode. The Power buon (D) will
light red.
2. Press the Power buon (D) to start the air purier in
default automac operaon mode (see below for more
informaon). The air quality indicator (A) will light blue.
Aer the sensor is preheated, the air quality indicaon is
displayed and the air quality indicator (A) will light in the
color of the current air quality:
• Good quality: Green color
• Medium quality: Orange color
• Bad quality: Red color
TIMER
Press the Timer buon (C) to display a cycle of 1–8 hours on the
display and make your selecon. Wait for about 2 seconds ll
the hour seng stops blinking and disappears from the display.
The Timer buon indicaon light now shines bright to indicate
that the mer has been set. Long press for 2 seconds to cancel
the mer seng.
SPEED
Press the speed buon to change the working speed of the air
purier: A (automac) – 1 (low speed) – 2 (middle speed) – 3
(high speed). Press the speed buon for 3 seconds to acvate
turbo speed mode (4). The selected speed mode is shown on
the display.
When the air purier operates in automac mode the speed
will be adjusted automacally according to the amount of
parcles in the air. If the air quality sensor measures a value:
• between 1-50 (PM2.5 value) the green color will be
displayed and the unit will operate in low speed.
• between 51-100 (PM2.5 value) the orange color will be
displayed and the unit will operate in middle speed.
• between 101-500 (PM2.5 value) the red color will
be displayed and the unit will operate in high speed.
SLEEP MODE
Press the Sleep buon (F) to lower the brightness of the display
and turn o all other lights. The air purier now operates in
low noise mode. Press the buon again to exit the sleep mode.
FILTER REPLACEMENT REMINDER
When the lter replacement reminder (B) ashes, it means
that the HEPA + acvated carbon composite lter inside the air
purier needs to be replaced. Replace the lter as described
above and press and hold the lter replacement buon to
reset the lter replacement cycle. “0” is shown on the display,
followed by “000”.
Note:
• The digits appearing on the display when pressing the lter
replacement buon show the operaon me of the unit.
When the unit has been working for 75 hours for example
it shows “0” followed by “075”.
• Depending on the place and the method of use (for
example, households with a large number of smokers or
areas with severe air polluon), the lter replacement
cycle may be shortened. If the ltraon eect is not
obvious, replace the lter in me.
SAFETY INSTRUCTIONS
1. Do not place in the following places:
• In direct sunlight or facing the air outlet and heated
places.
• Close to devices such as TVs and radios (which may
cause image distoron and noise). Please place it at a
distance of 1m or more.
2. In order to eecvely circulate the air in the room, place
the product about 30 cm or more from the le and right
sides of the wall, furniture, curtains, etc.
3. Do not place objects on the unit.
4. Do not block the air inlet and outlet, for example, do not
place objects on the air outlet or in front of the air inlet. G
5. Do not pull on the power cord as it may cause a short
circuit or damage to the inside of the power cord, resulng
in re or electric shock.
6. Do not damage the power cord or plug, and do not cut,
excessively twist, pull, or twist the power cord. If the power
cord is damaged, it must be replaced by the manufacturer,
service department or a professional to avoid danger.
Non-professionals are prohibited from disassembling the
machine to avoid the risk of electric shock.
7. Do not use power supplies, universal sockets or connected
devices that exceed the rated value. Using a universal
outlet that exceeds the rated value or connecng the
power supply may cause the power cord to overheat and
cause a re.
8. Do not touch the power plug with wet hands, which may
result in electric shock.
9. Do not put your ngers or metal objects into the gap of the
air outlet, otherwise it may cause electric shock or injury.
Do not allow water, ammable detergents or other liquids
to enter the product to avoid electric shock or re.
10. Do not use this product in a wet or hot environment such
as a bathroom, toilet or kitchen
11. Do not use air puriers in indoors with incense-based
inseccides. Chemical residues may accumulate in the
machine and then be released from the air outlet to
endanger your health.
SUPPORT
For more informaon, spare parts, technical quesons and
return requests concerning this product, you should contact
support@mrsafe.eu.
GUARANTEE
Copyright © Mr Safe. Mr Safe® is a registered trademark of
TE-Group NV. The Mr Safe® brand stands for superior product
quality and outstanding customer service. That is why Mr
Safe® warrants this product against all defects in material
and workmanship for a period of two (2) years from the
date of original purchase of the product. The condions of
this guarantee and the extent of responsibility of Mr Safe®
under this guarantee can be downloaded from our website:
www.mrsafe.eu.
QRG / MrSafe Air purifier AP-200/ 07-21 / V01
Copyright©Mr Safe
DFR
NL
GB
AIR PURIFIER
AP-200
ILLUSTRATIONS DECLARATION OF CONFORMITY
GB
ONDERDELEN & FUNCTIES
Zie illustrae I
1. Luchtuitlaat
2. Bedieningspaneel
A. Indicaelampje luchtkwaliteit
B. Herinnering ltervervanging
C. Timer-toets
D. Aan/uit-toets
E. Snelheidstoets
F. Slaapmodus-toets
3. Sensorinlaat
4. Adapteraansluing
5. Luchnlaat
INSTALLATIE
Zie illustrae II
De luchtreiniger hee een geïntegreerde lter.
Volg deze stappen om de lter te verwijderen en te vervangen:
1. Demonteer de basis met de luchnlaat door deze tegen de
klok in te draaien.
2. Haal de lter uit de binnenkant van de luchtreiniger.
3. Neem de vervangende lter en verwijder de plasc zak.
4. Installeer de vervangende lter zonder de plasc zak in de
luchtreiniger.
Opmerking: De wie bandjes aan de lter moeten naar de
basis gericht zijn.
5. Monteer de basis met de luchnlaat door deze met de klok
mee te draaien.
Belangrijk:
• Schakel bij het vervangen van de lter eerst de stroom
uit. Gebruik het apparaat niet als de lter is verwijderd
(geen stofverwijderingseect en het ingeademde stof kan
storingen in de apparatuur veroorzaken).
• Plaats de lter op een gevenleerde plaats zodat de
schadelijke gassen en bacteriën op het oppervlak van het lter
kunnen vervliegen. Stel niet bloot aan overmag zonlicht.
• Was de lter niet met water.
WERKING
1. Nadat u de stroom hebt aangesloten, hoort u een geluid
en gaat de luchtreiniger in de stand-bymodus. De aan/uit-
toets (D) licht rood op.
2. Druk op de aan/uit-toets (D) om de luchtreiniger in de
standaard automasche modus te starten (zie hieronder
voor meer informae). De luchtkwaliteitsindicator (A)
licht blauw op. Nadat de sensor is voorverwarmd, wordt
de luchtkwaliteitsindicae weergegeven en licht de
luchtkwaliteitsindicator (A) op in de kleur van de huidige
luchtkwaliteit:
• Goede kwaliteit: Groene kleur
• Medium kwaliteit: Oranje kleur
• Slechte kwaliteit: rode kleur
TIMER
Druk op de Timer-toets (C) om een cyclus van 1-8 uur op het
display weer te geven en maak uw keuze. Wacht ongeveer 2
seconden totdat de uurinstelling stopt met knipperen en van het
display verdwijnt. Het indicaelampje van de Timer-toets brandt
nu helder om aan te geven dat de mer is ingesteld. Houd de
Timer-toets 2 seconden lang ingedrukt om de merinstelling te
annuleren.
SNELHEID
Druk op de snelheidstoets (E) om de werksnelheid van de
luchtreiniger te wijzigen: A (automasch) – 1 (lage snelheid) – 2
(gemiddelde snelheid) – 3 (hoge snelheid). Druk 3 seconden op
de snelheidstoets om de turbosnelheidsmodus (4) te acveren.
De geselecteerde snelheidsmodus wordt weergegeven op het
display.
Wanneer de luchtreiniger in de automasche modus werkt, wordt
de snelheid automasch aangepast aan de hoeveelheid deeltjes in
de lucht. Als de luchtkwaliteitssensor een waarde meet:
• tussen 1-50 (PM2.5-waarde) wordt de groene kleur
weergegeven en werkt het apparaat op lage snelheid.
• tussen 51-100 (PM2.5-waarde) wordt de oranje kleur
weergegeven en werkt het apparaat op gemiddelde
snelheid.
• tussen 101-500 (PM2.5-waarde) wordt de rode kleur
weergegeven en werkt het apparaat op hoge snelheid.
SLAAPMODUS
Druk op de Slaapmodus-toets (F) om de helderheid van het
scherm te verlagen en alle andere lichten uit te schakelen.
De luchtreiniger werkt nu in de geluidsarme modus. Druk
nogmaals op de toets om de slaapmodus te verlaten.
HERINNERING VOOR VERVANGEN VAN DE FILTER
Wanneer de herinnering voor het vervangen van het lter (B)
knippert, betekent dit dat de HEPA + aceve koolcomposieilter
in de luchtreiniger moet worden vervangen. Vervang de lter
zoals hierboven beschreven en houd de ltervervangingsknop
ingedrukt om de ltervervangingscyclus te reseen. Op het
display wordt “0” weergegeven, gevolgd door “000”.
Opmerking:
• De cijfers die op het display verschijnen wanneer u op de
ltervervangingsknop drukt, geven de bedrijfsjd van het
apparaat aan. Als het apparaat bijvoorbeeld 75 uur hee
gewerkt, wordt “0” weergegeven, gevolgd door “075”.
• Aankelijk van de plaats en de wijze van gebruik
(bijvoorbeeld huishoudens met veel rokers of ruimtes met
ernsge luchtvervuiling) kan de ltervervangingscyclus
worden verkort. Als het ltrae-eect niet duidelijk is,
vervang dan jdig de lter.
VEILIGHEIDSINSTRUCTIES
1. Niet op de volgende plaatsen plaatsen:
• In direct zonlicht of gericht naar de luchtuitlaat en
verwarmde plaatsen.
• Dichtbij toestellen zoals tv’s en radio’s (die
beeldvervorming en ruis kunnen veroorzaken). Plaats
het toestel op een afstand van 1 m of meer.
2. Om de lucht in de kamer eecef te laten circuleren,
plaatst u het product op een afstand van ongeveer 30
cm of meer van de linker- en rechterkant van de muur,
meubels, gordijnen, enz.
3. Plaats geen voorwerpen op het toestel.
4. Blokkeer de luchnlaat en -uitlaat niet, plaats bijvoorbeeld
geen voorwerpen op de luchtuitlaat of voor de luchnlaat.
5. Trek niet aan het netsnoer, aangezien dit kortsluing of
schade aan de binnenkant van het netsnoer kan veroorzaken,
wat kan leiden tot brand of elektrische schokken.
6. Beschadig het netsnoer of de stekker niet en snij,
draai, trek of draai het netsnoer niet. Als het netsnoer
beschadigd is, moet het worden vervangen door de
fabrikant, de serviceafdeling of een professional om
gevaar te voorkomen. Het is niet-professionals verboden
de machine te demonteren om het risico van elektrische
schokken te voorkomen.
7. Gebruik geen voedingen, universele stopcontacten
of aangesloten apparaten die de nominale waarde
overschrijden. Het gebruik van een universeel stopcontact
dat de nominale waarde overschrijdt of het aansluiten van
de voeding kan leiden tot oververhing van het netsnoer
en brand veroorzaken.
8. Raak de stekker niet aan met nae handen, dit kan leiden
tot een elektrische schok.
9. Steek uw vingers of metalen voorwerpen niet in de opening
van de luchtuitlaat, anders kan dit elektrische schokken
of letsel veroorzaken. Zorg ervoor dat er geen water,
ontvlambare reinigingsmiddelen of andere vloeistoen in
het product komen om elektrische schokken of brand te
voorkomen.
10. Gebruik dit product niet in een nae of warme omgeving
zoals een badkamer, toilet of keuken.
11. Gebruik geen luchtreinigers in ruimtes met insecciden op
basis van wierook. Chemische resten kunnen zich ophopen
in de machine en vervolgens vrijkomen uit de luchtuitlaat,
waardoor uw gezondheid in gevaar komt.
KLANTENONDERSTEUNING
Voor meer informae, technische vragen of retouraanvragen
met betrekking tot dit product dient u rechtstreeks contact op
te nemen met support@mrsafe.eu.
GARANTIE
Mr Safe is een gedeponeerd handelsmerk van TE-Group NV.
Het merk mr Safe staat voor producten van superieure kwaliteit
en een uitstekende klantenservice. Daarom garandeert mr
Safe dat dit product vrij is van materiaal- en fabricagefouten
gedurende een periode van twee (2) jaar na de oorspronkelijke
aankoopdatum van het product. De voorwaarden van deze
garane en de omvang van de verantwoordelijkheid van mr
Safe onder deze garane kunt u downloaden vanaf de website:
www.mrsafe.eu.
NL
1.
2.
3.
4.
5.
B. C. D. E. F.
A.
Illustraon I
Illustraon II
Company / Entreprise: TE-Group NV
Address: / Adresse: Kapelsestraat 61, 2950 Kapellen, Belgium
Product name / Nom du produit: AP-200
Product type / Type de produit: Air Purier
Conformity is guaranteed by the CE-symbol. The full text of the EU
declaraon of conformity is available at the following internet address:
hp://www.mrsafe.be/doc_ap-200.
La conformité est garane par le symbole CE. Le texte complet de la
déclaraon UE de conformité est disponible à l’adresse internet suivante:
hp://www.mrsafe.be/doc_ap-200.


Joignez-vous à la conversation sur ce produit
Ici, vous pouvez partager ce que vous pensez du Mr Safe AP-200 Purificateur d'air. Si vous avez une question, lisez d’abord attentivement le mode d’emploi. La demande d’un mode d’emploi peut être effectuée en utilisant notre formulaire de contact.