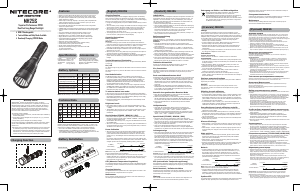
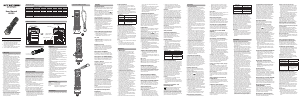
• 1,500 Meters Max Distance
• 4 Brightness Levels and 3 Special Modes
• Wireless Remote Switch Included
Next Generation 21700
Ultra Long Range Flashlight
Technical Data
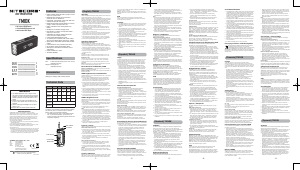
Charging Function
Operating Instructions
Features
Specications
Battery Options
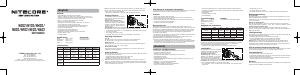
FL1
STANDARD
TURBO HIGH MID LOW STROBE BEACON SOS
1,500
Lumens
500
Lumens
150
Lumens
18
Lumens
1,500
Lumens
1,500
Lumens
1,500
Lumens
3h 15min 7h 15min 25h 105h ─ ─ ─
1,500m 860m 450m 150m ─ ─ ─
570,000cd 186,000cd 51,000cd 5,800cd ─ ─ ─
1m (Impact Resistance)
IP68, 2m (Waterproof and Submersible)
Note: The stated data is measured in accordance with the international
ashlight testing standards ANSI/PLATO FL 1-2019, using 2 x 21700 Li-ion
battery (5,000mAh) under laboratory conditions. The data may vary in real
world use due to dierent battery types or environmental conditions.
Type
Nominal
Voltage
Compatibility
21700
Rechargeable
Li-ion Battery
21700 3.6V/3.7V Y (Recommended)
18650
Rechargeable
Li-ion Battery
18650 3.6V/3.7V N (Incompatible)
Primary Lithium
Battery*
CR123 3V N (Incompatible)
Rechargeable
Li-ion Battery*
RCR123 3.6V/3.7V N (Incompatible)
(English) MH40S (Deutsch) MH40S
(Francais)
MH40S
Charging Function
The MH40S is equipped with an intelligent charging system. As illustrated, after
inserting the batteries and tightening the tail cap, pull out the rubber cover and
use the USB cable to connect an external power supply (e.g. a USB adapter or
other USB charging devices) to the charging port. Then press the Tail Switch to
begin the charging process.
• During the charging process, the power indicator beneath the Mode Button
will ash slowly to inform the user.
• When a problem is detected during the charging process (the ashlight is
o / the batteries are damaged / the battery type is wrong), the MH40S will
automatically cease the charging process and the power indicator will be o
or ash quickly to inform the user.
• When the batteries are fully charged, the MH40S will cease the charging
process and the power indicator will become steadily turned on to inform
the user.
• When the light is on, connecting to a power source will automatically turn
the light o. The light will automatically turn on when it is disconnected
from the power source.
• The charging time for two 21700 Li-ion batteries (5,000mAh) is approx. 2
hours 45 minutes. (Charged via the 12V/1.5A QC adapter)
Note:
1. The Tail Switch must be turned on during the charging process.
2. DO NOT charge batteries of other types or brands.
Operating Instructions
Battery Installation / Removal
As illustrated, after unscrewing the battery cap, insert / remove the batteries
and screw to tighten the battery cap.
Warnings:
1. Ensure the batteries are inserted with the positive end towards the head.
The product will not work if the batteries are incorrectly inserted.
2. CAUTION! Possible dangerous radiation! Don't look into the light! May be
dangerous for your eyes.
3. When the power level is low, please stop using the product and replace or
recharge the batteries to prevent damage to the batteries.
4. When the product is kept in a backpack or left unused for prolonged time,
please remove all batteries to prevent accidental activation or battery
leakage.
Tactical Momentary Illumination
When the light is o, half press and hold the Tail Switch to turn on the light
momentarily. Release to turn it o.
On / Off
On: When the light is o, press the Tail Switch until a click sound is heard to
turn it on.
O: When the light is on, press the Tail Switch until a click sound is heard to
turn it o.
(The MH40S has a memory function. When reactivated, the ashlight will
automatically access the previous memorized brightness level or STROBE
Mode.)
Brightness Levels
When the light is on, short press the Mode Button to cycle through the following
brightness levels: LOW – MID – HIGH – TURBO.
Special Modes (STROBE / BEACON / SOS)
When the light is on, keep holding the Mode Button to cycle through the
following special modes: STROBE – BEACON – SOS. Release to select the
desired special mode. Short press the Mode Button to return to the previous
status; or press the Tail Switch to turn o the light.
Wireless Remote Switch
The MH40S is equipped with a specialized Wireless Remote Switch, which
enables it to be controlled wirelessly. After pairing, the buttons on the Wireless
Remote Switch have the same functions as those on the ashlight. The pairing
is preset in the factory.
• The Wireless Remote Switch is powered by 1 x 3V CR1632 button cell
battery which enables approx. 4,000 presses. The standby time is approx.
12 months for a new battery.
• The maximum signal range between the ashlight and the Wireless Remote
Switch is 1m (39.37") when there are no obstacles blocking the path.
• To replace the button cell battery, remove the battery cap of the Wireless
Remote Switch with a ngernail or a key.
Please follow the steps below if you need to re-pair the Wireless Remote Switch
with the ashlight.
1. After inserting the batteries and tightening the tail cap, short press the Tail
Switch while holding the Mode Button for 5 seconds, the light will ash
quickly to indicate the access to the pair pending status.
2. When the ashlight accesses the pair pending status, press both Button A
and Button B of the Wireless Remote Switch until the ashlight becomes
steadily turned on.
Note:
1. If the ashlight is turned on after accessing the pair pending status, it will
automatically exit the status.
2. Make sure the distance between the ashlight and the Wireless Remote
Switch is within 1m during the pairing process.
3. Replace or recharge the batteries when the battery power of the ashlight is
low. Changing batteries does not remove the pairing between the ashlight
and the Wireless Remote Switch.
On / Off
Only when the MH40S is turned on can it be connected and controlled with the
Wireless Remote Switch.
On: When the light is o, full press the Button A to turn it on.
O: When the light is on, full press the Button A to turn it o.
Note: When the light is o, the power indicator beneath the Mode Button will
ash every 5 seconds to inform the user that the Wireless Remote Switch has
been paired with the ashlight. If there is no operation in 2 hours, the Wireless
Remote Switch will automatically disconnect from the ashlight.
Brightness Level Adjustment
When the light is on, half press the Button A to cycle through the following
brightness levels: LOW – MID – HIGH – TURBO.
Accessing TURBO Mode
When the light is on, press and hold the Button B to access TURBO. Release to
return to the previous status.
Accessing Special Modes
When the light is on, half press and hold the Button A to access STROBE. Then
half press the Button A to cycle through the following special modes: STROBE –
BEACON – SOS.
WARNING
THIS PRODUCT CONTAINS A BUTTON BATTERY
If swallowed, a lithium button battery can cause severe or fatal injuries within
2 hours.
Keep batteries out of reach of children.
If you think batteries may have been swallowed or placed inside any part of
the body, seek immediate medical attention.
Power Indication
• When the light is o, press the Tail Switch while holding the Mode Button
and then quickly release both buttons to access Power Indication. The power
indicator beneath the Mode Button will ash to show the remaining battery
power. Once the ashing stops, the ashlight will turn on.
• Flashing 3 times indicates that the power is no less than 50%.
• Flashing 2 times indicates that the power is below 50%.
• Flashing 1 time indicates that the power is below 25%.
Low Power Vibration Indication
When the light is on and the remaining power is below 10%, the MH40S will
vibrate every 10 seconds to inform the user.
ATR (Advanced Temperature Regulation)
The integrated ATR technology regulates the output of the MH40S according
to the working condition and ambient environment to maintain the optimal
performance.
Changing Batteries
The batteries should be replaced when the output appears to be dim or the
ashlight becomes unresponsive due to low power.
Maintenance
Every 6 months, threads should be wiped with a clean cloth followed by a thin
coating of silicon-based lubricant.
Ladefunktion
Die MH40S ist mit einem intelligenten Ladesystem ausgestattet. Önen Sie - wie
in der Abbildung gezeigt - nach dem Einlegen der Akkus und dem Festziehen
der Heckkappe die Gummiabdeckung. Verbinden Sie den Ladeanschluss der
MH40S mittels USB-Kabel mit einer externen Stromversorgung (z. B. einen USB-
Adapter oder andere USB-Ladegeräte). Drücken Sie dann den Heckschalter, um
den Ladevorgang zu starten.
• Während des Ladevorgangs blinkt die Betriebsanzeige unter der Mode-Taste
langsam.
• Wenn während des Ladevorgangs ein Problem festgestellt wird (die
Taschen lampe ist ausgeschaltet / die Akkus sind beschädigt / der Akkutyp
ist falsch), unterbricht die MH40S automatisch den Lade vorgang und die
Betriebsanzeige ist ausgeschaltet oder blinkt schnell.
• Wenn die Akkus vollständig aufgeladen sind, unterbricht die MH40S den
Ladevorgang und die Betriebsanzeige leuchtet stetig.
• Wenn die Lampe eingeschaltet ist, schaltet sie sich automatisch aus, wenn
sie an eine Stromquelle angeschlossen wird. Die Lampe schaltet sich
automatisch wieder ein, wenn sie von der Stromquelle getrennt wird.
• Die Ladezeit für zwei 21700 Li-Ionen-Akkus (5000mAh) beträgt ca. 2
Stunden und 45 Minuten (Auadung über einen 12V/1,5A QC-Adapter).
HINWEIS:
1. Die MH40S muss eingeschaltet sein, um den Ladevorgang zu starten.
(Heckschalter)
2. Laden Sie KEINE Akkus verschiedener Typen oder Marken zusammen auf.
Bedienungsanleitung:
Einsetzen / Entnehmen der Akkus
Nach dem Abschrauben der Heckkappe - wie dargestellt -
setzen Sie die Akkus ein oder entnehmen Sie diese und drehen Sie dann die
Heckkappe wieder fest.
HINWEIS:
Vor dem Einlegen der Batterien bitte den Silikat-Beutel entnehmen!
WARNUNG:
1. Legen Sie die Batterien mit dem positiven (+) Ende in Richtung des
Lampenkopfes ein.Mit falsch eingesetzten Akkus wird die MH40S nicht
funktionieren!
2. ACHTUNG! Gefährliche Strahlung möglich! Blicken Sie NIEMALS direkt in den
Lichtstrahl! Dies kann gefährlich für Ihre Augen sein!
3. Wenn der Strompegel niedrig ist, beenden Sie die Nutzung der Lampe und
tauschen Sie die Akkus aus oder laden Sie sie diese auf, um Schäden an den
ihnen zu vermeiden.
4. Wenn Sie die Taschenlampe in einem Rucksack aufbewahren oder für
längere Zeit nicht benutzten, entfernen Sie bitte alle Akkus, um eine
versehentliche Aktivierung der Lampe oder ein Auslaufen der Akkus zu
vermeiden.
Taktische Moment-Beleuchtung
Wenn das Licht ausgeschaltet ist, halten Sie den Heckschalter halb gedrückt,
um das Licht kurzzeitig einzuschalten. Loslassen, um es auszuschalten.
Ein - / Ausschalten
Einschalten: Wenn das Licht aus ist, drücken Sie den Heckschalter, bis ein
"Klick" zu hören ist.
Ausschalten: Wenn das Licht an ist, drücken Sie den Heckschalter erneut, bis
ein "Klick" zu hören ist.
(Die MH40S verfügt über eine Speicherfunktion. Wenn sie wieder aktiviert wird,
greift die Lampe automatisch auf die zuvor gespeicherte Helligkeitsstufe oder
den STROBE-Modus zu).
Helligkeitsstufen
Wenn die Lampe eingeschaltet ist, drücken Sie kurz auf die Mode-Taste, um
zwischen den folgenden Helligkeitsstufen zu wechseln: "LOW" - "MID" - "HIGH"
- "TURBO".
Sondermodi (STROBE / BEACON / SOS)
Wenn das Licht eingeschaltet ist, halten Sie die Mode-Taste gedrückt, um
zwischen den folgenden Sondermodi zu wechseln: „STROBE“ – „BEACON“
– „SOS“. Lassen Sie die Taste los, um den gewünschten Spezial-Mode
auszuwählen. Drücken Sie kurz die Mode-Taste, um zum vorherigen Status
zurückzukehren, oder drücken Sie den Heckschalter, um das Licht auszuschalten.
Der drahtlose Fernbedienungsschalter
Die MH40S ist mit einem speziellen drahtlosen Fernbedienungsschalter
ausgestattet, mit dem sie kabellos gesteuert werden kann. Nach dem Pairing
haben die Tasten des Wireless Remote Switches die gleichen Funktionen wie die
der Taschenlampe. Das Pairing wurde bereits vor der Verpackung voreingestellt.
• Der Wireless Remote Switch wird mit 1 x 3V CR1632 Knopfzellenbatterie
betrieben, die ca. 4000 Betätigungen ermöglicht. Die Standby-Zeit beträgt
ca. 12 Monate, wenn die Batterie mit voller Leistung eingelegt wurde.
• Wenn keine Hindernisse den Weg zwischen der Taschenlampe und dem
drahtlosen Fernschalter versperren, beträgt die eektive Reichweite 1 m.
• Wenn die Knopfzellenbatterie ausgetauscht werden muss, önen Sie bitte
die Batterieabdeckung des drahtlosen Fernbedienungsschalters mit dem
Fingernagel oder einem Schlüssel und nehmen Sie die Batterie heraus.
Wenn Sie den drahtlosen Fernbedienungsschalter erneut mit der Taschenlampe
koppeln möchten, befolgen Sie bitte die nachstehenden Schritte.
1. Nach dem Einlegen der Batterien und dem Festziehen der Endkappe drücken
Sie kurz auf den Endschalter, während Sie die Mode-Taste 5 Sekunden lang
gedrückt halten; das Licht blinkt schnell, um den Zugri auf den Status der
Kopplung anzuzeigen.
2. Wenn die Taschenlampe den Koppelungs-Status erreicht, drücken Sie
sowohl die Taste A als auch die Taste B des drahtlosen Fernschalters, bis die
Taschenlampe dauerhaft eingeschaltet ist.
Hinweis:
1. Wenn die Taschenlampe nach dem Zugri auf den Status "Koppelung
ausstehend" eingeschaltet wird, verlässt sie diesen Status automatisch.
2. Achten Sie darauf, dass der Abstand zwischen der Taschenlampe und dem
drahtlosen Fernbedienungsschalter während des Kopplungsvorgangs nicht
mehr als 1 m beträgt.
3. Wenn der Batteriestand der Taschenlampe niedrig ist, wechseln Sie bitte
die Akkus oder laden Sie sie auf. Nach dem Akkuwechsel müssen Sie die
Taschenlampe nicht mehr mit dem drahtlosen Fernbedienungsschalter
koppeln.
Ein / Aus
Nur wenn die MH40S eingeschaltet ist, kann sie mit dem drahtlosen
Fernbedienungsschalter verbunden und gesteuert werden.
Einschalten: Wenn die Lampe ausgeschaltet ist, drücken Sie die Taste A ganz
durch, um sie einzuschalten.
Ausschalten: Wenn das Licht eingeschaltet ist, drücken Sie die Taste A ganz
durch, um es auszuschalten.
Hinweis: Wenn das Licht ausgeschaltet ist, blinkt die Betriebsanzeige unter
der Mode-Taste alle 5 Sekunden, um den Benutzer zu informieren, dass der
drahtlose Fernbedienungsschalter mit der Taschenlampe gekoppelt wurde.
Wenn innerhalb von 2 Stunden keine Betätigung erfolgt, wird der drahtlose
Fernbedienungsschalter automatisch von der Taschenlampe abgekoppelt.
Einstellen der Helligkeitsstufe
Wenn die Lampe eingeschaltet ist, drücken Sie die Taste A halb, um zwischen
den folgenden Helligkeitsstufen zu wechseln: „LOW“ – „MID“ – „HIGH“ –
„TURBO“.
Aufrufen des TURBO-Modus
Halten Sie bei eingeschaltetem Licht die Taste B gedrückt, um den
TURBO-Modus aufzurufen. Lassen Sie sie los, um zum vorherigen Status
zurückzukehren.
Zugriff auf die Spezial-Modi
Wenn das Licht leuchtet, halten Sie die Taste A halb gedrückt, um auf „STROBE“
zuzugreifen. Drücken Sie dann die Taste A halb, um zwischen den folgenden
Sondermodi zu wechseln: „STROBE“ – „BEACON“ – „SOS“.
WARNUNG
DIESES PRODUKT ENTHÄLT EINE KNOPFBATTERIE
Eine Lithium-Knopfbatterie kann beim Verschlucken innerhalb von 2 Stunden
zu schweren oder tödlichen Verletzungen führen.
Bewahren Sie Batterien außerhalb der Reichweite von Kindern auf.
Wenn Sie glauben, dass Batterien verschluckt wurden oder sich in einem
Körperteil benden, suchen Sie sofort einen Arzt auf.
Energieanzeige
• Wenn das Licht aus ist, drücken Sie den Heckschalter, während Sie die
Mode-Taste gedrückt halten, und lassen Sie dann beide Tasten schnell los,
um auf die Energieanzeige zuzugreifen. Die Energieanzeige unter der Mode-
Taste blinkt, um die verbleibende Batterieleistung anzuzeigen. Sobald das
Blinken aufhört, schaltet sich die Taschenlampe ein.
• Dreimaliges Blinken zeigt an, dass die Batterieleistung mindestens 50 %
beträgt.
• Zweimaliges Blinken zeigt an, dass die Leistung unter 50 % liegt.
• 1-maliges Blinken zeigt an, dass die Leistung unter 25 % liegt.
Vibrationsanzeige bei niedriger Leistung
Wenn das Licht leuchtet und die verbleibende Leistung unter 10 % liegt, vibriert
der MH40S alle 10 Sekunden, um den Benutzer zu informieren.
ATR (Erweiterte Temperaturregulierung)
Die integrierte ATR-Technologie regelt die Leistung des MH40S entsprechend
den Arbeitsbedingungen und der Umgebung, um eine optimale Leistung zu
gewährleisten.
Auswechseln der Akkus
Die Akkus sollten ausgetauscht oder geladen werden, wenn die Leuchtkraft
nachlässt oder die Taschenlampe nicht mehr reagiert, weil sie zu schwach ist.
Wartung
Alle 6 Monate sollte das Gewinde mit einem sauberen Tuch abgewischt und
anschließend mit einer dünnen Schicht Silikonfett geschmiert werden.
Entsorgung von Elektro- und Elektronikgeräten
Die durchgestrichene Mülltonne bedeutet, dass Sie gesetzlich
verpichtet sind, diese Geräte einer vom unsortierten Siedlungsabfall
getrennten Erfassung zuzuführen. Die Entsorgung über die
Restmülltonne oder die gelbe Tonne ist untersagt. Enthalten die
Produkte Batterien oder Akkus, die nicht fest verbaut sind, müssen diese vor
der Entsorgung entnommen und getrennt als Batterie entsorgt werden.
Fonction de charge
La MH40S est équipée d’un système de charge intelligent. Comme illustré, après
avoir inséré les accus et resserré le capuchon arrière, retirez la protection en
caoutchouc et utilisez le câble USB pour connecter une alimentation externe
(par exemple, un adaptateur USB ou d’autres dispositifs de charge USB) au
port de charge. Appuyez ensuite sur l’interrupteur de queue pour commencer le
processus de charge.
• Pendant le processus de charge, l’indicateur d’alimentation sous le bouton
Mode clignote lentement pour informer l’utilisateur.
• Lorsqu’un problème est détecté pendant le processus de charge (la lampe
est éteinte / les batteries sont endommagées / le type de batterie est
incompatible), la MH40S cessera automatiquement le processus de charge
et l’indicateur d’alimentation sera éteint ou clignotera rapidement pour
informer l’utilisateur.
• Lorsque les batteries sont complètement chargées, la MH40S cessera le
processus de charge et l’indicateur d’alimentation s’allumera régulièrement
pour informer l’utilisateur.
• Lorsque la lumière est allumée, la connexion à une source d’alimentation
éteindra automatiquement la lumière. La lumière s’allume automatiquement
lorsqu’elle est déconnectée de la source d’alimentation.
• Le temps de charge de deux batteries Li-ion 21700 (5000 mAh) est d’environ
2 heures 45 minutes. (Chargé via l’adaptateur QC 12V/1.5A)
Note:
1. L’interrupteur arrière doit être allumé pendant le processus de charge.
2. NE CHARGEZ PAS les batteries d’autres formats que 21700 ou d’autres
marques que Nitecore.
MODE D’EMPLOI
Installation / retrait de la batterie
Comme illustré, après avoir dévissé le bouchon de la batterie, insérez / retirez
les accus et vissez pour serrer le capuchon de la batterie.
Avertissements:
1. Assurez-vous que les accus sont insérés avec l’extrémité positive vers la
tête. Le produit ne fonctionnera pas si les batteries sont mal insérées.
2. ATTENTION ! Radiations dangereuses possibles ! Ne regardez pas
directement dans le faisceau ! Peut être dangereux pour vos yeux.
3. Lorsque le niveau de puissance est faible, veuillez cesser d’utiliser le produit
et remplacer ou recharger les batteries pour éviter d’endommager les
batteries.
4. Lorsque le produit est conservé dans un sac à dos ou laissé inutilisé pendant
une période prolongée, veuillez retirer toutes les piles pour éviter une
activation accidentelle ou une fuite de batterie.
Eclairage tactique momentané
Lorsque la lumière est éteinte, appuyez à moitié sur l’interrupteur arrière et
maintenez-le enfoncé pour allumer la lumière momentanément. Relâchez pour
l’éteindre.
On / Off
ON : Lorsque la lumière est éteinte, appuyez sur l’interrupteur arrière jusqu’à ce
qu’un bruit de clic se fasse entendre pour l’allumer.
OFF : Lorsque la lumière est allumée, appuyez sur l’interrupteur arrière jusqu’à
ce qu’un bruit de clic se fasse entendre pour l’éteindre.
(La MH40S possède une fonction mémoire. Lorsqu’elle est réactivée, la lampe
accède automatiquement au niveau de luminosité mémorisé précédent ou au
mode STROBE.)
Niveau de luminosité
Quand la lampe est allumée, un appui court sur le bouton mode pour naviguer
entre les niveaux : Bas - moyen - haut - turbo.
Modes spéciaux (STROBE / BALISE / SOS)
Lorsque la lumière est allumée, appuyez brièvement sur le bouton Mode pour
parcourir les niveaux de luminosité suivants : BAS – INTERMEDIAIRE – HAUT –
TURBO.
Commutateur à distance sans fil
La MH40S est équipée d’un commutateur sans l, qui lui permet d’être contrôlé
à distance. Après le couplage, les boutons du commutateur à distance sans l
ont les mêmes fonctions que ceux de la lampe de poche. L’appairage est déjà
préréglé en usine avant l’emballage.
• Le commutateur à distance sans l est alimenté par 1 pile bouton CR1632
de 3 V qui permet d’eectuer environ 4 000 pressions. Le temps de veille est
d’environ 12 mois si la batterie est insérée à pleine puissance.
• Lorsque rien ne bloque le chemin entre la lampe de poche et le commutateur
à distance sans l, la portée de contrôle eective est de 1 mètre.
• Lorsque la pile bouton doit être remplacée, veuillez découvrir le capuchon de
la pile du commutateur à distance sans l avec l’ongle ou la clé, puis retirez
la batterie.
Veuillez suivre les étapes ci-dessous si vous devez jumeler à nouveau le
commutateur à distance sans l avec la lampe de poche.
1. Après avoir inséré les piles et resserré le capuchon arrière, appuyez
brièvement sur le commutateur de queue tout en maintenant le bouton
mode enfoncé pendant 5 secondes, le voyant clignotera rapidement pour
indiquer l’accès à la paire en attente d’état.
2. Lorsque la lampe de poche accède à l’état en attente d’appairage, appuyez
sur les boutons A et B du commutateur à dis-tance sans l jusqu’à ce que la
lampe de poche s’allume régulièrement.
Note:
1. Si la lampe de poche est allumée après avoir accédé à l’état en attente de la
paire, elle quittera automatiquement l’état.
2. Assurez-vous que la distance entre la lampe de poche et le commutateur à
distance sans l est inférieure à 1m pendant le processus de couplage.
3. Lorsque la puissance de la batterie de la lampe de poche est faible, veuillez
remplacer ou recharger les piles. Après avoir changé les piles, vous n’avez
plus besoin de coupler la lampe avec le commutateur à distance sans l.
On / Off
Ce n’est que lorsque la MH40S est allumée qu’il peut être connecté et contrôlé
avec le commutateur à distance sans l.
ON : Lorsque le voyant est éteint, appuyez à fond sur le bouton A pour l’allumer.
OFF : Lorsque le voyant est allumé, appuyez à fond sur le bouton A pour
l’éteindre.
Remarque: Lorsque le voyant est éteint, l’indicateur d’alimentation sous le
bouton Mode clignote toutes les 5 secondes pour informer l’utilisateur que le
commutateur à distance sans l a été couplé à la lampe de poche. S’il n’y a pas
de fonctionnement dans les 2 heures, le commutateur à distance sans l se
déconnectera automatiquement de la lampe de poche.
Réglage du niveau de luminosité
Lorsque la lumière est allumée, appuyez à moitié sur le bouton A pour parcourir
les niveaux de luminosité suivants : BAS – INTERMEDIAIRE – HAUT – TURBO.
Accès au mode TURBO
Lorsque le voyant est allumé, maintenez enfoncé le bouton B pour accéder à
TURBO. Relâchez pour revenir à l’état précédent.
Accès aux modes spéciaux
Lorsque le voyant est allumé, appuyez à moitié sur le bouton A et maintenez-le
enfoncé pour accéder à STROBE. Appuyez ensuite à moitié sur le bouton A pour
parcourir les modes spéciaux suivants : STROBE – BALISE – SOS.
AVERTISSEMENT
CE PRODUIT CONTIENT UNE PILE BOUTON
En cas d’ingestion, une pile bouton au lithium peut causer des blessures
graves ou mortelles dans les 2 heures.
Gardez les piles hors de portée des enfants.
Si vous pensez que les piles ont pu être avalées ou placées à l’intérieur d’une
partie du corps, consultez immédiatement un médecin.
Indication de puissance
• Lorsque le voyant est éteint, appuyez sur l’interrupteur arrière tout en
maintenant le bouton MODE enfoncé, puis relâchez rapidement les deux
boutons pour accéder à l’indication d’alimentation. L’indicateur d’alimentation
sous le bouton MODE clignote pour acher la puissance restante de la
batterie. Une fois que le clignotement s’arrête, la lampe s’allume.
• Clignoter 3 fois indique que la puissance est supérieure à 50%.
• Clignoter 2 fois indique que la puissance est inférieure à 50%.
• Clignoter 1 fois indique que la puissance est inférieure à 25%.
Indication de vibration de faible puissance
Lorsque la lumière est allumée et que la puissance restante est inférieure à
10%, la MH40S vibre toutes les 10 secondes pour informer l’utilisateur.
ATR (Advanced Temperature Regulation)
La technologie ATR intégrée régule la sortie de la MH40S en fonction des
conditions de travail et de l’environnement ambiant pour maintenir les
performances optimales.
Changer les batteries
Les batteries doivent être remplacées lorsque la sortie semble faible ou que la
lampe de poche ne répond plus en raison d’une faible puissance.
Entretien
Tous les 6 mois, les ls doivent être essuyés avec un chion propre suivi d’un
mince revêtement de lubriant à base de silicium.
(Русский) MH40S
Функция зарядки
MH40S оснащен интеллектуальной схемой зарядки. После установки
аккумулятора и закручивания задней крышки снимите резиновую крышку
и подключите к фонарю USB-кабель, как показано на иллюстрации,
для подсоединения его к внешнему источнику питания (USB-адаптеру
или другому устройству с USB-входом для зарядки). внешний источник
питания (например, USB-адаптер или другое USB-устройство для зарядки)
к зарядному порту. Затем нажмите на задний переключатель, чтобы
началась зарядка.
• Во время зарядки индикатор питания под кнопкой режима будет
медленно мигать, сообщая об этом таким образом пользователю.
• При обнаружении проблемы в процессе зарядки (выключенный фонарик
/ повреждение аккумуляторов / несоответствующий тип аккумулятора)
MH40S автоматически остановит зарядку, а индикатор питания погаснет
или быстро замигает, информируя таким образом пользователя о
возникшей проблеме.
• Когда аккумуляторы будут полностью заряжены, MH40S остановит
зарядку и индикатор питания начнет беспрерывно гореть, информируя
таким образом об этом пользователя.
• Если работающий фонарик подключить к источнику питания свет
автоматически выключится. Фонарь снова загорится, как только его
отсоединят от источника питания.
• Время зарядки двух литий-ионных аккумуляторов 21700 (5000 мАч)
составляет приблизительно 2 часа 45 минут. (При заряде через адаптер
QC 12 В / 1,5 А)
Примечание:
1. Задний переключатель должен быть включен во время зарядки.
2. НЕ заряжайте аккумуляторы других типов и марок.
Инструкции по эксплуатации
Установка / извлечение аккумуляторов
Втавьте / извлеките аккумуляторы, открутив крышку батарейного отсека,
как показано на иллюстрации, и затем закрутите ее обратно.
Внимание
1. Устанавливайте аккумуляторы положительным зарядом в направлении
головной части фонаря. В противном случае фонарь не будет
функционировать.
2. ВАЖНО! Возможно опасное излучение. Не смотрите на излучаемый
свет! Может быть опасно для ваших глаз.
3. Если аккумуляторы разрядились, пожалуйста, перестаньте пользоваться
фонарем и поменяйте либо подзарядите аккумуляторы во избежание их
повреждения.
4. Если вы храните продукт в рюкзаке или оставляете его без
использования на протяжении длительного времени, пожалуйста,
вытащите из него все аккумуляторы во избежание их протечки или
случайной активации фонаря.
Моментальное освещение
При выключенном фонаре наполовину нажмите и удерживайте задний
переключатель, чтобы включить моментальное освещение. Отпустите
переключатель, чтобы выключить его.
Включение / Выключение
Включение: когда фонарь выключен, зажмите и удерживайте задний
переключатель, пока не услышите звук щелчка, чтобы включить его.
Выключение: когда фонарь включен, зажмите и удерживайте задний
переключатель, пока не услышите звук щелчка, чтобы выключить его.
(У MH40S есть функция запоминания последнего установленного режима.
При повторной активации фонарь автоматически перейдет к последнему
установленному уровню яркости или режиму STROBE.)
Уровни яркости
При включенном фонаре кратковременно нажимайте на кнопку режима,
чтобы переключаться между следующими уровнями яркости: НИЗКИЙ –
СРЕДНИЙ – ВЫСОКИЙ – ТУРБО.
Специальные режимы (STROBE / МАЯК / SOS)
При включенном фонаре долго удерживайте кнопку режима, чтобы
переключаться между следующими специальными режимами: STROBE
— МАЯК — SOS. Отпустите кнопку, чтобы выбрать нужный специальный
режим. Снова кратковременно нажмите на кнопку режима, чтобы вернуться
к предыдущему состоянию; или нажмите задний переключатель, чтобы
выключить свет.
Беспроводной дистанционный переключатель
MH40S оснащен специальным беспроводным дистанционным
переключателем, который позволяет управлять им на дистанции. После
сопряжения кнопки на беспроводном дистанционном переключателе
обладают тем же функционалом, что и кнопки на фонарике. Сопряжение
было настроено еще на заводе перед упаковкой продукта.
• Дистанционный переключатель питается от 1 батарейки-таблетки 3 В
CR1632, которая обеспечивает приблизительно 4000 нажатий. Время
работы в режиме ожидания составляет около 12 месяцев, если в
переключатель была вставлена новая батарейка.
• Если на дистанции между фонариком и беспроводным дистанционным
переключателем нет никаких препятствий, эффективный диапазон
управления фонарем составляет 1 м (39,37 дюйма).
• Если батарейку-таблетку необходимо заменить, откройте крышку
батарейного отсека беспроводного переключателя ногтем или ключом
и затем извлеките батарейку.
Пожалуйста, следуйте инструкциям ниже, если вам необходимо повторное
сопряжение беспроводного дистанционного переключателя с фонариком.
1. После установки батарей и закручивания задней крышки
кратковременно нажмите на задний переключатель, удерживая при
этом кнопку режима в течение 5 секунд, индикатор начнет быстро
мигать, сообщая таким образом о пребывании в статусе ожидания
сопряжения.
2. Когда фонарик перейдет в статус ожидания сопряжения, зажмите
одновременно обе кнопки A и B на переключателе до тех пор, пока
фонарик не начнет беспрерывно работать.
Примечание:
1. Если включить фонарик после его перехода в ожидание сопряжения, он
автоматически выйдет из режима ожидания.
2. Убедитесь, что расстояние между фонариком и беспроводным
дистанционным переключателем не превышает 1 м во время
сопряжения.
3. Если заряд аккумулятора фонарика низкий, замените или перезарядите
аккумуляторы. После замены аккумуляторов вам не придется заново
сопрягать фонарь с дистанционным переключателем.
Включение / Выключение
Только когда MH40S включен, он сможет подсоединиться к дистанционному
переключателю, с помощью которого им можно будет управлять.
Включение: когда фонарь выключен, нажмите кнопку A до конца, чтобы
включить его.
Выключение: когда фонарь включен, нажмите кнопку A до конца, чтобы
выключить его.
Примечание: когда фонарь выключен, индикатор питания под
кнопкой режима будет мигать каждые 5 секунд, сообщая таким образом
пользователю о том, что с фонариком сопряжен беспроводной пульт
дистанционного управления. Если в течение 2 часов не производить
никаких действий, беспроводной пульт дистанционного управления
автоматически отключится от фонарика.
Регулирование уровня яркости
При включенном фонаре нажимайте кнопку A наполовину, чтобы
переключаться между следующими уровнями яркости: НИЗКИЙ – СРЕДНИЙ
– ВЫСОКИЙ – ТУРБО.
Переход в режим ТУРБО
При включенном фонаре нажмите и удерживайте кнопку B, чтобы перейти
в режим ТУРБО. Отпустите ее, чтобы вернуться к предыдущему режиму.
Переход в специальные режимы
При включенном фонаре зажмите наполовину кнопку A удерживайте ее,
чтобы перейти в режим STROBE. Затем наполовину нажимайте на кнопку
A, чтобы переключаться между следующими специальными режимами:
STROBE – МАЯК – SOS.
ВНИМАНИЕ
ДАННЫЙ ПРОДУКТ СОДЕРЖИТ КНОПОЧНУЮ БАТАРЕЙКУ
При проглатывании литиевая кнопочная батарейка может привести
к тяжелым или смертельным травмам в течение 2 часов. Храните
батарейки и аккумуляторы в недоступном для детей месте.
Если вы считаете,что батарейки или аккумуляторы могли быть
проглочены или оказались внутри какой-либо части тела,
незамедлительно обратитесь за медицинской помощью.
Сообщение уровня заряда
• Когда фонарь выключен, нажмите на задний переключатель, удерживая
кнопку режима, и затем быстро отпустите обе кнопки, чтобы получить
доступ к уровню заряда. Индикатор питания под кнопкой режима
начнет мигать, сообщая таким образом оставшийся уровень заряда
аккумулятора. Как только мигание прекратится, фонарик включится.
• Трехкратное мигание указывает на то, что мощность не менее 50%.
• Двукратное мигание указывает на то, что мощность ниже 50%.
• Однократное мигание указывает на то, что мощность ниже 25%.
Вибрация при низком уровне заряда
Если фонарик работает, а уровень его заряда ниже 10%, MH40S начнет
вибрировать каждые 10 секунд, сообщая таким образом пользователю о
низком уровне заряда.
ATR (Усовершенствованное регулирование
температуры)
Встроенная технология ATR регулирует мощность MH40S в соответствии
с рабочими условиями и условиями окружающей среды для поддержания
оптимальной производительности.
Замена аккумуляторов
Аккумуляторы следует заменить, если свет фонаря вам кажется тусклым
или фонарик перестает реагировать на команды вследствие низкого уровня
заряда.
Техническое обслуживание
Каждые 6 месяцев резьбу следует протирать чистой тканью с последующим
нанесением тонкого слоя смазки на силиконовой основе.
SYSMAX Innovations Co., Ltd.
TEL: +86-20-83862000
FAX: +86-20-83882723
Web: www.nitecore.com
Address: Unit6355,5/F,No.1021GaopuRoad,
TianheDistrict,Guangzhou,510653,
Guangdong,China
Please nd us on facebook : NITECORE Flashlight
Thanks for purchasing NITECORE!
MH090840S22
Made in China
• Utilizes a Luminengin G9 LED with a max output of 1,500 lumens
• Max peak beam intensity of 570,000cd and max throw of 1,500 meters
• An optical system combined with crystal coating and “Precision Digital Optics
Technology” (PDOT)
• Powered by 2 x 21700 high capacity Li-ion batteries to provide a runtime up
to 105 hours
• Equipped with the low power vibration indication
• The tactical tail switch and the mode button control 4 brightness levels and
3 special modes
• STROBE Mode uses randomly changing frequencies for stronger dizzying
eects
• A power indicator beneath the mode button indicates the remaining battery
power
• Intelligent Li-ion battery charging circuit with a USB-C charging port
• NITECORE 21700 Li-ion batteries included (NL2150 5,000mAh)
• Highly ecient constant current circuit provides a stable output
• Incorporated Advanced Temperature Regulation (ATR) module (Patent No.
ZL201510534543.6)
• Optical lenses with double-sided scratch resistant coating
• Constructed from aero grade aluminum alloy
• HA III military grade hard-anodized nish
• Waterproof and dustproof rating in accordance with IP68 (2 meters
submersible)
• Impact resistant to 1 meter
Length: 256mm (10.08")
Head Diameter: 65mm (2.56")
Tube Diameter: 25.8mm (1.02")
Tail Diameter: 27.2mm (1.07")
Weight: 245.8g (8.67 oz)
2
1
7
0
0
2
1
7
0
0
Warranty Service
All NITECORE
®
products are warranted for quality. Any DOA /
defective product can be exchanged for a replacement through a local
distributor/dealer within 15 days of purchase. After that, all defective
/ malfunctioning NITECORE
®
products can be repaired free of charge
within 60 months from the date of purchase. Beyond 60 months, a
limited warranty applies, covering the cost of labor and maintenance,
but not the cost of accessories or replacement parts.
The warranty will be nullied if
1. the product(s) is/are broken down, reconstructed and/or modied by
unauthorized parties.
2. the product(s) is/are damaged due to improper use. (e.g. reversed
polarity installation)
3. the product(s) is/are damaged due to battery leakage.
For the latest information on NITECORE
®
products and services, please
contact a local NITECORE
®
distributor or send an email to service@
nitecore.com
※ All images, text and statements specied herein this user manual are
for reference purpose only. Should any discrepancy occur between
this manual and information specied on www.nitecore.com, Sysmax
Innovations Co., Ltd. reserves the rights to interpret and amend the
content of this document at any time without prior notice.
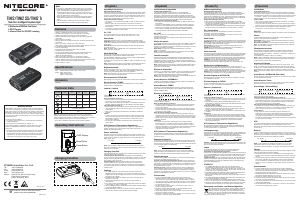
Accessories
1
3
5
7
2
4
6
NITECORE 21700 Rechargeable
Li-ion Batteries x 2
(NL2150 5,000mAh)
Lanyard
USB-C Charging Cable
Wireless Remote Switch Set
Hook-and-loop Straps x 2
Spare O-ring
QC Adapter
Holster
Hook-and-loop FastenerWireless Remote Switch
Picatinny Rail Mounts x 2 (optional)
Wireless Remote Switch
Button A
Button B
MH40S

Joignez-vous à la conversation sur ce produit
Ici, vous pouvez partager ce que vous pensez du Nitecore MH40S Lampe de poche. Si vous avez une question, lisez d’abord attentivement le mode d’emploi. La demande d’un mode d’emploi peut être effectuée en utilisant notre formulaire de contact.