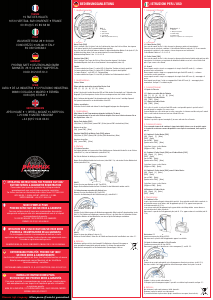
Version 2/PB/JUL16
80
180
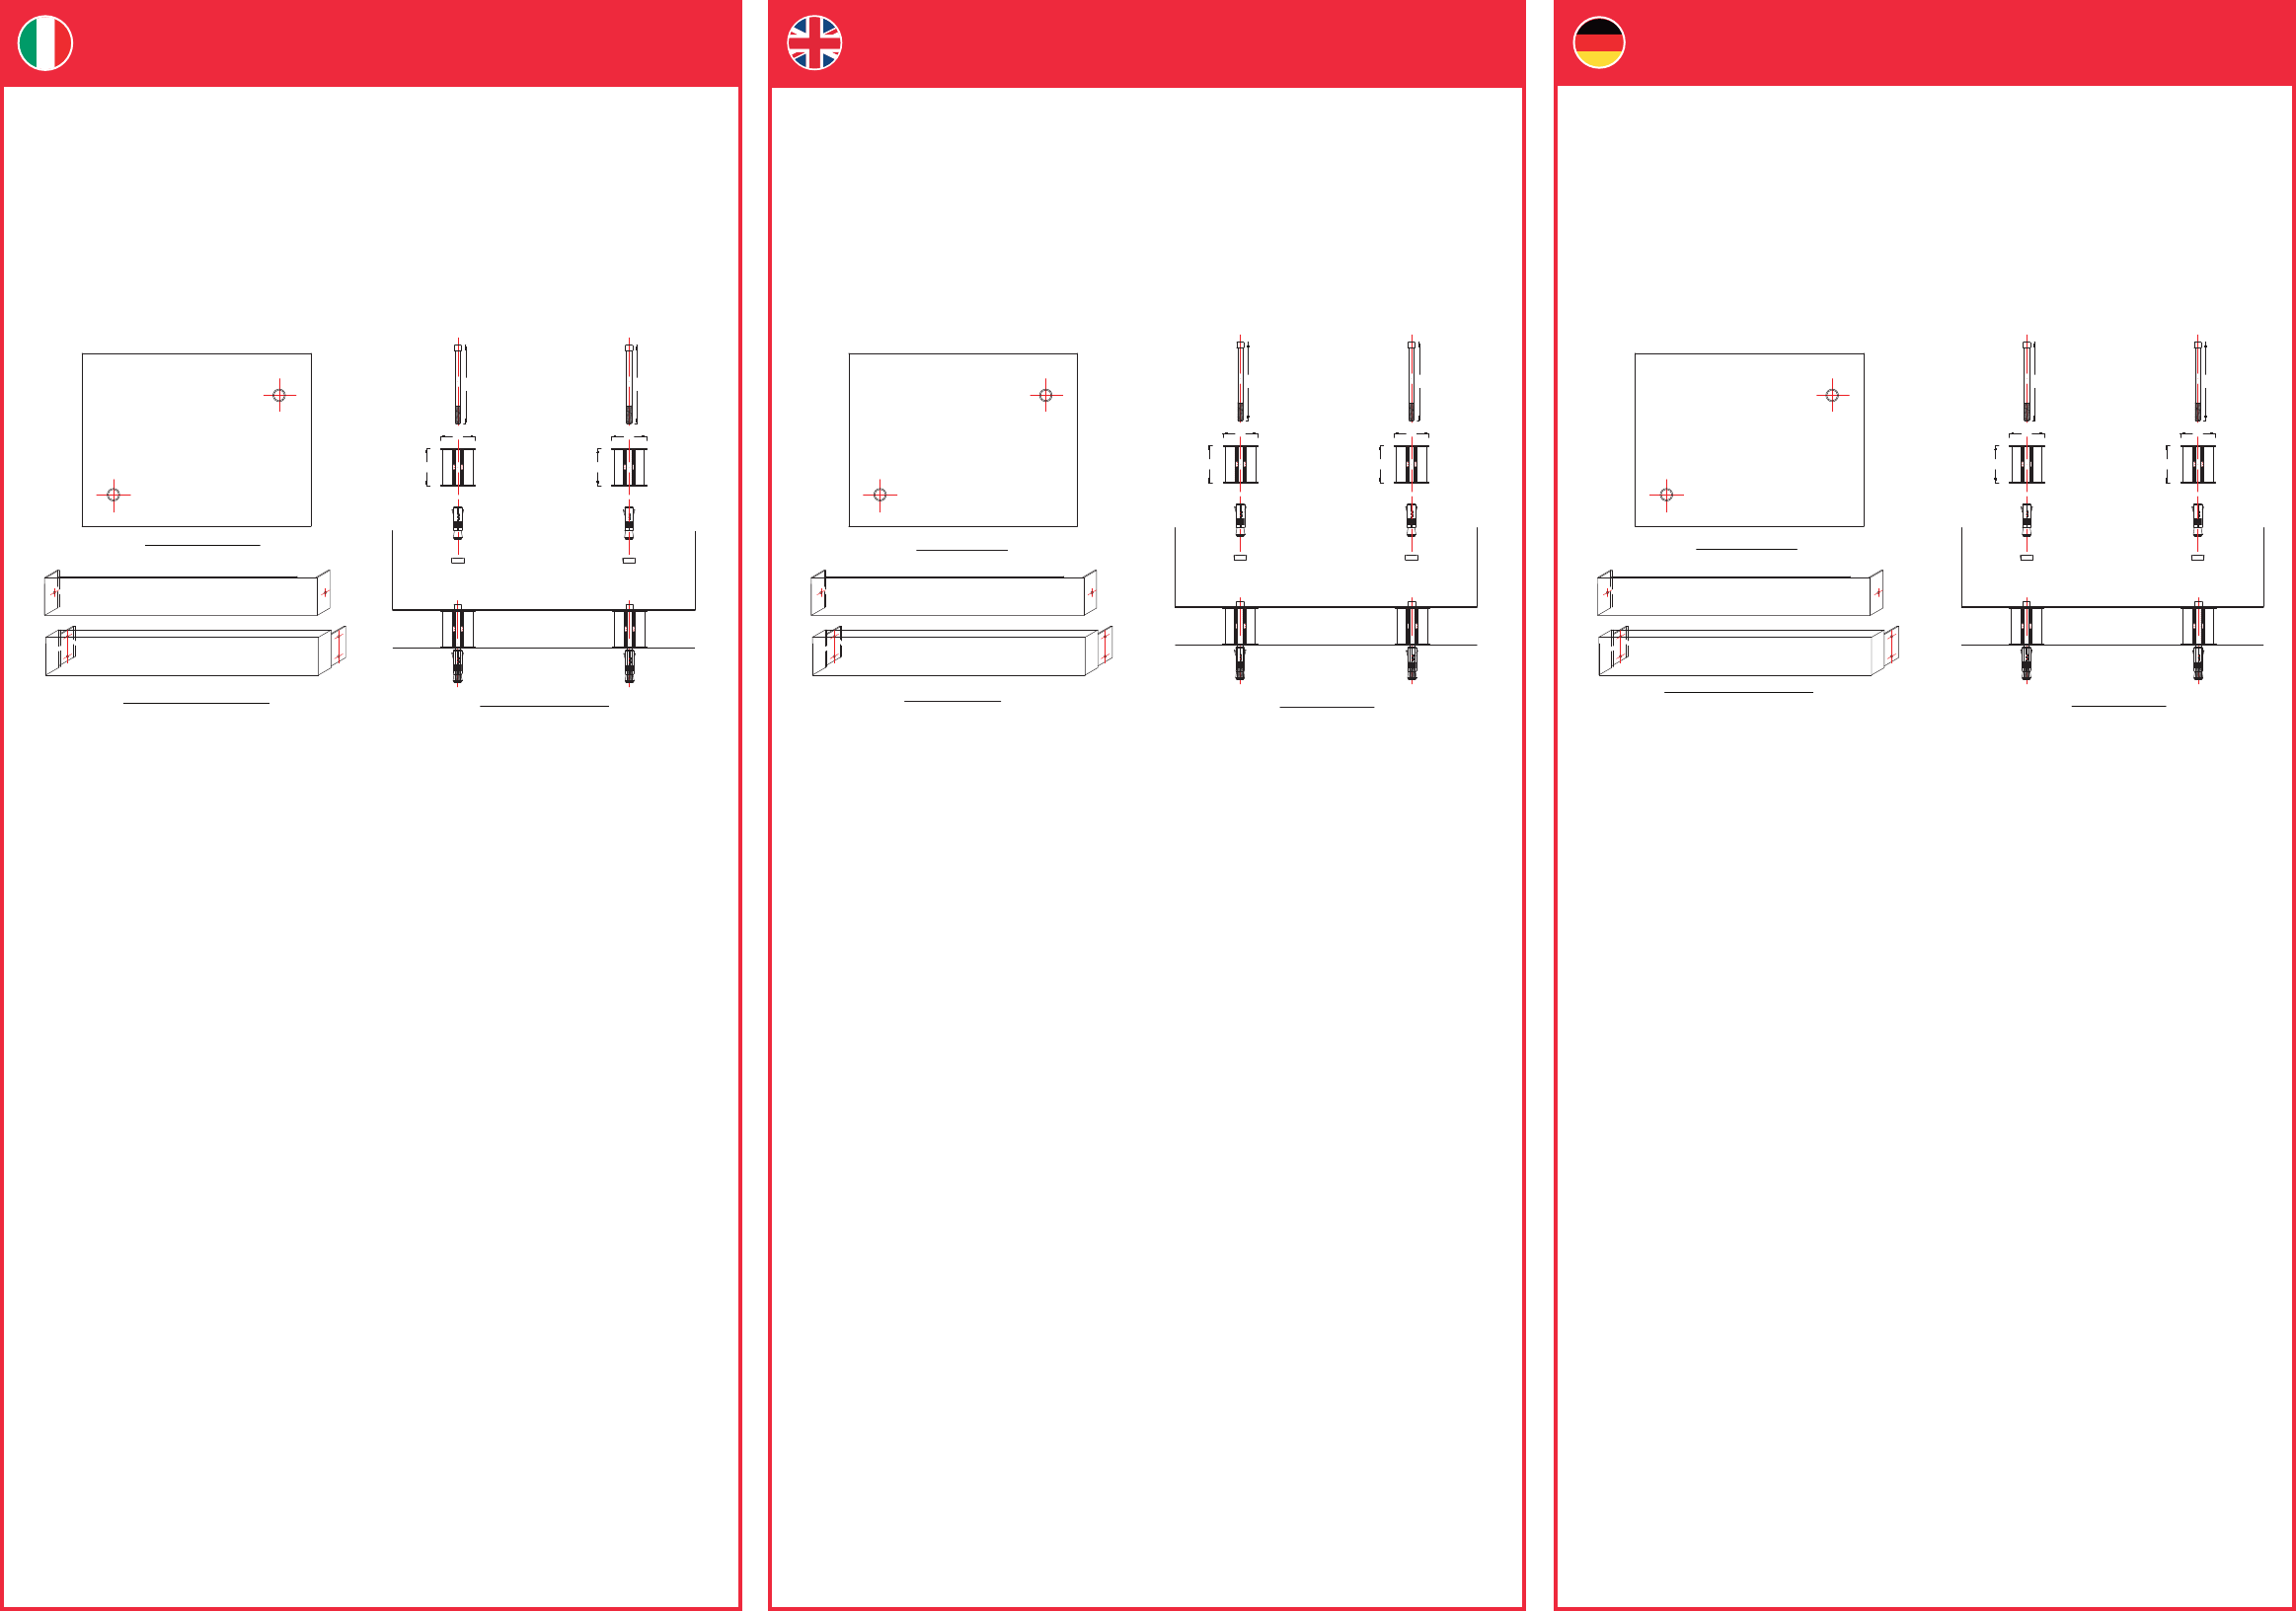
M12 BOLT
SPACER
M12 ANCHOR
CAP
86
FFL
- ELEVATION of FIXING -
80
180
M12 BOLT
SPACER
M12 ANCHOR
CAP
86
- INSIDE BASE -
- PLAN of SAFE FLOOR -
- PLINTH FIXING DETAIL -
- FRONT PLINTH -
- BACK PLINTH -
FOR A SUCCESSFUL INSTALLATION, YOU WILL NEED :-
• An electric drill
• A 22 mm drill bit (suitable for concrete)
• A measuring tape
• Masking tape
• An allen key size 10mm
• A pencil
• Small brush
YOUR SAFE WILL HAVE PACKED INSIDE :-
• 2 fixing bolts (bolt and anchor shield)
• 2 spacers (86mm)
• Front and back plinth cover plates
• 6 security screws
• 12 shelf clips
• 3 or 4 shelves dependent on the size of safe
INSTRUCTIONS
• Decide on a suitable location for your safe
• With the safe in your chosen position mark around it, with the pencil
• Again with the pencil mark on the floor (through the safe) the position of the two bolt holes
• Remove the safe.
• Take the electric drill and put the 22 mm drill bit into it.
• With your tape, measure 80 mm from the tip of the drill bit.
• Now put around the drill bit some masking tape leaving the 80mm showing.
• Now drill the two holes previously marked with your pencil; to the depth of 80 mm. Where your masking tape is.
• With your small brush clear all the residue from your drilling
• Take the two anchor shields and push them into the holes until they are flush with the floor
• If the back of your safe is to be against a wall, you will need to take the back plinth cover and insert it into the back
of the plinth of the safe; aligning the holes in the cover with the holes in the plinth. Now insert two of the security
screws to hold the plinth cover firmly in position.
• Place the safe back into your chosen position (inside the pencil marks).
• Insert the two 86 mm spacers under the safe and directly above the anchor shields.
• Take the two fixing bolts (m 12) and insert them through the safe – through the 86 mm spacers – and into the
anchor shields which you have previously put into the concrete floor.
• Insert the allen key into the cap head bolt and tighten each bolt until you can not tighten them further.
• Take the front plinth cover and position it so that the holes on the sides of the cover plate, match up with the holes
in the steel plinth leg that the safe stands on.
• Insert the four security screws and tighten them up.
Your safe is now secured to the floor
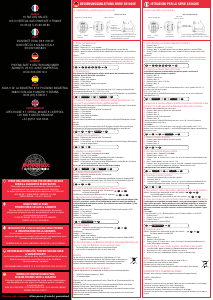
80
180
M12
Verankerungsschraube
Abstandhalter
M12 Verankerungshülse
KAPPE
86
FFL
- MONTAGESITUATION -
80
180
M12
Verankerungsschraube
Abstandhalter
M12 Verankerungshülse
KAPPE
86
- TRESORBODEN -
- SKIZZE TRESORBODEN -
- DETAILANSICHT SOCKELBLENDEN -
- VORDERE SOCKELBLENDE -
- HINTERE SOCKELBLENDE -
FÜR EINE ERFOLGREICHE VERANKERUNG BENÖTIGEN SIE:
• 1 Bohrmaschine
• 1 Stein-/Betonbohrer (Durchmesser = 22mm)
• Messmittel (Lineal, Maßband....)
• 1 x 10mm Innensechskantsteckschlüssel (Inbusschlüssel)
• 1 Stift
• 1 kleinen Pinsel
ZUM LIEFERUMFANG GEHÖREN:
• 2 Verankerungsbolzen
• 2 Abstandhülsen (86mm)
• vordere und hintere Sockelblende
• 6 Sicherheitsschrauben
• 12 Fachbodenhalter
• 3 bzw. 4 Fachböden, je nach Safemodell
VERANKERUNGSANWEISUNG
• suchen Sie sich einen geeigneten Standort für Ihren Safe
• markieren Sie den Umriss des Safes auf dem Fussboden
• markieren Sie durch die Verankerungsbohrungen die Bohrlöcher auf dem Fussboden
• stellen Sie den Safe zur Seite
• nehmen Sie die Bohrmaschine mit dem 22mm Bohrer
• bevor Sie mit dem 22mm dicken Bohrer bohren, markieren Sie diesen bitte, von der Bohrspitze zum Bohrerende
hin gesehen, auf 80mm, damit Sie nicht tiefer als diese 80mm bohren
• nun umwickeln Sie den Bohrer mit Ihrem Klebeband auf Höhe der 80mm
• bohren Sie jetzt mit dem 22mm dicken Bohrer 80mm tief in den Boden
• entfernen Sie danach die Bohrspäne bzw. den Bohrstaub rund um die Bohrlöcher
• nehmen Sie jetzt die beiden Verankerungshülsen und drücken diese in die Bohrlöcher bis sie bündig mit dem
Fussboden abschließen
• sollte der Safe direkt bündig an der Wand stehen, schrauben Sie bitte, bevor sie ihn zurück auf den endgültigen
Standort stellen, die hintere Sockelblende mithilfe der beiden Sicherheitsschrauben fest
• stellen Sie den Safe jetzt auf seinen endgültigen Standort
• stecken Sie die Ankerhülsen bzw. die Abstandhalter in den Boden bzw. unter den Safe
• nehmen sie die beiden M12 Verankerungsschrauben und stecken diese durch die Bohrungen im Safeboden durch
die Abstandhalter in die Verankerungshülsen
• nehmen Sie nun den Inbusschlüssel und ziehen die Schrauben fest
• nehmen Sie jetzt die vordere Sockelblende und stecken diese auf den Sockel
• befestigen Sie jetzt die Sockelblende mittels der 4 Sicherheitsschrauben
Ihr Safe ist nun sicher am Boden verankert.
80
180
BULLONE M12
DISTANZIATORE
TASSELLO M12
CAPTESTA
86
FFL
- PROSPETTO DEL FISSAGGIO -
80
180
BULLONE M12
DISTANZIATORE
TASSELLO M12
CAPTESTA
86
- BASE INTERNA -
- PIANO BASE CASSAFORTE -
- DETTAGLIO FISSAGGIO ZOCCOLO -
- ZOCCOLO FRONTALE -
- ZOCCOLO POSTERIORE -
MATERIALE NECESSARIO PER UNA PERFETTA INSTALLAZIONE :-
• Trapano elettrico
• Punta da trapano da 22 mm (adatta al cemento)
• Metro
• Nastro per mascherare
• Chiave a brugola di 10mm
• Matita
• Piccolo pennello
ALL’INTERNO DELLA CASSAFORTE TROVERETE :-
• 2 bulloni di fissaggio (bullone e tassello d’ancoraggio)
• 2 distanziatori (86mm)
• Copertura frontale e posteriore dello zoccolo
• 6 viti di sicurezza
• 12 morsetti per i ripiani
• 3 o 4 ripiani a seconda della misura della cassaforte
ISTRUZIONI
• Scegliere la posizione adatta per la cassaforte
• Posizionare la cassaforte e tracciarne la sagoma con la matita
• Sempre con la matita contrassegnare sul pavimento (attraverso la cassaforte) i fori per i bulloni
• Spostare la cassaforte.
• Applicare al trapano la punta da 22 mm.
• Con il metro misurare una distanza di 80 mm dall’apice della punta.
• Applicare ora sulla punta il nastro per mascherare in modo da lasciare liberi gli 80mm.
• Con il trapano praticare i due fori corrispondenti ai contrassegni in matita fino a una profondità di 80 mm.,
all’altezza del nastro per mascherare.
• Con il pennello eliminare dai fori qualsiasi residuo del trapano.
• Inserire i due tasselli di ancoraggio e spingere fino a quando sono a livello con il pavimento
• Se la parte posteriore della cassaforte è contro il muro, sarà necessario inserire la copertura dello zoccolo
posteriore della cassaforte; allineando i fori della copertura ai fori dello zoccolo. Inserire ora due viti di sicurezza per
fissare saldamente lo zoccolo in posizione.
• Riposizionare la cassaforte nella posizione prescelta (seguendo la tracciatura in matita).
• Inserire i due distanziatori di 86 mm sotto la cassaforte e direttamente sopra i tasselli di ancoraggio.
• Inserire i due bulloni di fissaggio (m 12) attraverso la cassaforte – attraverso i distanziatori di 86 mm– nei tasselli di
ancoraggio precedentemente inseriti nel pavimento di cemento.
• Inserire la chiave a brugola nelle teste dei bulloni e stringere al massimo.
• Posizionare la copertura dello zoccolo frontale in modo che i fori laterali della copertura combacino con i fori dei
piedi in acciaio su cui poggia la cassaforte.
• Inserire le quattro viti di sicurezza e stringere.
La cassaforte è ora fissata al pavimento
Vielen Dank, dass Sie sich für einen Tresor aus dem Hause Phoenix entschieden haben.
ÖFFNEN DES SAFES
Einen der beiden mitgelieferten Schlüssel in das Schlüsselloch stecken und im Uhrzeigersinn drehen.
Dann am Türgriff ziehen um den Tresor zu öffnen.
Ihr Tresor ist bereits für die Bodenmontage vorbereitet. Bitte folgen Sie den unten stehenden
Anleitungen.
VERANKERUNGSANWEISUNG & BEFESTIGUNGSANWEISUNG FÜR DIE SOCKELBLENDEN
Thank you for purchasing a Phoenix Safe.
OPENING SAFE
Please insert one of the two keys supplied into the key hole and turn clockwise.
Then pull the door to open.
Your safe is ready prepared for base fixing. To base fix your safe, follow the instructions below.
FITTING INSTRUCTIONS TO BOLT DOWN THE SAFE, AND TO FIT THE PLINTH ON THE FS1610K SERIES
FS1610K OPERATING INSTRUCTIONS
& GUARANTEE REGISTRATION
ANLEITUNG FS1610K & GARANTIEKARTE
Grazie per aver acquistato una Cassaforte Phoenix.
APRIRE LA CASSAFORTE
Inserire nella serratura una delle due chiavi in dotazione e girare in senso orario.
Quindi tirare lo sportello per aprire.
La cassaforte è pronta per essere fissata alla base. Per fissare la cassaforte alla base seguire le istruzioni sotto
indicate.
ISTRUZIONI PER IL FISSAGGIO DELLA CASSAFORTE E DELLO ZOCCOLO SULLA SERIE FS1610K
FS1610K ISTRUZIONI D’USO & REGISTRAZIONE
DELLA GARANZIA


Joignez-vous à la conversation sur ce produit
Ici, vous pouvez partager ce que vous pensez du Phoenix FS1611K Coffre-fort. Si vous avez une question, lisez d’abord attentivement le mode d’emploi. La demande d’un mode d’emploi peut être effectuée en utilisant notre formulaire de contact.