
IAN 110628
KOMPERNASS HANDELS GMBH
BURGSTRASSE 21
44867 BOCHUM
DEUTSCHLAND / GERMANY
www.kompernass.com
Version des informations · Stand der Informationen
Last Information Update: 04 / 2015
Ident.-No.: STS8B1-042015-2
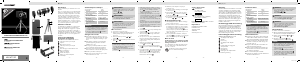
♦ Entfernen Sie die Schutzkappe und
4
von
dem Objektiv
.
♦ Befestigen Sie das Objektiv
mit dem
Schraubgewinde an der Smartphonehülle
7
.
HINWEIS
► Achten Sie darauf, dass das Gewinde nicht ver-
kantet, schräg und zu fest eingeschraubt wird,
da es sonst beschädigt werden kann.
► Achten Sie hierbei auf einen guten Halt der
Smartphonehülle
.
► Achten Sie darauf, dass sich kein Schmutz auf
der Kameralinse und der Smartphonehülle
7
oder auf dem Smartphone befindet. Es besteht
die Gefahr von Kratzern auf dem Smartphone-
gehäuse oder der Kameralinse.
► Je nach Smartphonetyp, kann es sein das Sie
das Blitzlicht Ihres Smartphones ausschalten
müssen, da die Smartphonehülle
das Blitz-
licht verdeckt. Ansonsten wird das Bild dunkel
oder farblich verfälscht.
Lesen Sie hierzu die Gebrauchsanleitung des
Smartphones.
► Bedenken Sie, das sich durch das Zusatobjektiv
das Originalbild, durch mögliche Randunschärfe
und Randabdunkelungen, verschlechtert.
♦ Setzen Sie jetzt Ihr Smartphone in die Smartphone-
hülle
ein.
♦ Befestigen Sie die Halterung
mittels Schraub-
gewinde auf dem Stativ
.
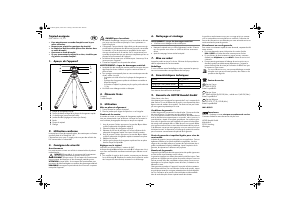
♦ Stellen Sie das Stativ
5
für ein verwackelungsfreies
Bild und einen sichern Stand auf, indem Sie die drei
Stativbeine auseinanderziehen.
♦ Die Länge der einzelnen Stativbeine lässt sich
zusätzlich individuell anpassen. Ziehen Sie dazu
jedes einzelne Stativbein auf die gewünschte
länge herraus.
♦ Setzen Sie Ihr vormontiertes Smartphone mit der
Smartphonehülle
7
in die Halterung
ein.
♦ Ziehen Sie dazu an dem Metallbügel der Halte-
rung
10
um die Smartphonehülle
7
einzusetzen.
♦ Um Ausrichtungseinstellung vorzunehmen, lösen
Sie die Feststellschraube für das Kugelgelenk
und richten Sie Ihr Smartphone damit aus. In der
gewünschten Position drehen Sie die Feststell-
schraube
wieder fest.
♦ Ihr Smartphone ist jetzt bereit für Aufnahmen mit
dem zusätzlichen Teleobjektiv.
♦ Um das gewünschte Bild scharf zu stellen, drehen
sie den Fokussierring
.
♦ Nehmen Sie Ihr Smartphone nach Gebrauch
wieder aus der Smartphonehülle
heraus und
entfernen Sie das Objektiv
wieder aus der
Smartphonehülle
.
♦ Setzen Sie zum Schutz des Teleobjektives die Schutz-
kappen
und
4
wieder auf das Objektiv
.
Reinigung/Lagerung
♦ Reinigen Sie das Gerät mit dem mitgelieferten
Reinigungstuch, um Kratzer zu vermeiden.
♦ Bei hartnäckiger Verschmutzung befeuchten Sie ein
Reinigungstuch mit Alkohol oder einer Reinigungs-
flüssigkeit für optische Linsen und wischen Sie die
Linse bzw. das Objektiv
damit ab.
Sprühen Sie das Reinigungsmittel nicht direkt auf
die Linse bzw. auf das Objektiv, sondern immer auf
das Reinigungstuch.
♦ Bei Nichtgebrauch bewahren Sie Ihr Objektiv
in dem mitgelieferten Transportbeutel
9
an einem
trockenen Ort auf.
■ GB
Introduction
Congratulations on the purchase of your new device.
You have selected a high-quality product.
The operating instructions are part of this product.
They contain important information on safety, usage
and disposal. Before using the product, familiarise
yourself with all handling and safety guidelines. Use
the product only as described and for the range of
applications specified. Retain these instructions for
future reference. Please also pass these operating
instructions on to any future owner(s).
Intended use
This telephoto lens for smartphones is intended exclu-
sively for taking non-commercial photographs with an
enlarged view. This product is not intended for com-
mercial or industrial use. The warranty does not apply
to damage caused by improper use of the appliance!
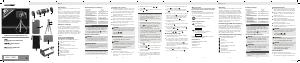
Contents of package/Device
description
SMARTPHONE CAMERA LENS STS 8 B1
Lens cap
Lens
Focus ring
4
Lens cap
5
Tripod
Locking screw for ball joint
7
Smartphone cover
Cleaning cloth
9
Carrying bag
Holder for smartphone cover
These operating instructions
Technical data
Magnification 8x
Telephoto lens 18 mm
Focus range 3 m -
∞
Angle of field 9°
Manual focusing
Lens dimensions
(without caps)
Length: 81 mm,
Ø 31 mm
Lens weight
(incl. lens caps)
approx. 75 g
NOTE
► This telephoto lens for smartphones is available in
six different versions. These operating instructions
cover all versions.
► The smartphone cover
7
pictured can vary
from the model actually supplied.
Warnings used
DANGER!
► A warning notice at this hazard level indicates
an imminently hazardous situation which could
lead to serious injuries or death.
WARNING!
► A warning notice at this hazard level indicates
a potentially hazardous situation which could
lead to injuries.
NOTE
► A note provides additional information that will
assist you in using the device.
Safety instructions
■ Prior to use, check the device for visible, external
damage. Do not operate an device that has been
damaged or dropped.
■ Do not use or store the telephoto lens in the vicinity
of devices which generate heat, e.g. radiators,
ovens, etc.
■ Do not place the telephoto lens in places which
are subjected to extreme temperature fluctuations.
■ Do not touch the surface of the lens with your
hands and avoid contact with sharp objects.
■ Do not drop the telephoto lens!
■ Avoid water spray and direct or indirect contact
with water.
DANGER!
► Never put the open lens down on combustible
surfaces. Always close it using lens caps
and
4
.
Risk of fire!
WARNING!
► Never look directly at the sun through the lens.
Risk of injury to the eyes!
DANGER!
► The packaging material is not a plaything. Keep
plastic sheeting, bags and all other packaging
material away from children.
Danger of suffocation!
Initial operation
♦ Remove all parts from the carton.
♦ Remove all packing material and the protective
film from the lens and accessories.
♦ Remove the lens caps
and
4
from the lens
.
♦ Use the screw thread to fix the lens
to the
smartphone cover
7
.
NOTE
► Take care that the thread does not cant, tilt or
become overtightened otherwise it could be
damaged.
► Ensure that the smartphone cover
7
is firmly
attached.
► Ensure that there is no dirt on the camera lens or
the smartphone cover
or on the smartphone
itself. This could cause scratches on the smart-
phone housing or the camera lens.
► Depending on the smartphone type, you may
need to switch your smartphone flashlight off
because the smartphone cover
is covering
the flashlight. Otherwise, the image will be dark
or discoloured.
Please refer to your smartphone instruction manual.
► Bear in mind that using the additional lens may
cause a reduction in picture quality due to pos-
sible edge blurring and vignetting.
♦ Now insert your smartphone into the smartphone
cover
.
♦ Fix the holder
to the tripod
using the screw
thread.
♦ Ensure that the tripod
is standing firmly by
pulling the three tripod legs apart to ensure that
the image is shake-free.
♦ The length of each tripod leg can also be individu-
ally adapted. Pull each individual tripod leg out to
the required length for this purpose.
♦ Now place your pre-fitted smartphone with its
smartphone cover
7
in the holder
.
♦ To do this, pull the metal ring on the holder
10
so
that you can insert your smartphone cover
7
.
♦ To adjust the position, loosen the fixing screw for
the ball joint
6
and then use it to position your
smartphone. When in the required position, tighten
the fixing screw
6
again.
♦ Now your smartphone is ready to take pictures
with the additional telephoto lens.
♦ Rotate the focus ring
to ensure that the image
is in focus.
♦ After use, remove your smartphone from the smart-
phone cover
and then remove the lens
2
from
the smartphone cover
.
♦ Always replace the lens caps
and
on the
telephoto lens
2
to protect it.
Cleaning/storage
♦ Clean the device using the supplied cleaning cloth
to avoid scratches.
♦ Remove stubborn dirt by moistening a cleaning
cloth with alcohol or cleaning fluid for optical
lenses and wipe the lens
2
with it.
Do not spray the cleaner directly onto the lens
but always onto the cleaning cloth.
♦ When your lens is not being used,
2
keep it in
the supplied carrying bag
in a dry place.
Disposal
Dispose of all packaging materials and the
device itself in normal domestic waste.
You can obtain further information from your local
disposal company or the city or local authority.
Dispose of all packaging materials in an
environmentally friendly way.
- 10 - - 11 - - 12 - - 13 - - 14 - - 15 - - 16 - - 17 -
Entsorgung
Entsorgen Sie alle Verpackungsmaterialien
und das Gerät in dem normalen Hausmüll.
Weitere Informationen erhalten Sie bei Ihrem lokalen
Entsorger oder der Stadt bzw. Gemeindeverwaltung.
Führen Sie alle Verpackungsmaterialien einer
umweltgerechten Entsorgung zu.
Service
Service Deutschland
Tel.: 0800 5435 111 (Kostenfrei aus dem
dt. Festnetz/Mobilfunknetz)
IAN 110628
Service Österreich
Tel.: 0820 201 222 (0,15 EUR/Min.)
IAN 110628
Service Schweiz
Tel.: 0842 665566 (0,08 CHF/Min.,
Mobilfunk max. 0,40 CHF/Min.)
IAN 110628
Erreichbarkeit Hotline: Montag bis Freitag von
8:00 Uhr – 20:00 Uhr (MEZ)
Importeur
KOMPERNASS HANDELS GMBH
BURGSTRASSE 21
44867 BOCHUM
GERMANY
www.kompernass.com
2
Service
Service Great Britain
Tel.: 0871 5000 720 (£ 0.10/Min.)
IAN 110628
Hotline availability: Monday to Friday
08:00 - 20:00 (CET)
Importer
KOMPERNASS HANDELS GMBH
BURGSTRASSE 21
44867 BOCHUM
GERMANY
www.kompernass.com
- 18 -
IB_110628_STS8B1_LB2.indd 2 16.04.15 15:25


Joignez-vous à la conversation sur ce produit
Ici, vous pouvez partager ce que vous pensez du SilverCrest STS 8 B1 Trépied. Si vous avez une question, lisez d’abord attentivement le mode d’emploi. La demande d’un mode d’emploi peut être effectuée en utilisant notre formulaire de contact.