
日本語
電気製品は、安全のための注意事項を守らないと、人身への
危害や火災などの財産への損害を与えることがあります。
この取扱説明書には、事故を防ぐための重要な注意事項と製品の取り扱いかたを
示しています。この取扱説明書をよくお読みの上、製品を安全にお使いください。
お読みになったあとは、いつでも見られる所に必ず保管してください。
この「取扱説明書」ではレンズごとの使いかたを説明していま
す。使用上のご注意など、レンズに共通したご注意や説明につ
いては別冊の「使用前のご注意」でご覧頂けます。
必ずご使用の前に、本書と合わせてよくお読みのうえでご使用
ください。
1.4X Teleconverter (SAL14TC)/2X Teleconverter (SAL20TC)
は、対応レンズとカメラの間に取り付けると、レンズの焦点距離を
それぞれ
1.4
倍(
SAL14TC
)、
2.0
倍(
SAL20TC
)にするテレコンバー
ジョンレンズです。
本機はソニー製αカメラで使用できる、
A
マウント用レンズです。
使用上のご注意
レンズを取り付けてカメラを持ち運ぶときは、カメラとレンズの両方を
しっかり持ってください。
E
マウントカメラではお使いになれません。
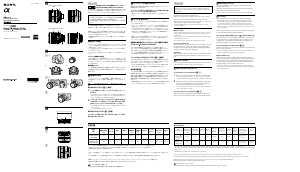
使用可能なレンズと機能
本機は、表記載のレンズ専用です。その他のレンズと装着す
ると、レンズやテレコンバーターが破損する恐れがありますの
で、絶対に取り付けないでください。
表の読みかた
AF
オートフォーカス(
auto focus
)が可能です。
MF
手動でピント合わせ(マニュアルフォーカス
/manual
focus
)が可能です。
*
カメラのフォーカス表示は作動しません。ファインダーなどを見ながら
手動でピント合わせを行ってください。
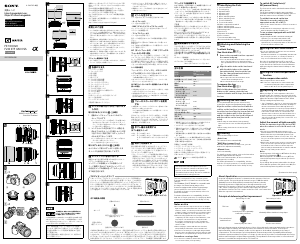
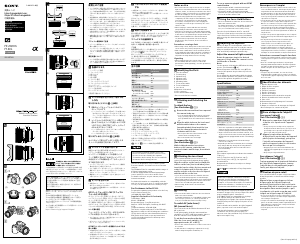
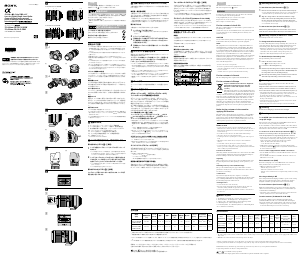
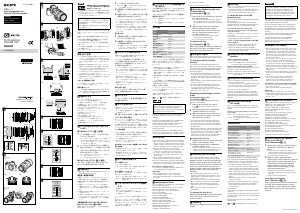
各部のなまえ
1
…レンズ信号接点
* 2
…マウント指標
3
…レンズ交換レバー
4
…マウント標点
5
…
A
マウント
*
レンズ信号接点は、
A
マウント(
5
)側にもあります。直接手で触れない
でください。
主な仕様
商品名
(
型名
)
焦点距離倍率 絞り
*
1
レンズ群
-
枚
最短撮影
距離
*
2
最大撮影
倍率
被写界深度
外形寸法
(最大径×長さ)
(mm)
質量
(g)
1.4X Teleconverter
(SAL14TC)
使用レンズの
1.4
倍
使用レンズの
プラス
1
段
4
−
5
使用レンズと
同じ
使用レンズの
1.4
倍
使用レンズの
約
1/1.4
倍
約
64
×
20
約
170
2X Teleconverter
(SAL20TC)
使用レンズの
2.0
倍
使用レンズの
プラス
2
段
5
−
6
使用レンズと
同じ
使用レンズの
2.0
倍
使用レンズの
約
1/2
倍
約
64
×
43.5
約
200
*
1
135mm F2.8 [T4.5] STF (SAL135F28)
では、
T
ナンバー
(T No.)
に対してそれぞれプラス
1
段、
2
段変化します。
*
2
撮像素子面から被写体までの距離を表します。
同梱物:テレコンバーター
(1)
、ボディキャップ(前側キャップ)(
1
)、レンズリヤキャップ(後側キャップ)(
1
)、レンズケース
(1)
、印刷物一式
仕様および外観は、改良のため予告なく変更することがありますが、ご了承ください。
はソニー株式会社の商標です。
Specifications
Name
(Model name)
Effective focal
length
f-stop*
1
Lens
groups-
elements
Minimum
focus*
2
Maximum
magnification
Depth of field
Dimensions
(maximum diameter
× height) (mm (in.))
Mass
(g (oz.))
1.4X Teleconverter
(SAL14TC)
1.4X that of the
attached lens
1 f-stop higher
from that of the
attached lens
4–5
Same as that of
the attached lens
1.4X that of the
attached lens
Approx. 1/1.4 that
of the attached
lens
Approx. 64×20
(2 1/2×13/16)
Approx. 170
(6)
2X Teleconverter
(SAL20TC)
2.0X that of the
attached lens
2 f-stop higher
from that of the
attached lens
5–6
Same as that of
the attached lens
2.0X that of the
attached lens
Approx. 1/2 that of
the attached lens
Approx. 64×43.5
(2 1/2×1 11/16)
Approx. 200
(7 1/16)
*
1
When 135mm F2.8 [T4.5] STF (SAL135F28) is attached, a 1 or 2 stop increase of the T-number (T No.).
*
2
Minimum focus is the distance from the image sensor to the subject.
Included items: Teleconverter (1), Body cap (front side cap) (1), Lens rear cap (rear side cap) (1), Lens case (1), Set of printed documentation
Designs and specifications are subject to change without notice.
is a trademark of Sony Corporation.
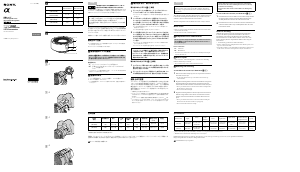
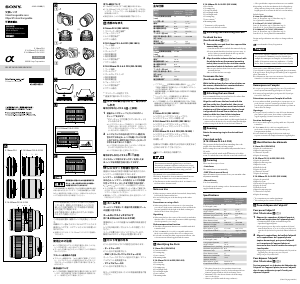
取り付けかた/取りはずしかた
取り付けかた
(
イラスト
–
参照
)
1
テレコンバーターの前後キャップ、レンズのリヤキャッ
プ、カメラのボディキャップをそれぞれはずす。
テレコンバーターの前後キャップはそれぞれ反時計方向に回すとは
ずれます。
2
レンズのオレンジの点
(
マウント標点
)
を、テレコンバー
ターのオレンジの点
(
マウント指標
)
に合わせてはめ込み、
レンズを軽くテレコンバーターに押し当てながら、時計方
向に「カチッ」とロックがかかるまでゆっくり回す。
レンズを取り付けるときに、テレコンバーターのレンズ交換レバー
を押さないで下さい。
レンズを斜めに差し込まないようにしてください。
3
レンズを取り付けたテレコンバーターのオレンジの点
(
マ
ウント標点
)
を、カメラのオレンジの点
(
マウント指標
)
に合
わせてはめ込み、テレコンバーターを軽くカメラに押し当
てながら、時計方向に「カチッ」とロックがかかるまでゆっ
くり回す。
テレコンバーターを取り付けるときに、カメラのレンズ取りはずし
ボタンを押さないで下さい。
テレコンバーターを斜めに差し込まないようにしてください。
テレコンバーターをカメラに取り付けたあとに、レンズをテ
レコンバーターに装着すると、適正な露出・調光が得られな
い場合があります。正しい順番で取り付けてください。
テレコンバーターは必ず
1
個でご使用ください。複数個の使
用はできません。無理に取り付けると、テレコンバーターが
破損する恐れがあります。
取りはずしかた
(
イラスト
–
参照
)
1
カメラのレンズ取りはずしボタンを押したまま、レンズを
取り付けたテレコンバーターを反時計方向に回してから、
前方に引き出してはずす。
2
テレコンバーターのレンズ交換レバーを押したまま、レン
ズを反時計方向に回してから、前方に引き出してはずす。
撮影上のご注意
テレコンバーターを装着すると焦点距離は長くなりますが、装着
したレンズの実効絞り値は暗くなります
*
。カメラの
TTL
測光シ
ステムにより実効絞りは自動的に補正されます。レンズ側面の距
離目盛はテレコンバーターを使用してもそのまま利用できます。
被写界深度は、テレコンバーターを装着していない場合に比べて
浅くなります
*
。
*
詳細は「主な仕様」をご覧ください。
テレコンバーターを装着すると、焦点距離が望遠になり、実効絞り値も暗
くなりますので、カメラぶれにご注意ください。三脚のご使用をおすす
めします。
テレコンバーター装着後、蛍光灯照明の比較的暗いところでは、
AF
では
ピントが合いにくいことがあります。コントラストのはっきりしたもの
でピントを合わせるか、マニュアルフォーカスに切り替えてピント合わ
せをしてください。
English
You will find information on using each lens in this manual. Precautions
common to lenses, such as notes on use will be found in “Precautions
before using” on a separate sheet. Be sure to read both documents before
using the lens.
The 1.4X Teleconverter (SAL14TC)/2X Teleconverter (SAL20TC) functions
to increase the focal length of the attached lens by 1.4X (SAL14TC)/2.0X
(SAL20TC) when mounted between the camera and lens.
This lens is designed for A-mount, which can be used on Sony α cameras.
Notes on use
When you carry the camera with the lens attached, make sure to hold both the
camera and the lens steadily.
This lens can not be used on E-mount cameras.
Compatible Lenses and Functions
This teleconverter is designed exclusively for use with the lenses listed in
the table
. Do not attach other lenses, otherwise the teleconverter or
lens may be damaged.
How to read the table
AF:
Auto focus
MF:
Manual focus
* The camera’s focus indicator does not work. Focus manually monitoring the
subject by the finder, etc.
Names of parts
1···Lens contacts* 2···Lens mounting index 3···Lens release 4···Mounting
index for camera body 5···A-mount
* Do not touch the lens contacts on the front and rear mounts.
Attaching and removing
To attach the teleconverter (See illustration
–
.)
1
Remove the camera body cap, lens rear cap, and teleconverter’s
front and rear lens caps.
To remove the teleconverter’s caps, turn the front and rear lens caps
counterclockwise.
2
Align the mounting index on the lens barrel with the orange lens
mounting index on the teleconverter. Insert the lens into the
teleconverter mount and turn it clockwise until it locks into place.
Do not press the lens release on the teleconverter when mounting the lens.
The lens will not couple properly.
Do not insert the lens at an angle.
3
Align the mounting index for camera body on the teleconverter
with the orange index on the camera. Insert the teleconverter
into the camera mount and turn it clockwise until it locks into
place.
Do not press the lens release button on the camera when mounting the
teleconverter. The teleconverter will not couple properly.
Do not insert the teleconverter at an angle.
SAL14TC/SAL20TC
1.4X Teleconverter
2X Teleconverter
取扱説明書
/
Operating Instructions/Mode d'emploi/Manual de
instrucciones/
交換レンズ
/
Interchangeable Lens/
Objectif interchangeable/
A-mount
4-271-846-04(1)
©2006 Sony Corporation
Printed in Japan
Always attach the lens to the teleconverter before attaching the
teleconverter to the camera. Attaching them in reverse order may
result in incorrect metering.
Do not use more than one teleconverter with a lens. Damage may
result.
To remove the teleconverter (See illustration
–
.)
1
Hold down the lens release button on the camera body and turn
the teleconverter and lens counterclockwise until they stop.
Carefully lift the teleconverter out of the camera mount.
2
Hold down the lens release on the teleconverter and turn the lens
counterclockwise until it stops. Carefully lift the lens out of the
teleconverter mount.
Notes on shooting
While the teleconverter increases the focal length of the attached lens,
it reduces the effective aperture of the attached lens.* The camera’s
TTL metering compensates for the effective aperture automatically.
The teleconverter does not affect the lens’ distance scale; it can be read
in the normal way. The lens’ depth of field is shallower when using the
teleconverter.*
* See the following specifications for further information.
Because of the increase in focal length and decrease in effective aperture, use a
tripod to reduce camera shake.
In low light conditions, such as with dim fluorescent light, the camera may not
be able to focus. Use focus lock on high contrast subject or manual focus.
–1
–2
–1
–2
1.4X
Teleconverter
2X
Teleconverter
70-200mm F2.8 G
(SAL70200G)
AF MF AF MF
300mm F2.8 G
(SAL300F28G)
AF MF AF MF
135mm F2.8 [T4.5] STF
(SAL135F28)
MF
*
MF
*
70-400mm F4-5.6 G SSM
(SAL70400G)
MF
*
MF
*

Joignez-vous à la conversation sur ce produit
Ici, vous pouvez partager ce que vous pensez du Sony SAL20TC Objectif. Si vous avez une question, lisez d’abord attentivement le mode d’emploi. La demande d’un mode d’emploi peut être effectuée en utilisant notre formulaire de contact.