
レンズの取り付けかた/取りはず
しかた
取り付けかた(イラスト
–
参照)
1
レンズの前後レンズキャップとカメラのボ
ディキャップをはずす。
ˎ
レンズフロントキャップは図の(
1
)、(
2
)の
2
通りの方
法で取り付け/取りはずしができます。(
2
)は、レンズ
フードを付けた状態でのレンズキャップの取り付け/
取りはずしに便利です。
2
レンズとカメラのオレンジの点(マウント標
点)を合わせてはめ込み、レンズを軽くカメラ
に押し当てながら、時計方向に「カチッ」とロッ
クがかかるまでゆっくり回す。
ˎ
レンズを取り付けるときは、カメラのレンズ取りはず
しボタンを押さないでください。
ˎ
レンズを斜めに差し込まないでください。
取りはずしかた(イラスト
–
参照)
カメラのレンズ取りはずしボタンを押したまま、
レンズを反時計方向に回してはずす。
レンズフードを取り付ける
画面外にある光が描写に影響するのを防ぐために、レ
ンズフードの使用をおすすめします。
レンズフードの赤線をレンズの赤点(レンズフー
ド指標)に合わせ、そのままレンズフードの赤点と
レンズの赤点が合い「カチッ」というまで時計方向
に回す。
ˎ
レンズフードを正確に取り付けてください。レンズフード
の効果が出なかったり、画面の一部にレンズフードが写り
込むことがあります。
ˎ
撮影後レンズフードを収納するときは、逆向きにレンズに
取り付けてください。
ズームする
ズームリングを回して、希望の焦点距離(ズームの位
置)に合わせる。
ピントを合わせる
AF
(オートフォーカス)/
MF
(マニュアル
フォーカス)、フォーカスレンジ(
AF
駆動範囲)
の切り替え
AF
(オートフォーカス:自動ピント合わせ)/
MF
(マ
ニュアルフォーカス:手動によるピント合わせ)の設
定を、レンズ側で切り替えることができます。
AF
設
定時は、フォーカスレンジ(
AF
駆動範囲)も切り替え
ることができます。
AF
で撮影する場合は、カメラ側とレンズ側両方の設
定を
AF
にします。レンズ側の設定が
AF
の時は、フォー
カスレンジ(駆動範囲)も切り替えます。カメラ側あ
るいはレンズ側のいずれか一方、または両方の設定が
MF
の場合、
MF
になります。
レンズ側の設定(イラスト
-
参照)
フォーカスモード
/
レンジ切り替えスイッチを、
AF
または
MF
のいずれか設定したい方に合わせ、
AF
設定時は、フォーカスレンジ(
AF
駆動範囲)を切
り替えます。
ˎ
AF
設定時は、フォーカスモード
/
レンジ切り替えスイッチ
で、以下の撮影距離範囲を選択します。駆動範囲を切り替
えると、ピント合わせの時間を短縮できます。撮影距離が
一定の範囲内に限られている場合に便利です。
ˋ
FULL :
距離制限はありません。全域で
AF
が駆動します。
ˋ
-3m :
無限遠から
3.0m
まで
AF
が駆動します。
ˎ
MF
では、ファインダー等を見ながらフォーカスリングを回
して、ピントを合わせます(
イラスト
-
参照)。
AF/MF
コントロールボタンを装備したカメラをお使
いの場合
ˎ
AF
時に
MF
に切り替えるには、カメラとレンズ両方の設定
が
AF
のときに、
AF/MF
コントロールボタンを押します。
ˎ
MF
時に
AF
に切り替えるには、カメラの設定が
MF
、レンズ
の設定が
AF
のときに、
AF/MF
コントロールボタンを押し
ます。
ダイレクトマニュアルフォーカス(
DMF
)
AF
制御自動切り替え(
AF-A
)、またはシングル
AF
(
AF-
S
)でフォーカスロックしているときに、フォーカスリ
ングを回すと
DMF
が作動します。
ˎ
次の場合、
DMF
は作動しません:
ˋ コンティニュアス
AF
(
AF-C
)を選択した場合
ˋ ピントが合っていない場合
ˋ
AF-A
の連続撮影中
2
回目のピント合わせが終了したあと
無限遠の被写体を
MF
で撮影する場合
温度変化によるピントの移動を補正するため、無限遠
(∞)位置に余裕を持たせてあります。無限遠の被写
体を
MF
で撮影する場合は、ファインダー等で確認し
ながらピント合わせをしてください。
フォーカスホールドボタン
(イラスト−参照)
このボタンを押している間、オートフォーカスの駆動
を止めることができます。押した時点でのピントが
固定されますので、そのままのピントでシャッターを
切ることができます。
ˎ
カスタム設定機能を搭載しているカメラでは、このボタン
の機能を変更することができます。詳細はカメラの取扱説
明書をご覧ください。
Des informations relatives à l’utilisation de chaque
objectif sont disponibles dans ce manuel. La section
« Précautions avant toute utilisation », qui fait l’objet
d’un document séparé, contient des précautions
relatives aux objectifs, telles que des remarques sur
leur utilisation. Veuillez lire attentivement ces deux
documents avant d’utiliser l’objectif.
Cet objectif est conçu pour les montures A, à utiliser sur
les appareils photo α Sony.
Remarques sur l’utilisation
ˎ
Lorsque cet objectif est utilisé avec un appareil
photo à monture E, rattachez un adaptateur pour
monture d’objectif vendu séparément. Ne rattachez
pas directement l’objectif à l’appareil photo à
monture E sinon l’objectif et l’appareil pourraient être
endommagés.
ˎ
Tenez fermement à la fois l’appareil photo et l’objectif
lorsque vous transportez l’appareil photo avec
l’objectif fixé.
ˎ
Ne tenez pas l’appareil par une partie saillante de
l’objectif lors d’une opération de zoom.
ˎ
Cet objectif n’est pas étanche à l’eau bien qu’il
soit conçu pour résister à la poussière et aux
éclaboussures. Si vous l’utilisez sous la pluie, etc.
veillez à ce que de l’eau ne tombe pas dessus.
Précaution concernant l’utilisation du flash
Lorsque vous utilisez le flash intégré à l’appareil photo,
n’oubliez pas de retirer le pare-soleil. Dans le cas de
certaines combinaisons objectif/flash, l’objectif peut
partiellement bloquer la lumière du flash, ce qui génère
une ombre en bas de l’image.
Vignetage
Lorsque vous utilisez l’objectif, les coins de l’écran
peuvent s’assombrir par rapport au centre. Pour réduire
ce phénomène (appelé vignetage), l’ouverture doit être
réglée à une valeur comprise entre 1 et 2 par rapport à
la position de fermeture complète.
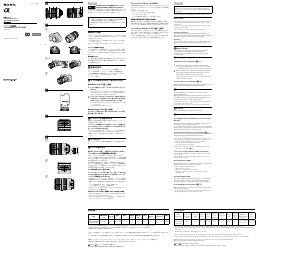
Noms des pièces
1···Bague du zoom 2···Bague de mise au point
3···Index de distance 4···Contacts de l’objectif
5···Repère du pare-soleil
6···Echelle de la longueur focale
7···Repère de la longueur focale
8···Echelle de mise au point
9···Bouton de désactivation de la mise au point
10···Commutateur de mise au point/plage
11···Repère de montage
Fixation/retrait de l’objectif
Fixation de l’objectif
(Voir l’illustration –.)
1
Retirez les capuchons d’objectif situés à l’avant
et l’arrière, ainsi que le capuchon de l’appareil
photo.
ˎ
Vous pouvez fixer/détacher le capuchon avant de
l’objectif de deux façons, (1) et (2). Lorsque vous
fixez/détachez le capuchon d’objectif alors que le
pare-soleil est en place, utilisez la méthode (2).
2
Alignez le repère orange situé sur la monture
de l’objectif sur le repère orange de l’appareil
(repère de montage), puis insérez l’objectif
dans la monture de l’appareil et tournez-le
dans le sens horaire jusqu’à ce qu’il se bloque.
ˎ
N’appuyez pas sur le bouton de déblocage de
l’objectif de l’appareil lorsque vous fixez l’objectif.
ˎ
Ne fixez pas l’objectif de travers.
Retrait de l’objectif
(Voir l’illustration –.)
Tout en appuyant et en maintenant enfoncé le
bouton de déblocage de l’objectif sur l’appareil,
tournez l’objectif dans le sens anti-horaire jusqu’à
la butée, puis détachez l’objectif.
Fixation du pare-soleil
Il est recommandé d’utiliser un pare-soleil afin de
réduire la lumière parasite et d’assurer une qualité
d’image maximale.
Alignez la ligne rouge située sur le pare-soleil sur
le point rouge de l’objectif (repère du pare-soleil).
Tournez le pare-soleil dans le sens horaire jusqu’à
ce que son point rouge se trouve en face du point
rouge de l’objectif et qu’il émette un déclic de
mise en place.
ˎ
Fixez le pare-soleil correctement. Sinon, il risque
de perturber l’effet souhaité ou d’apparaître sur les
images.
ˎ
Lorsque vous le rangez, retournez le pare-soleil et
placez-le sur l’objectif à l’arrière.
Utilisation du zoom
Tournez la bague du zoom pour obtenir la
longueur focale de votre choix.
主な仕様
商品名(型名)
70-300mm F4.5-5.6 G
SSM II
(SAL70300G2)
焦点距離(
mm
)
70-300
焦点距離イメージ
*
1
(
mm
)
105-450
レンズ群一枚
11-16
画角
1*
2
34
-8
10'
画角
2*
2
23
-5
20'
最短撮影距離
*
3
(
m
)
1.2
最大撮影倍率(倍)
0.25
最小絞り
F22-F29
フィルター径(
mm
)
62
外形寸法(最大径×長さ)
(約:
mm
)
82.5
×
135.5
質量(約:
g
)
750
*
1
撮像素子が
APS-C
サイズ相当のレンズ交換式デジタルカ
メラ装着時の
35mm
判換算値を表します。
*
2
画角
1
は
35mm
判カメラ、画角
2
は
APS-C
サイズ相当の撮像
素子を搭載したレンズ交換式デジタルカメラでの値を表
します。
*
3
撮像素子面から被写体までの距離を表します。
ˎ このレンズは距離エンコーダーを搭載しています。距離
エンコーダーにより、高精度な調光(
ADI
調光)を
ADI
対応フ
ラッシュとの組み合わせで実現しています。
ˎ レンズの機構によっては、撮影距離の変化に伴って焦点距
離が変化する場合があります。記載の焦点距離は撮影距離
が無限遠での定義です。
同梱物
レンズ(
1
)、レンズフロントキャップ(
1
)、レンズリヤ
キャップ(
1
)、レンズフード(
1
)、レンズケース(
1
)、印
刷物一式
仕様および外観は、改良のため予告なく変更すること
がありますが、ご了承ください。
および はソニー株式会社の商標です。
その他、各社名及び各商品名は各社の商標または登録
商標です。
You will find information on using each lens in this
manual. Precautions common to lenses, such as
notes on use will be found in “Precautions before
using” on a separate sheet. Be sure to read both
documents before using the lens.
This lens is designed for A-mount, which can be used
on Sony α cameras.
Notes on use
ˎ
When using this lens with an E-mount camera, attach
a separately sold Mount Adaptor. Do not attach the
lens directly to the E-mount camera or you may
damage both.
ˎ
When you carry the camera with the lens attached,
make sure to hold both the camera and the lens
steadily.
ˎ
Do not hold by any part of the lens that protrudes
when zooming.
ˎ
This lens is not water-proof, although designed with
dust-proofness and splash-proofness in mind. If using
in the rain etc., keep water drops away from the lens.
Precaution for flash use
When using a built-in camera flash, make sure to
remove the lens hood. With certain of lens/flash
combinations, the lens may partially block the light of
the flash, resulting in a shadow at the bottom of the
picture.
Vignetting
When you use lens, the corners of the screen become
darker than the center. To reduce this phenomena
(called vignetting), close the aperture by 1 to 2 stops.
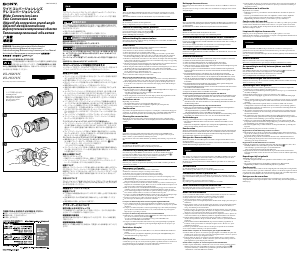
Names of parts
1···Zooming ring 2···Focusing ring 3···Distance index
4···Lens contacts 5···Lens hood index
6···Focal-length scale 7···Focal-length index
8···Distance scale 9···Focus hold button
10···Focus-mode/range switch 11···Mounting index
Attaching/detaching the lens
To attach the lens (See illustration –.)
1
Remove the rear and front lens caps and the
camera body cap.
ˎ
You can attach/detach the lens front cap in
two ways, (1) and (2). When you attach/detach
the lens cap with the lens hood attached, use
method (2).
2
Align the orange index on the lens barrel with
the orange index on the camera (mounting
index), then insert the lens into the camera
mount and rotate it clockwise until it locks.
ˎ
Do not press the lens release button on the
camera when mounting the lens.
ˎ
Do not mount the lens at an angle.
To remove the lens (See illustration –.)
While pressing and holding the lens release button
on the camera, rotate the lens counterclockwise
until it stops, then detach the lens.
Attaching lens hood
It is recommended that you use a lens hood to reduce
flare and ensure maximum image quality.
Align the red line on the lens hood with the red
dot on the lens (Lens hood index). Turn the hood
clockwise until the red dot on the hood meets the
red dot on the lens and it clicks into place.
4-563-297-01(1)
Printed in Japan
A-mount
–2
(1) (2)
–1
ˎ
Attach the lens hood properly. Otherwise, the lens
hood may interfere with the desired effect or may
appear in pictures.
ˎ
When storing, turn over the lens hood and place it
onto the lens backwards.
Zooming
Rotate the zooming ring to the desired focal
length.
Focusing
To set AF/MF (auto focus/manual focus)
and Focus range (AF range)
The focus mode can be switched between AF and MF
on the lens. You can also select the focus range (AF
range) in AF mode.
To shoot in AF mode, set the focus mode to AF both
on the camera and lens, and select the focus range (AF
range) on the lens. You can shoot in MF mode when
either the camera or the lens or both are set to MF.
To set the focus mode on the lens
(See illustration -.)
Slide the focus-mode/range switch to the appropriate
mode, AF or MF, and to the appropriate focus range (AF
range) when AF is selected.
ˎ
In AF, select a focus range from the following,
depending on the distance to your subject with the
focus-mode/range switch. Setting the focus range
allows for quicker focusing. This is useful when the
shooting range is limited.
–
FULL : No distance limit. AF works in the entire
range.
–
-3m : AF works from 3.0 m to infinity.
ˎ
In MF, turn the focusing ring to adjust the focus while
looking through the viewfinder, etc. (See illustration
-).
To use a camera equipped with an AF/MF
control button
ˎ
Press the AF/MF control button to switch AF to MF
when both the camera and lens are set to AF.
ˎ
Press the AF/MF control button to switch MF to AF
when the camera is set to MF and the lens is set to
AF.
Direct manual focus (DMF)
Rotate the focusing ring to set correct DMF when the
focus is locked in AF-A (automatic auto focus) or AF-S
(single-shot auto focus).
ˎ
DMF is not available in the following cases:
–
When the image is out of focus
–
When AF-C (continuous auto focus) is selected
–
When the focus is confirmed for the second photo
during continuous recording in AF-A
Shooting at infinity in MF
The focusing mechanism turns slightly past infinity
to provide accurate focusing under various operating
temperatures. Always confirm the image sharpness
through the viewfinder, etc., especially when the lens is
focused near infinity.
Focus-hold button (See illustration –.)
While the focus-hold button is pressed, auto focus
function is suspended and the focus is fixed for
shooting.
ˎ
The function of the focus-hold button can be changed
on cameras with custom function capability. Refer to
the camera manuals for details.
Specifications
Name (Model name)
70-300mm F4.5-5.6 G SSM II
(SAL70300G2)
Focal length (mm) 70-300
35mm equivalent
focal length*
1
(mm)
105-450
Lens groups-elements 11-16
Angle of view 1*
2
34°-8°10'
Angle of view 2*
2
23°-5°20'
Minimum focus*
3
(m (feet)) 1.2 (4)
Maximum magnification (×) 0.25
Minimum f-stop f/22-f/29
Filter diameter (mm) 62
Dimensions (maximum
diameter × height)
(Approx., mm (in.))
82.5 × 135.5
(3 1/4 × 5 3/8)
Mass (Approx., g (oz)) 750 (26.5)
*
1
This is the equivalent focal length in 35mm format when
mounted on an Interchangeable Lens Digital Camera
equipped with an APS-C sized image sensor.
*
2
The value of angle of view 1 is based on 35mm-format
cameras, and that of angle of view 2 is based on
Interchangeable Lens Digital Cameras equipped with an
APS-C sized image sensor.
*
3
Minimum focus is the distance from the image sensor to
the subject.
ˎ
This lens is equipped with a distance encoder. The
distance encoder allows more accurate measurement
(ADI) by employing a flash for the process.
ˎ
Depending on the lens mechanism, the focal length
may change with any change of the shooting
distance. The focal length assumes the lens is
focused at infinity.
Included items
Lens (1), Front lens cap (1), Rear lens cap (1), Lens hood
(1), Lens case (1), Set of printed documentation
Design and specifications are subject to change
without notice.
and is a trademark of Sony Corporation.
Company names and company product names
are trademarks or registered trademarks of those
companies.
(Suite à la page arrière)
5
1
2
3
7
6
8
4
9 10
11
©2015 Sony Corporation
SAL70300G2
交換レンズ
Interchangeable Lens
Objectif interchangeable
取扱説明書
Operating Instructions
Mode d’emploi
Manual de instrucciones
70-300mm F4.5-5.6 G SSM II
電気製品は、安全のための注意事項を守らない
と、人身への危害や火災などの財産への損害を
与えることがあります。
この取扱説明書には、事故を防ぐための重要な注意事項と製品の
取り扱いかたを示しています。この取扱説明書をよくお読みの上、
製品を安全にお使いください。お読みになったあとは、いつでも
見られる所に必ず保管してください。
この「取扱説明書」ではレンズごとの使いかたを説
明しています。使用上のご注意など、レンズに共
通したご注意や説明については別冊の「使用前の
ご注意」でご覧頂けます。
必ずご使用の前に、本書と合わせてよくお読みの
うえでご使用ください。
本機はソニー製αカメラで使用できる、
A
マウント
用レンズです。
使用上のご注意
ˎ
E
マウントカメラでお使いの場合は、別売のマウントアダプ
ターをご使用ください。破損のおそれがありますので、レ
ンズを
E
マウントカメラに直接取り付けないでください。
ˎ
レンズを取り付けてカメラを持ち運ぶときは、カメラとレ
ンズの両方をしっかり持ってください。
ˎ
ズームにより繰り出されたレンズ部分でカメラを保持しな
いでください。
ˎ
本機は防じん、防滴性に配慮して設計されていますが、防水
性能は備えていません。雨中使用時などは、水滴がかから
ないようにしてください。
フラッシュ使用時のご注意
カメラ内蔵フラッシュ使用時には、レ
ンズフードをは
ずして使用してください。レンズとフラッシュの組
み合わせによっては、レンズがフラッシュ光を妨げ、
写真の下部に影ができることがあります。
周辺光量について
レンズは原理的に画面周辺部の光量が中心部に比べ
低下します。周辺光量の低下が気になる場合は、開放
絞りから1〜
2
段絞り込んでご使用ください。
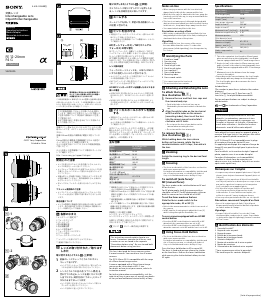
各部のなまえ
1
…ズームリング
2
…フォーカスリング
3
…距離指標
4
…レンズ信号接点
5
…レンズフード指標
6
…焦点距離目盛
7
…焦点距離指標
8
…距離目盛
9
…フォーカスホールドボタン
10
…フォーカスモード
/
レンジ切り替えスイッチ
11
…マウント標点

Joignez-vous à la conversation sur ce produit
Ici, vous pouvez partager ce que vous pensez du Sony SAL70300G2 Objectif. Si vous avez une question, lisez d’abord attentivement le mode d’emploi. La demande d’un mode d’emploi peut être effectuée en utilisant notre formulaire de contact.