
–1
–2
(1)
(2)
電気製品は、安全のための注意事項を守
らないと、人身への危害や火災などの財
産への損害を与えることがあります。
この取扱説明書には、事故を防ぐための重要な注意事項と
製品の取り扱いかたを示しています。この取扱説明書を
よくお読みの上、製品を安全にお使いください。お読みに
なったあとは、いつでも見られる所に必ず保管してくださ
い。
この「取扱説明書」ではレンズの使いかたを説明
しています。使用上のご注意などは別冊の「使
用前のご注意」でご覧頂けます。
必ずご使用の前に、本書と合わせてよくお読み
のうえでご使用ください。
本機はソニー製αカメラシステム
E
マウントカメラ
専用のレンズです。
A
マウントカメラにはお使いに
なれません。
(カメラ本体との互換情報については)専用サポー
トサイトでご確認ください。
http://www.sony.co.jp/DSLR/support/
使用上のご注意
•
レンズを取り付けてカメラを持ち運ぶときは、カメラと
レンズの両方をしっかり持ってください。
•
本機は防じん、防滴性に配慮して設計されていますが、防
水性能は備えていません。雨中使用時などは、水滴がか
からないようにしてください。
•
ズームピンの取り付け、取りはずしが可能です。
•
保管、移動時には落下させないようにしてください。ま
た撮影時にはしっかりした三脚を使用してください。
•
AF
補助光がレンズで遮られることがあります。
AF
補助
光を
OFF
にすることをおすすめします。
フラッシュ使用時のご注意
•
カメラ内蔵フラッシュはお使いになれません。外付けフ
ラッシュ(別売)をご使用ください。
•
フラッシュ光がレンズでさえぎられて、写真下部に影が
できることがあります。レンズフードを取りはずしてく
ださい。
周辺光量について
•
レンズは原理的に画面周辺部の光量が中心部に比べ低下
します。周辺光量の低下が気になる場合は、開放絞りか
ら1〜
2
段絞り込んでご使用ください。
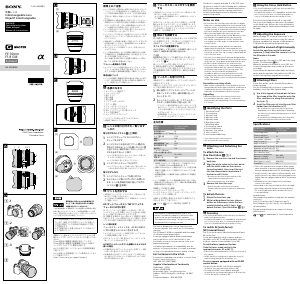
各部のなまえ
1
レンズフード
2 PUSH
(レンズフード取りはずし)ボタン
3
フォーカスリング
4
ズームリング
5
アイリスリング
6
三脚座指標
7
レンズ信号接点
*
8
三脚座
9
絞り指標
10
距離指標
11
レンズフード指標
12 IRIS LOCK
スイッチ
13
アイリスリングクリック切換スイッチ
14
距離目盛
15
絞り目盛
16 POWER ZOOM
レバー
17 ZOOM
スイッチ
18
ストラップ取り付け部
19
マウント標点
20
三脚座クランプノブ
21
手ブレ補正スイッチ
22
ズームピン
23
フードキャップ
*
直接手で触れないでください。
レンズの取り付けかた/取りは
ずしかた
取り付けかた(イラスト
–
参照)
1
レンズのレンズリヤキャップとカメラのボ
ディキャップをはずす。
2
レンズとカメラの白の点(マウント標点)を合
わせてはめ込み、レンズを軽くカメラに押し
当てながら、時計方向に「カチッ」とロックが
かかるまでゆっくり回す。
•
レンズを取り付けるときは、カメラのレンズ取りは
ずしボタンを押さないでください。
•
レンズを斜めに差し込まないでください。
取りはずしかた(イラスト
–
参照)
カメラのレンズ取りはずしボタンを押したま
ま、レンズを反時計方向に回してはずす。
三脚を使う
三脚をお使いの場合、カメラの三脚ネジ穴ではな
く、レンズの三脚座に取り付けます。
縦位置・横位置の変更
三脚座クランプノブをゆるめると(
1
)、カメラごと
任意に回転させることができます。三脚使用時に、
安定感を損なわずに縦位置/横位置の変更をすば
やくできます。
•
三脚座には、白の点(三脚座標点)があります。レンズ側
の白の線(三脚座指標)と合わせると、カメラの正確な位
置決めができます(
2
)。
•
位置を決めた後は、三脚座クランプノブをしっかりと締
めてください。
•
三脚座を回転すると一部のカメラ本体、およびアクセサ
リーと干渉します。カメラ本体、およびアクセサリーとの互
換情報については専用サポートサイトでご確認ください。
三脚座の取りはずしかた
三脚をお使いにならない場合、レンズから三脚座を
取りはずすことができます。
1
レンズをカメラから取りはずす。
•
詳しくは、「レンズの取り付けかた/取りはずし
か
た」を参照してください。
2
三脚座クランプノブを回し、三脚座取りは
ずし指標とクランプノブの標点を合わせる
(
3
)。
(1) (2)
(1) (2)
(3) (4)
4-542-899-02(1)
©2014 Sony Corporation
SELP28135G
交換レンズ
Interchangeable Lens
Objectif interchangeable
取扱説明書
Operating Instructions
Mode d’emploi
Manual de
instrucciones
E-mount
Printed in Japan
FE PZ 28-135mm F4 G OSS
3.3
5 7
10
15
30
4
0.95
1.5 2
3
5
10
1.2
AF/MF FULL MF
OPTICAL
STEADY SHOT
ON OFF
3
三脚座クランプノブを引っ張りながら下げ
(
4
)、三脚座を開く。
•
三脚座を開くときはレンズと三脚座の両方をしっか
り持ってください。
•
三脚座のヒンジ部を持って開くと、手を挟むおそれ
があります。三脚座を開くときはヒンジ部以外を
持ってください。
•
レンズをカメラから取りはずさずに三脚座を開く
と、一部のカメラ本体およびアクセサリーと干渉し
ます。三脚座を取りはずす際は、レンズをカメラか
ら取りはずすことをおすすめします。
レンズフードを取り付ける
画面外にある光が描写に影響するのを防ぐために、
レンズフードの使用をおすすめします。
フードの印をレンズのレンズフード指標に合わ
せてはめ込み、「カチッ」というまで時計方向に
回す。
レンズフードを取りはずす
PUSH(
レンズフード取りはずし
)
ボタンを押しなが
ら、取り付けた方向と反対方向に回す。
ストラップを取り付ける
一眼カメラを装着して持ち運ぶときは、レンズ側の
ストラップをご使用ください。(
1
)、(
2
)の順で取り
付けます。
•
あやまった取り付けかたをすると、レンズからストラッ
プがはずれて、レンズが落下する恐れがありますのでご
注意ください。
ズームする
POWER ZOOM
レバーを使う
1
ZOOM
スイッチを「
SERVO
」にする。
2
POWER ZOOM
レバーを動かして、希望の焦
点距離(ズームの位置)に合わせる。
POWER ZOOM
レバーを
T
側に動かすと望遠
(
Telephoto
)に、
W
側に動かすと広角(
Wide
)になり
ます。
ズームリングを使う
1
ZOOM
スイッチを「
MANUAL
」にする。
2
ズームリングを回して、希望の焦点距離(ズー
ムの位置)に合わせる。
ZOOM
スイッチを「
SERVO
」から「
MANUAL
」に変更する
と、焦点距離が自動で変更されることがあります。
ズームリングの操作方向を変更する
ズームリングの回転方向に対して、
W/T
の割り当てを設
定可能なカメラがあります。詳しくは、カ
メラの取扱説明
書をご覧ください。
ピントを合わせる
AF/MF
モードで調節する
手動調節中にピントの自動調節機能を併用したい
とき、または動画撮影するときには、フォーカスリ
ングをの位置にセットします。
FULL MF
モードで調節する
オートフォーカスを使用しないときはフォーカス
リングをの位置にセットし、手動でピントを調
節してください。
•
距離目盛は目安となります。
•
AF/MF
モード時と
FULL MF
モード時で、最短撮影距離が
異なります。
AF/MF
モード時:
0.4 m (W) – 0.95 m (T)
FULL MF
モード時:ズーム全域で
0.95 m
•
フォーカスリングを
AF/MF
モード位置から
FULL MF
モード位置に動かすと、そのときの距離目盛の撮影距
離にピントが調整されます。
明るさを調節する
IRIS LOCK
スイッチ
LOCK
:
アイリスリングを絞り目盛の「
A
」で固定、
または
F4
〜
F22
の間で動かすことができま
す。
RELEASE
:
アイリスリングを絞り目盛の
A
〜
F22
の間で動かすことができます。
絞り指標に絞り目盛「
A
」を合わせると、オートアイ
リスモードになり、カメラ本体で明るさを調節でき
ます。また、アイリスリングを回すことで、光量を
F4
〜
F22
にマニュアル調節できます。
マニュアルで光量調節する
カメラが
M
モードまたは
A
モードの状態で、アイ
リスリングを回して、希望の絞り値(
F
値)に合わ
せる。
ご注意
動画撮影時にアイリスリングを操作するときは、
アイリスリングクリック切換スイッチを「
OFF
」に
してください。(イラスト
-a
)アイリスリングク
リック切換スイッチを「
ON
」にしたまま動画撮影中
に絞りを変更すると、操作音が記録されます。
手ブレ補正を使用する
手ブレ補正スイッチ
•
ON
:
手ブレを補正します。
•
OFF
:
手ブレを補正しません。撮影時、三脚をお使いに
なることをおすすめします。
主な仕様
商品名(型名)
FE PZ 28-135mm F4
G OSS
SELP28135G
焦点距離(
mm
)
28-135
35mm
判換算焦点距離
*
1
(
mm
)
42-202.5
To change vertical/horizontal
position
Loosen the collar-locking knob on the tripod-mounting
collar (1) and rotate the camera either direction. The
camera can be quickly switched between vertical and
horizontal positions while maintaining stability when
using a tripod.
There is a White dot (collar index) on the collar. Align a
white dot on the tripod-mounting collar with the white
line (collar index) on the lens to adjust the camera
position precisely (2).
Tighten the collar-locking knob firmly after the camera
position is set.
The collar may hit the camera body or accessory when
rotated, depending on the camera or accessory model.
For more information on compatibility with cameras
and accessories, visit the web site of Sony for your area.
To detach the tripod-mounting collar
from the lens
The tripod-mounting collar can be detached from the
lens when not using a tripod.
1
Remove the lens from the camera.
See “ Attaching/detaching the lens” for details.
2
Turn the collar-locking knob, to align
the marks of collar-locking knob and
the collar (3).
3
Pull the collar-locking knob down (4),
and open the collar.
Hold the lens and the collar firmly when opening
the collar.
Do not hold the hinge when opening the collar. If
you hold the hinge you may pinch your hand.
If you open the collar without removing the lens
from the camera, the collar may hit the camera
body or accessory. We recommend you remove the
lens from the camera before detaching the collar.
Attaching the lens hood
It is recommended that you use a lens hood to
reduce flare and ensure maximum image quality.
Align the mark on the lens hood with the
lens hood index on the lens, then insert the
lens hood into the lens mount and rotate it
clockwise until it clicks into place.
To remove the lens hood
Hold the PUSH (lens hood release) button down and
turn the lens hood in the opposite direction of when
attaching.
Attaching the strap
Attach the strap to the lens when carrying the lens
with the interchangeable lens camera (still) attached.
Follow steps (1) and (2) to attach the strap.
To prevent the lens from dropping, be sure to attach
the strap properly so that the strap will not come loose
from the lens.
Zooming
Using the POWER ZOOM lever
1
Set the ZOOM switch to SERVO.
2
Move the POWER ZOOM lever to adjust
the focal distance (zoom position).
Move the POWER ZOOM lever toward T
(Telephoto) to zoom in.
Move the POWER ZOOM lever toward W (Wide) to
zoom out.
Using the zoom ring
1
Set the ZOOM switch to MANUAL.
2
Rotate the zoom ring to adjust the focal
distance (zoom position).
When you slide the ZOOM switch from SERVO to
MANUAL, the focal length may automatically change.
To change the rotating direction of the
zoom ring operation
Some cameras can be assigned to either W or T,
by rotating the zoom ring. For details, refer to the
Instruction Manual of the camera.
Focusing
To adjust the focus in AF/MF mode
When using the autofocus function together with
manual focus or when recording movies, set the
focusing ring to position .
To adjust the focus in FULL MF mode
If you do not want to use autofocus, set the focusing
ring to position and adjust the focus manually.
The distance scale is only a rough guide.
The minimum focuses are different in AF/MF mode and
in FULL MF mode.
In AF/MF mode: 0.4 m (W) – 0.95 m (T)
In FULL MF mode: 0.95 m in all area
When you move the focus ring from AF/MF mode
to FULL MF mode
, focus is adjusted to the distance
indicated on the distance scale.
Adjusting the exposure
IRIS LOCK switch
LOCK: You can lock the iris ring at “A” on the
aperture scale, or rotate it between f/4 and
f/22.
RELEASE: You can rotate the iris ring between “A” and
f/22 on the aperture scale.
When you align “A” on the aperture scale to the
aperture index, the camera is set to auto iris mode
and the exposure is set by the camera. And you can
adjust the amount of light manually between f/4 and
f/22 by rotating the iris ring.
商品名(型名)
FE PZ 28-135mm F4
G OSS
SELP28135G
レンズ群一枚
12-18
画角
1*
2
75°-18°
画角
2*
2
54°-12°
最短撮影距離
*
3
(
m
)
0.4-0.95
最大撮影倍率(倍)
0.15
最小絞り
F22
フィルター径(
mm
)
95
外形寸法(最大径×長さ)
(約:
mm
)
105 × 162.5
質量(約:
g
)(三脚座別)
1,215
手ブレ補正機能 あり
*
1
ここでの
35mm
判換算焦点距離とは、
APS-C
サイズ相
当の撮像素子を搭載したレンズ交換式デジタルカメラ
での値を表します。
*
2
画角
1
は
35mm
判カメラ、画角
2
は
APS-C
サイズ相当の撮
像素子を搭載したレンズ交換式デジタルカメラでの値
を表します。
*
3
最短撮影距離とは、撮像素子面から被写体までの距離を
表します。
•
レンズの機構によっては、撮影距離の変化に伴って焦点
距離が変化する場合があります。記載の焦点距離は撮影
距離が無限遠での定義です。
同梱物:レンズ(
1
)、レンズリヤキャップ(
1
)、レン
ズフード(
1
)、フードキャップ(
1
)、レンズケース
(
1
)、ストラップ(
1
)、ズームピン(
1
)、印刷物一式
仕様および外観は、改良のため予告なく変更するこ
とがありますが、ご了承ください。
および はソニー株式会社の商標です。
This instruction manual explains how to use
lenses. Notes on use are found in the separate
“Precautions before using”. Be sure to read both
documents before using your lens.
This lens is designed for Sony α camera system
E-mount cameras. You cannot use it on A-mount
cameras.
For further information on compatibility, visit the web
site of Sony in your area, or consult the dealer of Sony
or local authorized service facility of Sony.
Notes on use
When carrying a camera with the lens attached, always
firmly hold both the camera and the lens.
This lens is not water-proof, although designed with
dust-proofness and splash-proofness in mind. If using
in the rain etc., keep water drops away from the lens.
The zoom pin can be attached to and detached from
the zoom ring.
Be careful not to drop the lens when storing and
carrying it. Use a sturdy tripod for shooting.
AF illuminator of the camera may be blocked by the
lens. We recommend that you set the AF illuminator
to OFF.
Precautions on using a flash
You cannot use a built-in camera flash with this lens.
Use an external flash (sold separately).
When using a flash, the lens may partially block the
light of the flash, resulting in a shadow at the bottom
of the picture.
Vignetting
When using the lens, the corners of the screen become
darker than the center. To reduce this phenomena
(called vignetting), close the aperture by 1 to 2 stops.
Identifying the parts
1 Lens hood 2 PUSH (lens hood release) button
3 Focusing ring 4 Zoom ring 5 Iris ring
6 Collar index 7 Lens contacts*
8 Tripod-mounting collar 9 Aperture index
10 Distance index 11 Lens hood index
12 IRIS LOCK switch 13 Iris click switch
14 Distance scale 15 Aperture scale
16 POWER ZOOM lever 17 ZOOM switch
18 Strap hooks 19 Lens mounting index
20 Collar-locking knob 21 Shake compensation switch
22 Zoom pin 23 Hood cap
* Do not touch the lens contacts.
Attaching/detaching the lens
To attach the lens
(See illustration –.)
1
Remove the rear lens cap and the
camera body cap.
2
Align the white dot on the lens barrel
with the white dot on the camera
(mounting index), then insert the lens
into the camera mount and rotate it
clockwise until it locks.
Do not press the lens release button on the camera
when mounting the lens.
Do not mount the lens at an angle.
To remove the lens
(See illustration –.)
While holding down the lens release button on
the camera, rotate the lens counterclockwise until
it stops, then detach the lens.
Using the tripod
When using a tripod, attach it to the-mounting collar
of the lens, not to the tripod receptacle of the camera.
Adjust the amount of light manually
Rotate the iris ring to the desired exposure
(f-stop) when the camera is set to the M mode
or A mode.
Notes
Set the iris click switch to OFF when shooting movies.
(See illustration -a)
If you change the aperture value while shooting a
movie with the iris click switch set to ON, the sound of
the iris ring will be recorded.
Using the shake compensation
function
Shake compensation switch
ON: Compensate for camera shake.
OFF: Does not compensate for camera shake. We
recommend using a tripod during shooting.
Specifications
Name (Model name)
FE PZ 28-135mm F4
G OSS
SELP28135G
Focal length (mm)
28-135
Equivalent 35mm-format focal
length*
1
(mm)
42-202.5
Lens groups-elements
12-18
Angle of view 1*
2
75°-18°
Angle of view 2*
2
54°-12°
Minimum focus*
3
(m (feet))
0.4-0.95
(1.31- 3.12)
Maximum magnification (×)
0.15
Minimum aperture
f/22
Filter diameter (mm)
95
Dimensions
(maximum diameter × height)
(approx., mm (in.))
105 × 162.5
(4 × 6 1/2)
Mass (approx., g (oz))
(excluding tripod-mounting
collar)
1,215 (42.9)
Shake compensation function Yes
*
1
The values shown above for equivalent 35mm-format
focal length are for Interchangeable Lens Digital
Cameras equipped with an APS-C sized image sensor.
*
2
Angle of view 1 is the value for 35mm cameras, and
angle of view 2 is the value for Interchangeable Lens
Digital Cameras equipped with an APS-C sized image
sensor.
*
3
Minimum focus is the distance from the image sensor
to the subject.
Depending on the lens mechanism, the focal length
may change with any change in shooting distance. The
focal lengths given above assume the lens is focused
at infinity.
Included items: Lens (1), Rear lens cap (1), Lens hood
(1), Hood cap (1), Lens case (1), Strap (1), Zoom pin (1),
Set of printed documentation
Designs and specifications are subject to change
without notice.
and are trademarks of Sony Corporation.
Ce mode d’emploi explique comment se
servir des objectifs. Les remarques concernant
l’emploi se trouvent dans le document distinct
«Précautions avant toute utilisation ». Veuillez lire
les deux documents avant d’utiliser votre objectif.
Votre objectif est conçu pour les appareils photo
pourvus d’une monture E de type Sony α. Il ne peut
pas être utilisé pour les appareils photo pourvus
d’une monture A.
Pour plus d’informations sur la compatibilité,
consultez le site de Sony de votre pays, ou adressez-
vous à un revendeur Sony ou à un service après-
vente agréé Sony.
Remarques sur l’emploi
Lorsque vous portez un appareil photo sur lequel est
installé l’objectif, tenez toujours fermement l’appareil
photo et l’objectif.
Cet objectif n’est pas étanche bien qu’il soit conçu pour
résister à la poussière et aux éclaboussures. Si vous
l’utilisez sous la pluie, etc., veillez à ce que de l’eau ne
tombe pas dessus.
La goupille de zoom peut être posée ou déposée de la
bague de zoom.
Faites attention de ne pas faire tomber l’objectif lors de
son rangement ou transport. Utilisez un trépied robuste
lors de la prise de photos.
L’illuminateur AF de l’appareil photo peut être bloqué
par l’objectif. Nous conseillons de régler la position de
l’illuminateur AF sur OFF.
Précautions concernant l’emploi d’un flash
Vous ne pouvez pas utiliser le flash de votre appareil
photo avec cet objectif. Utilisez un flash externe (vendu
séparément).
Lors de l’utilisation d’un flash, l’objectif peut bloquer
partiellement la lumière du flash et produire une ombre
au bas de l’image.
Vignetage
Lorsque l’objectif est utilisé, les coins de l’écran
deviennent plus sombres que le centre. Pour réduire
ce phénomène (appelé vignetage), fermez l’ouverture
d’un ou de deux crans.
Identification des éléments
1 Parasoleil de l’objectif
2 Bouton PUSH (libération du parasoleil)
3 Bague de mise au point 4 Bague de zoom
5 Bague d’iris 6 Repère de cadre
7 Contacts d’objectif* 8 Cadre de montage du trépied
9 Repère d’ouverture 10 Indice de distance
11 Repère de parasoleil 12 Commutateur IRIS LOCK
13 Commutateur d’encliquetage de l’iris
14 Échelle des distances 15 Échelle d’ouverture
(Suite à la page arrière)
ON
OFF
CL CK
a
16 Levier POWER ZOOM 17 Commutateur ZOOM
18 Crochets de bandoulière
19 Repère de montage de l’objectif
20 Molette de blocage du cadre
21 Commutateur antibougé 22 Goupille de zoom
23 Capuchon de parasoleil
* Ne touchez pas les contacts d’objectif.
Pose et dépose de l’objectif
Pour poser l’objectif
(Voir l’illustration –.)
1
Déposez le capuchon d’objectif arrière
et le capuchon de l’appareil photo.
2
Alignez le repère blanc du barillet
d’objectif sur le repère blanc de
l’appareil photo (repère de montage),
puis posez l’objectif sur la monture de
l’appareil photo et tournez-le dans le
sens des aiguilles d’une montre jusqu’à
ce que vous entendiez un déclic.
N’appuyez pas sur le bouton de libération de
l’objectif de l’appareil photo lorsque vous posez
l’objectif.
Ne posez pas l’objectif de biais.
Pour déposer l’objectif
(Voir l’illustration –.)
Tout en appuyant sur le bouton de libération de
l’objectif sur l’appareil photo, tournez l’objectif
dans le sens contraire des aiguilles d’une
montre jusqu’à l’arrêt, puis déposez l’objectif.
Utilisation d’un trépied
Lors de l’utilisation d’un trépied, fixez-le au cadre de
montage de l’objectif et non au support de trépied
de l’appareil photo.
Pour modifier la position verticale/
horizontale
Desserrez la molette de blocage du cadre sur le cadre
de montage du trépied (1) puis tournez l’appareil
photo dans un des deux sens. L’appareil photo
peut rapidement passer d’une position verticale
à une position horizontale (ou inversement) tout
en préservant sa stabilité lors de l’utilisation d’un
trépied.
Le cadre est doté d’un point blanc (repère de cadre).
Alignez un point blanc du cadre de montage de trépied
sur la ligne blanche (repère de cadre) de l’objectif pour
ajuster plus précisément la position de l’appareil photo
(2).
Vissez à fond la molette de blocage du cadre une fois la
position de l’appareil photo établie.
Le cadre peut percuter l’appareil photo ou un accessoire
lors de sa rotation, selon le modèle d’appareil photo
ou d’accessoire. Pour plus d’informations sur la
compatibilité avec des appareils photo et accessoires,
consultez le site de Sony de votre pays.
Pour déposer le cadre de montage
de trépied de l’objectif
Le cadre de montage de trépied peut être déposé de
l’objectif si vous n’utilisez pas de trépied.
1
Déposez l’objectif de l’appareil photo.
Voir « Pose et dépose de l’objectif » pour plus
d’informations.
2
Tournez la molette de blocage du cadre
pour aligner les repères de la molette
de blocage du cadre sur le cadre (3).
3
Tirez la molette de blocage du cadre
vers le bas (4), puis ouvrez le cadre.
Tenez fermement l’objectif et le cadre jusqu’à
l’ouverture du cadre.
Ne tenez pas la charnière lors de l’ouverture du
cadre. Vous risquez de vous pincer la main dans le
cas contraire.
Si vous ouvrez le cadre sans déposer l’objectif
de l’appareil photo, le cadre risque de percuter
l’appareil photo ou l’accessoire. Il est conseillé
de déposer l’objectif de l’appareil photo avant de
déposer le cadre.
Fixation du parasoleil
Il est conseillé d’utiliser un parasoleil pour réduire
la lumière parasite et obtenir la meilleure image
possible.
Alignez le repère du parasoleil sur le repère de
parasoleil de l’objectif, installez le parasoleil sur
la monture d’objectif, puis tournez-le dans le
sens des aiguilles d’une montre jusqu’à ce que
vous entendiez un déclic.
Pour déposer le parasoleil
Tout en appuyant sur le bouton PUSH (levier de
libération du parasoleil), tournez le parasoleil dans le
sens inverse de la pose.
Fixation de la bandoulière
Lorsque vous portez l’appareil photo à objectif
interchangeable avec l’objectif dessus, fixez la
bandoulière sur l’objectif. Suivez les étapes (1) et (2)
pour fixer la bandoulière.
Pour éviter de faire tomber l’objectif, assurez-vous de
fixer correctement la bandoulière de telle manière
qu’elle ne puisse pas se détacher de l’objectif.
3.3
5
811 4
16
22
A
5.6
7
10
15
30
4
0.95
1.5 2
3
5
10
1.2
LOCK
RELEASE
POWER ZOOM
IRIS LOCK
2
11 10 9 18
8
3
1
4 5 6
7
11
16
22
POWER ZOOM
OPTICAL
STEADY SHOT
MANUAL
ON OFF
SERVO
T
W
LOCKRELEASE
ON
OFF
CL CK
IRIS LOCK
3.3
4
0.95
1.2
20
21
22
23
14
15
16
17 18 19
12
13
MANUAL SERVO
POWER ZOOM
T
W
3.3
5 7
10
15
30
4
0.95
1.5 2
3
5
10
1.2
AF/MF FULL MF
811 4
16
22
A
5.6
LOCKRELEASE
IRIS LOCK



Joignez-vous à la conversation sur ce produit
Ici, vous pouvez partager ce que vous pensez du Sony SELP28135G Objectif. Si vous avez une question, lisez d’abord attentivement le mode d’emploi. La demande d’un mode d’emploi peut être effectuée en utilisant notre formulaire de contact.