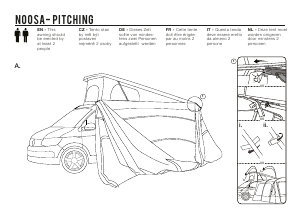
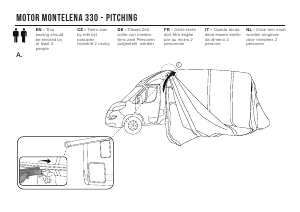
TENT PITCHING INSTRUCTIONS – VARKALA (UK)
All - in - one pitching:
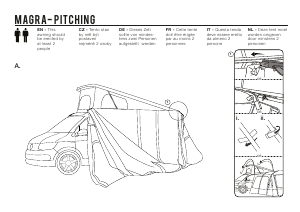
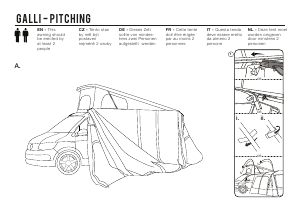
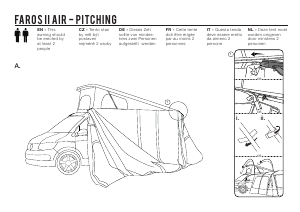
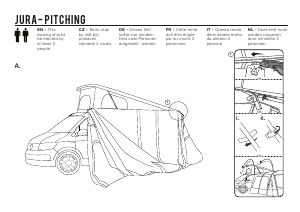
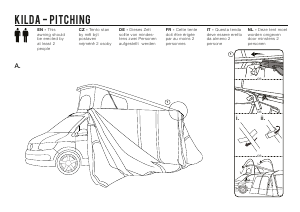
Park your vehicle in the best location on your pitch ensuring that there is at least 4.6m free space at the side where you would like to pitch your
AirAway/Awning.
Unpack and position the AirAway in the required direction with the rear attachment section facing the vehicle side.
Attach the AirAway to your vehicle using one of the 4 available options:
Kador - The AirAway comes fited with a 6mm kador strip. This can be slid directly into a kador rail on the vehicle but Vango recomends using figure eight
strips and an extra kador adaptor (sold seperatly) to ensure the kador fits snuggly and to provide flexibility when driving the vehilce away whilst the AirAway
is pitched.
Webbing Straps - Remove the supplied webbing straps from the peg bag and clip into the corresponding buckles on the rear of the AirAway roof. Pass the
straps over the roof of the vehicle and peg into the ground. Adjust the straps to fully tension the roof.
hook & loop Tabs - Use the pre-attached hook & loop tabs to connect to the roof bars of your vehicle.
Pole & Clamp - Slide the pole into the sleeve at the top of the rear section of the AirAway. Place the pole and fabric into the gutter on the vehicle and use
the clamps to secure at both ends and in the centre.
Pole & Clamp (sold separately) - Slide the pole into the sleeve at the top of the rear section of the AirAway. Place the pole and fabric into the gutter on the
vehicle and use the clamps to secure at both ends and in the centre.
Peg out the rear corners of the attachment section of the AirAway/AirAwning at the base of the vehicle.
Pull the front pegging points of the AirAway away from the vehicle until the base of the flysheet is straight.
Peg out the four main corners of the tent using the pegs supplied
Locate inflation points on each beam
Remove the valve cap (figure 1)
Insert the correct pump adaptor, which will lock onto the valve (figure 2 & 3)
There is no need to turn the white valve button as the adaptor will move this to the correct position
Inflate all tubes to 7psi. The tubes MUST be guided into an arch as they are inflated (figure 4)
Final tube pressure MUST NOT exceed 8psi
DO NOT OVER-INFLATE THE BEAMS
Inflate all AirBeams to 7psi. The Vango AirBeam® pump is supplied with a pressure release valve which will release pressure if more than 7.5 - 8psi is put
into the AirBeam.
Start with the rear AirBeam and guide into an upright position whilst it is inflating
A small amount of air may leak from the valve when it is being inflated but this is normal
Remove the pump adaptor as soon as the beam is at the correct psi
Replace the valve cap to create an air tight seal (figure 5 & 6)
Peg out the remaining poles and pegging points using pin pegs at the base of poles
Repeat for front AirBeam
tighten the webbing adjusters to ensure that the AirAway is evenly tensioned all round.
Peg out ALL guy lines, ensuring that they are in line with the AirBeam or seam they are attached to.
Re-position and adjust tensioning where necessary.
Inner Attachment:
Open out inner tent inside flysheet and position doorways to correspond with the living area
Suspend the inner by attaching toggles of inner tent through rings on inside of flysheet
Bracer AirBeam:
The AirAway is supplied with a short "Bracer" AirBeam. This AirBeam can be pumped up separately and attached to the hook and loop points at the top
centre of the main AirBeams. The Bracer AirBeam is slightly curved and should be attached to the main beams with the curve pointing upwards into the roof.
This Bracer AirBeam will increase the tension in the roof and will provide extra strength during poor weather.
Tension Band System:
Adjust the straps until they are taut
DO NOT OVERTENSION. Excess tension will alter the shape of the tent
Storm Straps:
When driving the vehicle away but leaving the AirAway up, Vango recommends using the supplied storm straps.
TO DEFLATE AIRBEAM/ AIRAWAY/ AIRAWNING:
To deflate the AirBeam (remove the cap (figure 7)) press & turn (figure 8) the button from CLOSED to OPEN
In the unlikely event of a puncture:
Deflate the air beam. Unzip the internal flysheet sleeve which contains the affected beam.
Remove the tube and its protective outer.
The zips for the protective outer are cable tied together to prevent accidental access. Cut the cable tie and open the zip.
DO NOT open these zips when the tube inflated.
Remove the clear rubberised tube from the protective sleeve taking care when removing the valve from the sleeve.
Partially inflate the tube and pass through a bucket or basin of water, looking for air bubbles. This will indicate location of puncture
Use the repair patch provided and cover hole, using instructions on patch. Re-insert tube into protective outer, closing zip from both ends, so that zip pullers
are in the flysheet sleeve (this might be easier with the tube partially inflated)
AIRBEAM INFLATION:
AIRBEAM DEFLATION:
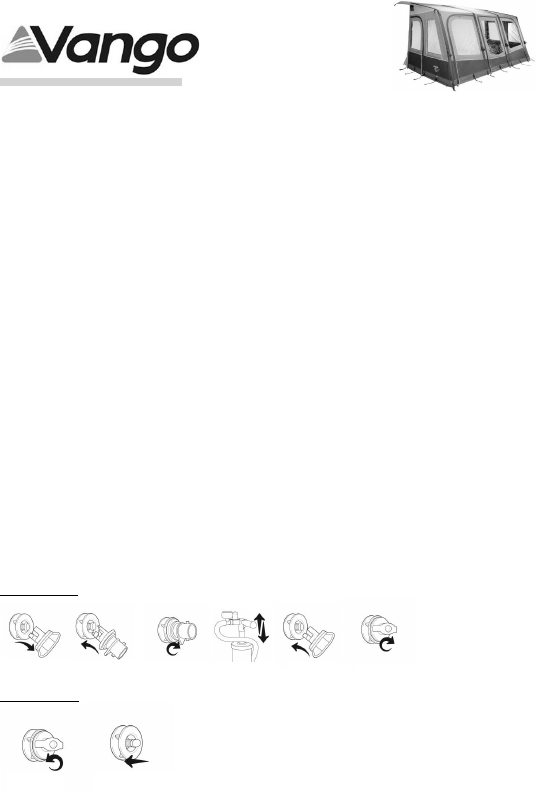
Figure 1
Remove
locking cap
Figure 3
Lock locking pump
connector
Figure 4
Inflate with
AirBeam pump
Figure 5
Insert locking
cap
Figure 6
Lock locking cap
Figure 8
Push button to deflate &
twist to open position
Figure 7
Unlock
locking cap
Figure 2
Insert locking pump
connector


Joignez-vous à la conversation sur ce produit
Ici, vous pouvez partager ce que vous pensez du Vango Varkala 150 Auvent. Si vous avez une question, lisez d’abord attentivement le mode d’emploi. La demande d’un mode d’emploi peut être effectuée en utilisant notre formulaire de contact.