
WHERE TO USE
12~18 in
12~18 in
Allow 12 ~ 18 in. of space between TVs, radios, and
other electronics
Electromagnetic interference from certain electronics
may cause product malfunction.
Place indoors away from direct sunlight
Direct exposure may cause product malfunction or
failure.
Only place on hard, flat surfaces
Flimsy or slanted surfaces may result in abnormal
noise and vibrations.
Allow at least 12 ~ 18 in. from walls for maximum air
flow
3
True HEPA Filter
2
Activated Carbon Filter
4
PlasmaWave
®
Technology
Pre-Filter
1
4-STAGE AIR PURIFICATION
FRONT
PACKAGE CONTENTS
BACK
Wi-Fi Setup Guide
User
Manual
Control Panel
Front Panel
Air Outlet
Vent
Handle
Power Plug
(1) Pre-Filter
(8) Activated Carbon Filters
(2) True HEPA Filters
Unit
* For a certified Refurbished Air purifier, there will be 4 new carbon filters and 1 True HEPA filter included,
equivalent to a 1-year supply.
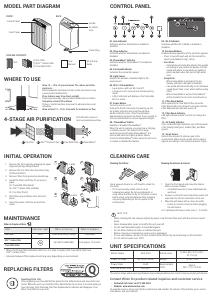
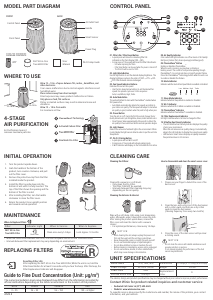
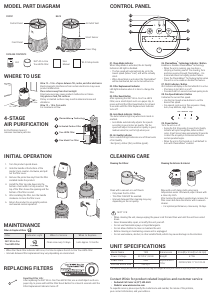
MODEL PART DIAGRAM
07 08 09 11 12
01 03 04 05 0602
10
01. Air Quality Indicator
Color coded LED light indicates one of three levels of
Air Quality: Red (poor), Amber (fair), and Blue (good).
02. Auto Mode Indicator
The LED "Auto" light will indicate when Auto Mode is
activated.
03. Fan Speed Indicator
Indicates the current fan speed.
04. Sleep Mode Indicator
The LED "Sleep" light will indicate when Sleep Mode
is activated.
05. Filter Replacement Indicator/
Filter Reset Button
• Indicator : LED light indicates when it is time to
change the filter.
• Button : After replacing the True HEPA Filter,
press the Filter Reset button for at least 5
seconds until the Filter Replacement Indicator
turns off.
06. Wi-Fi Indicator
• Enables or disables the Wi-Fi feature.
• When in the pairing state, the Wi-Fi LED flashes.
• When paired successfully, the Wi-Fi LED will be a
solid white light.
07. Smart Sensor
Detects the amount of odorous gas in the
environment. When in Auto mode, the fan speed
adjusts according to the detected amount of gas.
08. Power Button
Turns the unit on or off. During the first 30 seconds
of powering up, the Air Quality Indicator will cycle
through Blue, Amber and Red colors.
• Odor Sensor takes approximately 4 minutes to
detect the air quality in the environment before
normal operation begins.
CONTROL PANEL
INITIAL OPERATION
1. Remove the front panel by grasping its
upper edge and gently pulling forward.
2. Remove the Pre-Filter, then the bag of
filters behind it.
3. After removing the packing vinyl of the
filter, insert the Activated Carbon Filter
into the Pre-Filter.
4. Install the filters until they fit securely in place.
02. True HEPA Filter (back)
01. Pre-Filter (With Carbon Filter) (front)
5.
After filters are installed, close the front
panel.
6. Insert the power cord into an electrical
outlet.
01
02
Latch
Latch
When to Replace Filters
Filter Indicator Light When to Service When to Replace
Pre-Filter
none
Clean once every
14 days
P
ermanent
Activated Carbon
Filter
none
Can NOT be WASHED
Replace every
3 months
True HEPA Filter
Lasts Approx.
12 months
• When the Check Filter Indicator LED is flickering, it is time to replace the Filter.
• Intervals between filter replacement may vary depending on environment.
MAINTENANCE
CLEANING CARE
Cleaning the Filters:
Use a vacuum cleaner or soft brush to clean the
Pre-Filter
• If it is excessively soiled, rinse in room
temperature water.
• Do not use detergent or soap.
• Allow the filter to dry for 24 hours or more
before using.
• Intervals between filter cleaning may vary
depending on the air quality.
• Do not use hot water over 104
o
F or volatile
fluids such as paint thinner.
Cleaning the Exterior & Interior:
Wipe with a soft damp cloth using room
temperature water.
• Afterwards, wipe it down with a clean, dry cloth.
Open the front panel and clean the interior with a
vacuum cleaner.
• For optimal performance, clean every 1-2 months.
NOTICE
• When cleaning the unit, always unplug the
power cord first and then wait until the unit has
cooled down.
• Never disassemble, repair, or modify the unit
yourself.
• Do not use flammable sprays or liquid detergents.
• Do not allow children to clean or maintain the unit.
• Before cleaning or maintaining, ensure unit is
unplugged.
• Do not use benzene, alcohol, or other
volatile fluids, which may cause damage or
discoloration.
SPECIFICATIONS
Model
C909
Voltage
AC 120 V / 60 Hz
Power Rate
95W
Verified
Room Size
522sq.ft.
Dimensions
16.5in(W) × 11.4in(D)
× 23.2in(H)
Weight
17.2 lbs
Replacement
Filter
Filter A / SKU: 115115
The exterior, design, and product specifications
may be changed without prior notice to improve
product performance.
09. Fan Speed/Auto/Sleep/PlasmaWave
®
Buttons
Use the Fan Speed arrow buttons to set the desired
fan speed. Fan Speeds cycle over in this sequence:
Auto, Low, Medium, High, Turbo, Sleep, Auto.
Low Medium High Turbo
• Auto Mode:
- Auto Mode automatically adjusts fan speeds
according to your indoor air quality. The fan
speed will adjust to low when air quality is
good, medium when fair, and to high when
poor.
• Sleep Mode:
When Sleep Mode is activated, the Air Quality
Indicator
LED light is disabled.
- Fan speed will automatically set to minimum
speed (lower than 'Low') which will be nearly
silent.
- When Sleep Mode is active, PlasmaWave® will
be disabled, but it can be turned back on.
• PlasmaWave
®
Button Press and hold the two
arrow buttons
+ for 3 seconds
- Press the Plasmawave
®
button when the unit is
on to enable or disable this feature. By default,
PlasmaWave
®
is enabled whenever the unit is
powered on.
- When the unit is running, you may hear a
chirping or buzzing sound. The sound is from
particles passing through PlasmaWave
®
, it is
normal and does not signify product failure.
10. PlasmaWave
®
Indicator
Indicates whether PlasmaWave
®
is enabled or
disabled.
11. Wi-Fi Button
• Press for 3 seconds to activate pairing mode.
• When Wi-Fi is paired, press the button to turn Wi-
Fi off or back on.
12. Light Sensor
Detects the amount of ambient light in the
environment. When in Auto Mode, the light sensor
detects when to put the unit into Sleep Mode.
Resetting Filter Life:
After replacing your True HEPA Filter, place the Pre-Filter back in and close the Front
Panel. While the unit is on, hold the Filter Reset Button for at least 5 seconds until
you hear the beep. After the beep, the Filter Replacement Indicator will disappear.
Your Winix True HEPA is now reset.
REPLACING FILTERS
115115
Air Purification means it
removes inanimate particles
Winix Smart Wi-Fi Setup
Before you begin, make sure you have a wireless router
that is 2.4Ghz or newer and have a Smartphone that is
Android5.0 and later or iOS10.0 and later. Reference the
Winix Smart Wi-Fi Set Up Guide for more details.
• Latest Phone Operating System requirements are
subject to change based on future phone technology
and app version updates.
• Make sure to disable any VPN networks before
connecting your unit.
1.
Download the Winix Smart app on your device.
• available via Google Play store or iTunes App
store.
2.
Run the app and follow the setup guide to connect
your device to the unit.
①
Select "New Unit" and choose C909 to connect
to this model.
②
Read the notice and select "OK".
③
Enter the password to your Wi-Fi network.
④
Press and hold the Wi-Fi button on the unit's
control panel until it beeps.
• The Wi-Fi strength indicator will begin to
blink.
⑤
Connect to the Winix Smart network via your
device's network menu.
⑥
Selecting "Next" will connect your unit to your
device.
⑦
Define the unit settings (Name and Location).
⑧
When set up is complete, the Winix Smart
Indicator will light up.


Joignez-vous à la conversation sur ce produit
Ici, vous pouvez partager ce que vous pensez du Winix C909 Purificateur d'air. Si vous avez une question, lisez d’abord attentivement le mode d’emploi. La demande d’un mode d’emploi peut être effectuée en utilisant notre formulaire de contact.