8. GUARANTEE
We would remind you that TEMPORIS 08 is approved in conformity with
European regulations, as certified by the marking.
You are covered by a legal warranty on this product and for all information
concerning this warranty, please contact your reseller.
Regardless of the legal warranty on the product, the reseller guarantees
conformity of the products with their technical specifications for a period of
twelve (12) months, parts and labour, starting from the date on the proof of
purchase of the product. You should therefore keep your invoice or till
receipt specifying the date of purchase of the product and the name of the
reseller. However, if the legal warranty in your country exceeds twelve (12)
months, the legal warranty alone then applies. The non-conforming part or
product will be repaired or replaced free of charge, by an identical part or
product, or one at least equivalent in terms of function and performance. If
repair or replacement were to prove impossible, you would receive a refund
for the product.
The spare product or part, which may be either new or reconditioned, is
guaranteed for a period either of three months from the date of repair, or up
to the end of the initial warranty period if this is longer than three months. All
parts or products returned and replaced become the property of the
manufacturer.
However, this warranty becomes null and void in the following cases:
l installation or use other than as instructed in this guide;
l incorrect connection or abnormal use of the product, in particular with
accessories not specifically recommended;
l products which have been knocked or dropped;
l products damaged by lightning, voltage surge, source of heat or radiation,
water damage, exposure to excessive humidity, or any other cause
outside the product itself;
l normal wear and tear;
l defective maintenance, negligence;
l failure to comply with local technical and safety standards;
l maintenance, modification or repair by a person not approved by the
manufacturer or reseller.
SUBJECT TO LEGAL PROVISIONS, ALL WARRANTIES OTHER THAN
THOSE DESCRIBED HEREIN ARE EXPRESSLY EXCLUDED.
9. SAFETY / ENVIRONMENT
Used handset batteries must be disposed of in compliance with
current environmental protection regulations. You should return
your batteries to your reseller or dispose of them in an approved
recycling centre.
Do not attempt to open the batteries as they contain chemical
substances. In the event of leakage, avoid contact with the skin,
eyes and mouth. If necessary, rinse the affected part for several
minutes in running water. Clean the product with absorbent paper
or a dry cloth and contact your reseller for replacement batteries.
10. TECHNICAL SPECIFICATIONS /
DECLARATION OF CONFORMITY
The TEMPORIS 08 is designed to send and receive telephone
communications and for connection to the public telecommunications
network.
Appliance designed for connection to a TRT3 class analogue telephone
line (telecommunications network voltage) as defined in standard
NF EN 60-950.
ATLINKS hereby declares that the TEMPORIS 08 appliance is compliant
with the essential requirements and other relevant provisions of directive
1999/5/CE.
The certificate of conformity is available on the following Internet site:
"www.atlinks.com", or will be sent to you upon request.
5.3 ADJUSTING THE CONTRAST
In order to be able to read the display comfortably, you may want to adjust
the contrast (you have a choice of 5 levels). The optimal setting will depend
on where your telephone is located and how it is positioned (i.e. wall-
mounted or horizontal).
l Press and use the or keys until the screen shows:
"SELECT CONTRAST".
l Press again to open the sub-menu.
l Press or to scroll through the options.
l Press to confirm your selection.
5.4 ADJUSTING THE FLASH RATE
l Press and use the or keys until the screen shows: "FLASH
TIME".
l Press again to open the sub-menu.
l Press or to scroll through the options: 100, 300 or 600 ms.
l Press to confirm your selection.
Note: The standard setting for France is 300 ms.
5.5 SETTING THE DIALLING MODE
This setting, and the previous (flash rate) setting, only concern particular
types of installation such as, for example, behind an enterprise telephony
system (PBX).
l Press and use the or keys until the screen shows: "T/P
DIAL MODE".
l Press again to open the sub-menu.
l Press or to scroll through the options: voice frequency or
pulse.
l Press to confirm your selection.
Note: The standard setting for France is "TONE DIAL".
6. ACCESSING YOUR OPERATOR'S SERVICES
6.1 VOICEMAIL
If you subscribe to a voicemail service as well as caller ID (ask your operator),
the screen will signal the presence of a new message by displaying the icon
.
To listen to the message, call your voicemail service. Once you are
connected, a voice prompt will guide you through the process.
6.2 OTHER SERVICES
The , and keys provide access to additional services. Ask
your operator or installer for details.
7. WHAT TO DO IF …
The store where you bought your telephone can also provide assistance and
after-sales service.
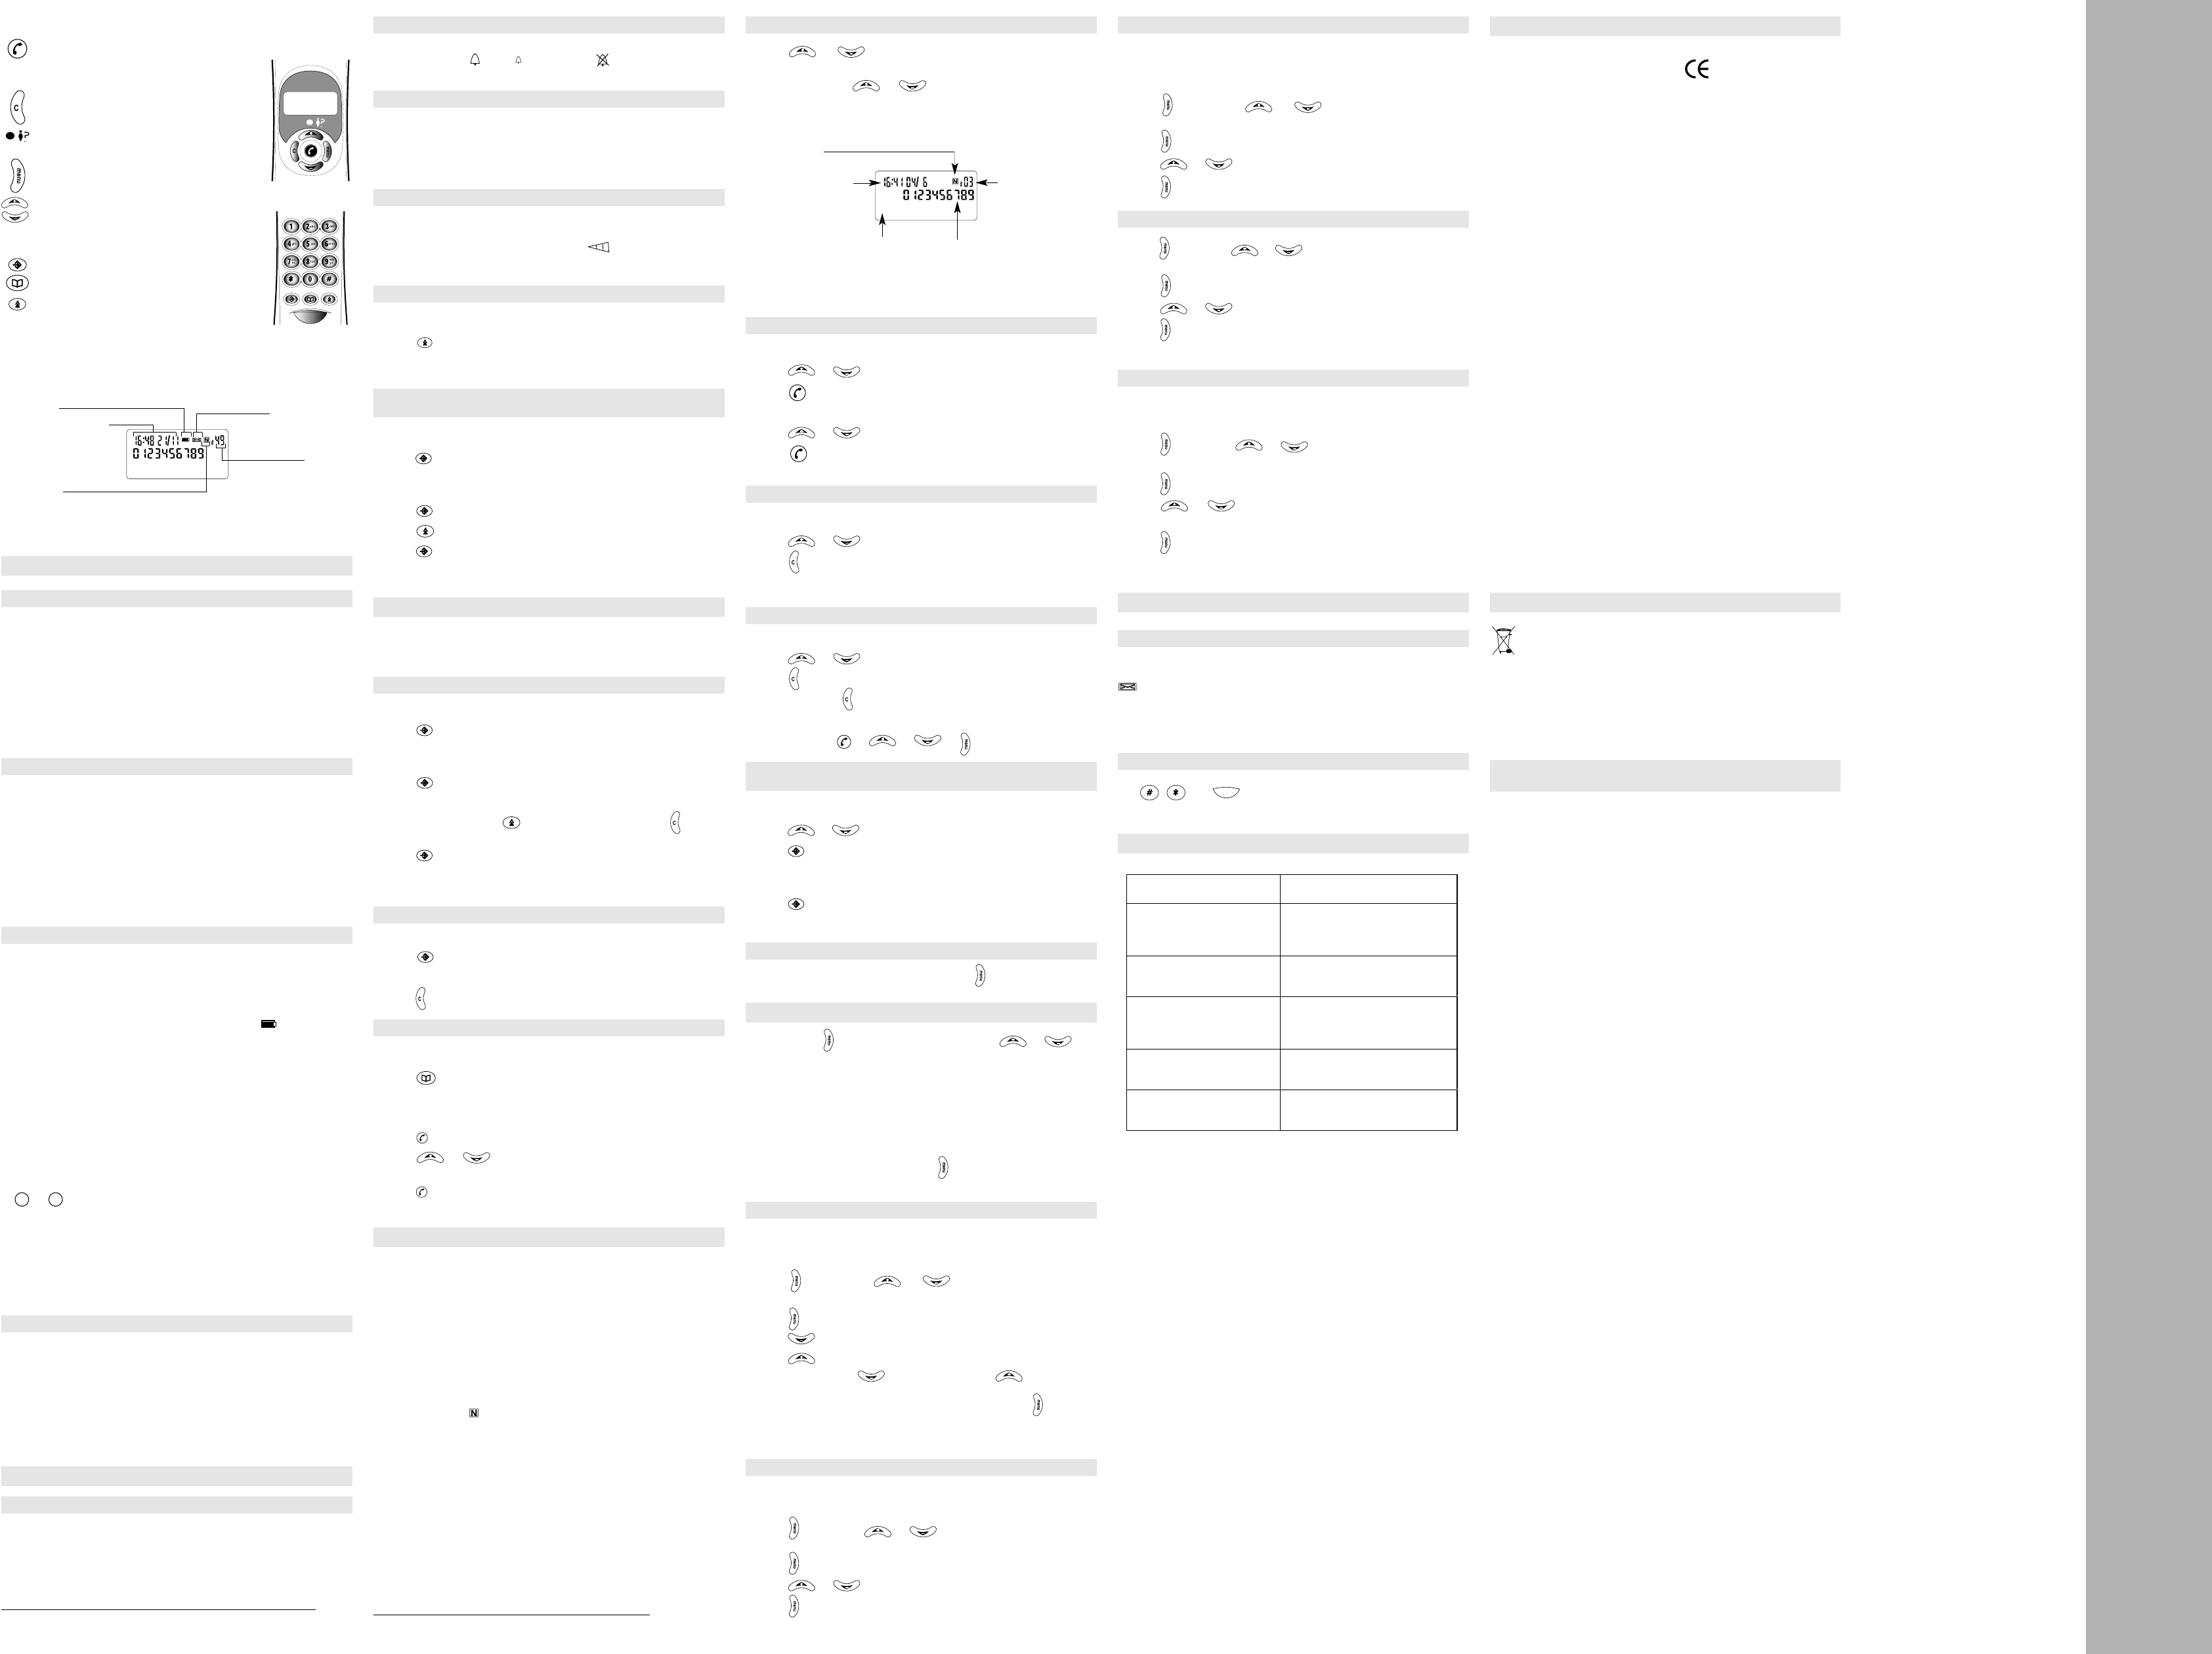
4.1 CONSULTING THE CALL LOG
l Press or to open the call log. Calls are listed in reverse
chronological order.
l Use the same keys or to scroll through the log. When you
are at the beginning or end of the list the display shows: "START/END".
When you consult the log, the display looks like this:
4.2 CALLING A NUMBER FROM THE LOG
l Pick up the handset.
l Press or to select the number you want.
l Press to initiate the call.
or, if consulting the log while on-hook:
l Press or to select the number you want.
l Press to initiate the call. As indicated on the display, the handset
must be picked up within 10 seconds.
4.3 DELETING A NUMBER FROM THE LOG
Whether consulting the log on-hook or off-hook:
l Press or to select the number you want.
l Press to delete the number on the display.
! Caution: The number is deleted immediately.
4.4
DELETING ALL THE NUMBERS IN THE LOG
Likewise, whether consulting the log on-hook or off-hook:
l Press or to open the log.
l Press for several seconds until the display shows: "ERASE ALL?"
l To confirm, press again.
or
l To cancel, press or or or .
4.5 COPYING A NUMBER FROM THE LOG INTO THE SPEED
DIAL LIST
l Pick up the handset.
l Press or to consult the log and select the number you want.
l Press to go into programming mode.
l Enter the memory position (from 0 to 9) that you want to assign to the
number.
l Press to confirm.
l Replace the handset.
4.6 QUITTING THE CALL LOG
You can quit the call log at any time by pressing twice.
5.
CUSTOMIZING YOUR TELEPHONE
When you press , the display prompts you to use the or keys
to scroll through the following settings options:
- Set time and date.
- Select display language.
- Adjust display contrast.
- Adjust flash rate.
- Set dialling mode.
When the desired option appears, press again to confirm.
To quit the settings menu, select the last option: "EXIT SETUP".
5.1 SETTING THE TIME AND DATE
If you subscribe to the "number announcement" service, the date and time
are adjusted automatically when you receive your first call. You can also
adjust them manually:
l Press and use the or keys until the screen shows:
"DATE/TIME".
l Press again to open the sub-menu. The time flashes.
l Press to scroll through the options.
l Press to confirm and move on to the minutes.
l Repeat the process: to select a value and to confirm and
move on to the next adjustment (day and month).
l Once you have finished adjusting the date and time, press to confirm.
If you enter an invalid date (30 February, for example), "ERROR" appears on
the screen. You can then correct the day and month settings.
5.2 SELECTING THE DISPLAY LANGUAGE
You have a choice of 4 languages: English, French, Spanish and Italian.
To select your preferred language:
l Press and use the or keys until the screen shows: "CID
LANGUAGE".
l Press again to open the sub-menu.
l Press or to scroll through the options.
l Press to confirm your selection.
2.2 ADJUSTING THE RINGING VOLUME
l The ringing volume adjustment is located on the side of the base. There
are 3 levels: loud ( ), soft ( ) and ringer off ( ) (the light will flash when
a call is received)
.
2.3 MAKING A CALL
l Pick up the line by lifting the handset. The timer starts.
l Dial.
l When you have finished, hang up by replacing the handset on the base.
2.4 ADJUSTING THE EARPIECE VOLUME
During a call,
l Slide the cursor on the side of the handset .
There are 3 levels: loud, medium and soft.
2.5 REDIALLING THE LAST NUMBER
l Pick up the handset
l Press .
"
The last number called (whether manually or via the speed dial list) is
automatically redialled.
2.6 COPYING THE LAST NUMBER DIALLED INTO THE
SPEED DIAL LIST
l Pick up the handset.
l Press to go into programming mode.
l Enter the memory position (from 0 to 9) that you want to assign to the
number.
l Press to confirm.
l Press .
l Press to confirm.
l Replace the handset.
3. THE SPEED DIAL LIST
Your Temporis 08 gives you rapid access to your 10 most useful numbers.
Use the included self-adhesive label to identify them: you can stick it in the
space provided on the base, above the battery compartment.
3.1 STORING A NUMBER
l Pick up the handset.
l Press to go into programming mode.
l Enter the memory position (from 0 to 9) that you want to assign to the
number.
l Press to confirm.
l Key in the telephone number (max. 16 digits).
To insert a pause, press . If you make a mistake, press to erase
the last digit.
l Press to confirm.
Note: To copy the last number dialled, or a number from the call log, into the
speed dial list, see sections 2.6 or 4.5 respectively.
3.2 DELETING A NUMBER FROM THE SPEED DIAL LIST
l Pick up the handset.
l Press to go into programming mode.
l Enter the memory position (from 0 to 9) to be cleared.
l Press for 3 seconds to erase the number.
3.3 USING THE SPEED DIAL LIST TO MAKE A CALL
l Pick up the handset.
l Press to open the speed dial list.
l Key in the desired memory position (from 0 to 9).
or, when on-hook:
l Press .
l Press or to scroll through the speed dial list until you reach
the desired number.
l Press to initiate the call. As indicated on the display, the handset must
be picked up within 10 seconds.
4.
THE CALL LOG*
If you subscribe to your network operator's "caller ID" or "number
announcement" service, your telephone will list the last 75 calls received
(answered or unanswered). This will tell you who called while you were
away, and you can also decide whether or not to take a particular call. If you
also subscribe to the "call waiting" service, you can see who is trying to get
through to you while you are already on the line.
When on-hook, the display shows:
-"WELCOME": no unanswered calls.
-"01 NEW CALL" or "XX NEW CALLS": there are one or more unanswered calls
in the log. The lamp on the back of the handset flashes. When you consult
the log, the icon (for "new") will be displayed alongside the caller's
number.
-"01 CALL" ou "XX CALLS": the log contains one or more calls that you have
already consulted, but no new calls.
1. FIRST USE
1.1 RECOMMENDATIONS
- Do not expose your telephone to direct sunlight or extreme temperatures.
- Operating temperature: between + 5°C and + 40°C.
- Position the telephone at least 1 meter away from potential sources of
interference such as TVs and cell phones.
Caution: Avoid contact with water. Use a damp cloth for cleaning. Never
use solvents (trichlorethylene, acetone, etc.) which might damage
the plastic surfaces, and never spray cleaning products on your
set.
Avoid using the telephone during electrical storms.
1.2 INSTALLATION
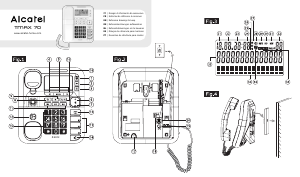
Your Temporis 08 telephone consists of:
- a base and a handset,
- a spiral cord and a telephone cord,
- a label for the numbers stored in memory.
1. Connect one end of the spiral cord to the end of the handset, and the
other to the socket at the front of the base.
2. The telephone cord plugs in under the base (there is a groove for holding
the cord). Connect the other end of the cord to the wall telephone jack.
1.3 INSERTING OR REPLACING BATTERIES
Your telephone uses 4 LR6-AA 1.5 V alkaline batteries (mercury and
cadmium-free), not supplied. To avoid damaging your set, only use
leakproof batteries.
The batteries should last about 5 months under normal conditions of use.
When the batteries are running low, the battery icon starts flashing.
Replace the batteries as soon as possible.
To install or replace the batteries:
Caution: To avoid losing your memorized numbers and customized
settings, or the contents of the call log, you need to perform the
following operation with reasonable speed.
- For safety reasons, unplug the telephone cord from the wall jack.
- Using a pointed object (the end of a pen, for example), open the battery
compartment on the top of the base.
-
Take the used batteries out one after the other, replacing each one in turn
with a new battery. Make sure you put them in the right way round, with the
or
ends as indicated
.
- Replace the battery cover and plug the telephone cord back in.
- Set the date and time as shown in 5.1.
Note: Without batteries or with empty batteries, your Temporis 08 will still
function as a basic telephone: you can make and receive calls, but all
display-dependent features (speed dial list, caller ID, call log, etc.) will
be disabled.
1.4 WALL MOUNTING
- Extract the peg (small serrated plastic part) from its housing under the
base and reinsert it upside-down.
- Run the line cord through the groove under the base.
- Drill 2 vertical holes in the wall, 83 mm apart. Insert the anchors then
screw in wood screws (diameter: 3 mm; length: 30 mm) without tightening
them. Secure the base onto the screws by pulling it downwards.
You can adjust the display contrast to make it easier to read (see 5.3).
2. USING THE TELEPHONE
2.1 RECEIVING A CALL
During the ringing phase and provided the batteries are charged correctly,
the red light on the handset flashes, signalling an incoming call if you have
cut off the ringer.
l To take the call, pick up the handset.


Joignez-vous à la conversation sur ce produit
Ici, vous pouvez partager ce que vous pensez du Alcatel Temporis 08 Téléphone. Si vous avez une question, lisez d’abord attentivement le mode d’emploi. La demande d’un mode d’emploi peut être effectuée en utilisant notre formulaire de contact.