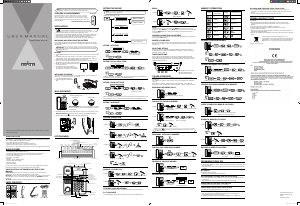
SETTING THE PHONE
NOTE: Proceed immediately to change any of the following
factory preset as required.
There are 4 options to set:
SETTING DATE/TIME
SETTING LOCAL AREA CODE
Caller ID number received that has area code (front of the number)
matches with the set area code will be ltered.
SETTING LONG DIST CODE
This code will be added to the front of the telephone number by press
and hold button “0”. This feature will only work in pre-dialing mode.
SETTING LANGUAGE
PHONE OPERATION
RECEIVING A PHONE CALL
MAKING A PHONE CALL
CONTRAST LEVEL ADJUSTMENT
Press the CONTRAST button to adjust the display contrast level.
P=>T DIAL MODE
In PULSE dialing mode, press [*] button to access TONE service.
REDIAL
MUTE
In off-hook state, user can press the MUTE button to access mute
function, when MUTE is on, the MUTE indicator will show on the screen.
Press the MUTE button to exit mute function and resume normal
conversation.
SPEAKER VOLUME LEVEL ADJUSTMENT
User may adjust speakerphone loudness level during conversation by
pressing the VOL button.
RINGER VOLUME LEVEL
The phone will ring when there is incoming call. User may select ringer
loudness to HI, MID or LOW. The ringer loudness switch is indicated at
location A.
PULSE TONE SETTING
User may select P (PULSE) or T(TONE) dialing mode according to
requirements from the local telephone company. The T/P switch is
indicated at location B.
FLASH TIME SETTING
User may use FLASH feature to access services provided by the
local telephone. The timing of the Flash is dependent on the local
telephone exchange and user may change it by setting the switch
indicated at location C.
A- Ringer Volume Switch
B- Tone/Pulse Switch
C- Flash Time Switch
CALLER ID FEATURES
Caller ID (CID) is a service available from your local telephone
company.
For Caller ID to work on this system, you must subscribe to Caller ID
service.
This unit can receive caller ID without any setting. Your caller ID
information may include the phone number, name, date and time.
REVIEWING INCOMING CALLS
DIAL BACK A CALLER ID NUMBER
REVIEWING OUTGOING NUMBERS
DIAL BACK AN OUTGOING NUMBER
DELETING A CALLER ID NUMBER
DELETING ALL CALLER ID NUMBER
MEMORY OPERATIONS
STORING A TELEPHONE NUMBER
STORING INCOMING CALL NUMBER
STORING OUTGOING NUMBERS INTO MEMORY
CHECK CONTENT OF MEMORY LOCATION
DIALING A MEMORY LOCATION
DELETING A MEMORY LOCATION
TROUBLESHOOTING TIPS
No Dial Tone
• Check all cabling to make sure that all connections are secure and
not damaged
• Check hook switch: Does it fully extend when handset is lifted from
cradle
?
No Display
• Replace the batteries.
• Check for proper battery installation.
No Information is Shown After the Phone Rings
• Are you subscribed to Caller ID service from your local telephone
company
?
• Be sure to wait until the second ring before answering.
Phone Dials in Pulse with Tone Service
• Make sure T/P DIAL MODE is on “T” mode.
Phone Won't Dial Out with Pulse Service
• Make sure T/P DIAL MODE is on “P” mode.
Phone Does Not Ring
• You may have too many extension phones on your line. Try
unplugging some extension phones.
• Check for dial tone. See troubleshooting tips for no dial tone.
NOTE: If you nd any of the parts missing, please contact your
local shop where you buy this product right away.
TELEPHONE JACK REQUIREMENTS
To use this phone, you need a RJ11C type modular
telephone jack, which might look the one pictured
here, installed in your home. If you don't have a jack,
call your local phone company to nd out how to get
one installed.
Modular telephone line jack
INSTALLATION
CAUTION: Disconnect the phone cord from the wall
outlet before installing or replacing the batteries.
• Never install telephone wiring during lightning storm.
• Never touch un-insulated telephone wires or terminals, unless the
telephone line has been disconnected at the network interface.
• Use caution when installing or modifying telephone lines.
• Never install telephone to operate in wet or damp locations.
INSTALLING AND REPLACING THE BATTERIES
Your Caller ID phone uses 3 AA-Size alkaline batteries for receiving
and storing Caller ID records and for storing the numbers you use for
frequently.
IMPORTANT: If you are not going to use the telephone for more
than 30
days, remove the batteries because they may leak and
damage the unit.
BATTERY
1. If the telephone line cord is connected, disconnect it from the base
unit.
2. Carefully turn over the phone, use a pen or paper clip to loosen
the battery cover. Open the battery compartment by pushing on
the battery cover and sliding it away from the unit.
3. Insert 3 AA-size alkaline batteries (not included) as shown on the
diagram in the battery compartment.
4. Snap the battery compartment door
back into place.
5. If the line cord was previously
connected, reattach it to the unit
and check your memory locations.
INSTALLING THE PHONE
Your phone should be placed on a level surface, such as a desk or
table top, or you can mount it on a wall.
1. Connecting the handset.
2. Connecting the telephone
line.
WALL MOUNTING
1. Rotate the wall mounting knob as shown in the following layout:
Wall mounting knob
Location Rotate 180°
WALL MOUNTING: The knob is designed to keep
this unit in place when the telephone is vertical
on the wall.
2. Install the base unit to the wall and then plug one end of line cord
into the junction box and the other end into modular telephone
line jack marked " ".
3. Fix the telephone in the wall as the following layout.
OPTIONS MENU
INTRODUCTION
Your Caller ID phone stores and displays specic information,
provided by your local telephone company, to subscribers of Caller
ID or similar caller identication services.
Your Caller ID phone enables you to:
• Identify callers before you answer the phone.
• View the time and date of each incoming call.
• Record up to 58 Caller ID name and number messages sequentially.
MAIN FEATURES
• FSK/DTMF auto detect.
• Call Waiting Caller ID(FSK Type
Ⅱ).
• Incoming call log records up to 58 calls name and number.
• Outgoing call log records up to 10 last dialed numbers.
• 10 two-touch memories.
• On hook pre-dialing.
• Redial.
• Pulse or Tone dialing mode.
• Flash timing selectable.
• Mute function.
• Speakerphone.
To get the most from your new phone, you are suggested to take a
few minutes right now to read through this user guide.
SHORT GLOSSARY OF TERMINOLOGY USED IN THIS
MANUAL
Hook switch. The part of the phone that pops up to activate the
phone line when the handset is lifted from the base.
Off-hook. A term used to describe the phone in its active mode when
the handset is off of the base cradle or when the SPEAKER button is
pressed.
On-hook. A term used to describe the phone in an inactive mode.
PARTS CHECKLIST
Make sure your package includes the items:
Base Handset Coil cord User’s Guide
Wall plate
Line cord




Joignez-vous à la conversation sur ce produit
Ici, vous pouvez partager ce que vous pensez du Alcatel Temporis 55-CE Téléphone. Si vous avez une question, lisez d’abord attentivement le mode d’emploi. La demande d’un mode d’emploi peut être effectuée en utilisant notre formulaire de contact.