SCC 400
EN - DE- FR - ES - TR
User Manual
Clock Radio
01M-GCR1130-3922-05
01M-8870721600-3922-05
A
1
2
3
4 5 6 7
8
9
10
11
12
14
13
EN __________________________
Please read this user manual first!
Dear Valued Customer,
Thank you for preferring this Grundig appliance. We hope that
you get the best results from your appliance which has been
manufactured with high quality and state-of-the-art technology.
For this reason, please read this entire user manual and all other
accompanying documents carefully before using the appliance
and keep it as a reference for future use. If you handover the ap-
pliance to someone else, give the user manual as well. Follow the
instructions by paying attention to all the information and warn-
ings in the user manual.
Remember that this user manual may also apply to other mod-
els. Differences between models are explicitly described in the
manual.
Meanings of the Symbols
Following symbols are used in various sections of this user
manual:
C
Important information and useful hints about us-
age.
A
Warnings against dangerous situations concerning
the security of life and property.
SAFETY ______________________
This section includes the safety in-
structions that will help providing
protection against personal injury
and material loss risks. Failure to fol-
low these instructions invalidates the
granted warranty.
• Do not drop the device and do
not expose it to liquid, moisture
or humidity. These might lead to
damage to the device.
• If the device is moved from a
cold environment into a warmer
one, do let it adapt to the new
temperature before operate the
device. Otherwise, it might lead
to condensation and cause mal-
functions in the device.
• Do not use the device in the dust
environment as dust can dam-
age the interior electronic com-
ponents and lead to malfunctions
in the device.
• Protect the device from strong
vibrations and place it on stable
surfaces.
• Do not attempt to disassembly
the device.
• If the device is not using for a
long period of time, disconnect
it from the power supply by un-
plugging the power plug. This is
to avoid the risk of fire.
• The ventilation should not be
impeded by covering the venti-
lation openings with items, such
as newspapers, table-cloths, cur-
tains, etc.
• No naked flame sources, such as
lighted candles, should be placed
on the apparatus.
• The product must be used in a
moderate climate.
• Only use the device with the sup-
plied parts and mains adapter.
• Attention! Always keep the de-
vice and mains adapter dry.
• If the charging adapter and power
cord are damaged, they cannot
be repaired. Please dispose of
the charging adapter in accord-
ance with environmental regula-
tions. You can procure your new
charger from the manufacturer or
authorized service.
• Never place the device, accesso-
ries or power adapter on or near
hot surfaces.
• Check that the mains voltage
indicated on the type plate cor-
responds to the local mains volt-
age.
• WARNING: Only use the adapter
supplied with the device.
• WARNING: Do not drop the
adapter into water.
• Avoid pinching, kinking or rub-
bing against sharp edges to pre-
vent the power cord from being
damaged. Keep the power cord
away from hot surfaces and
naked flames.
• Danger of suffocation! Keep all
packaging materials away from
children.
• The product must be discon-
nected from the power supply
before removing the battery.
Please dispose of used batter-
ies in accordance with local laws
and regulations.
• Never open the inside of the de-
vice. No warranty claims are ac-
cepted for damage caused by
misuse.
• This appliance can be used by
children aged from 8 years and
above and persons with reduced
physical, sensory or mental ca-
pabilities, or lack of experience
and knowledge, provided they
have been given supervision or
instruction concerning use of the
appliance in a safe way and un-
derstand the hazards involved.
Children should not play with
the appliance. Cleaning and user
maintenance should not be done
by children unless they are su-
pervised by an adult.
• Always disconnect the plug from
the socket before cleaning and
user maintenance.
• Do not drop the device.
• Attention! Always keep the de-
vice and mains adapter dry.
• Never use the product if the
power cord, product and cutter
heads are damaged. Contact the
authorized service.
• This appliance is intended for do-
mestic use only.
Power Supply
• The socket outlet should be installed near the de-
vice and should be easily accessible.
• Never touch the power plug with wet hands and never pull on
the power cable when pulling the plug out of the power socket.
• This lightning flash with arrowhead symbol within an equilat-
eral triangle is intended to alert the user to the presence of
non-insulated “dangerous voltage” within the product’s enclo-
sure that may be of sufficient magnitude to constitute a risk
of electric shock.
• The exclamation point within an equilateral triangle is intended
to alert the user to the presence of important operating and
maintenance instructions in the literature accompanying the
appliance.
• The product supports a coin/button cell battery for backup.
Backup battery isn’t included in product or package. If the
coin/button cell battery is swallowed, it can cause severe in-
ternal burns in just 2 hours and can lead to death. Always keep
lithium button batteries out of the reach of children!
• Do not ingest battery, Chemical Burn Hazard.
• If the battery compartment does not close securely, stop using
the product and keep it away from children.
• If you think batteries might have been swallowed or placed
inside any part of the body, seek immediate medical attention.
• Make sure the electrical voltage specified on the device and
its power plug is corresponding to the voltage of the power
socket. Do not apply excessive or incorrect voltages to the de-
vice, the device may not function properly and have an adverse
effect on external circuitry. Furthermore, the device itself may
become damaged or burnt.
• The device is connected to the mains with the power adap-
tor. Pull out the power adaptor when you want to completely
disconnect the device from the mains.
• The normal function of the product may be disturbed by strong
Electro-Magnetic Interference. If so, simply reset the product
to resume normal operation by following the instruction man-
ual. In case the function could not resume, please use the
product in other location.
• The device may malfunction when used in areas with strong
radio interference. The device will work properly again once
there is no more interference.
Maintenance/Cleaning
• Always power off the unit when cleaning it.
• Never use any harsh or strong solvents to clean the device
since these may damage the surface of the device. Dry, soft
cloth is appropriate, however, if the device is extremely dirty,
it may be wiped off with a slightly moist cloth. Make sure the
device is dried off after cleaning.
• Never open the device casing, the manufacturer will not ac-
cept any liability for damage resulting from improper handling.
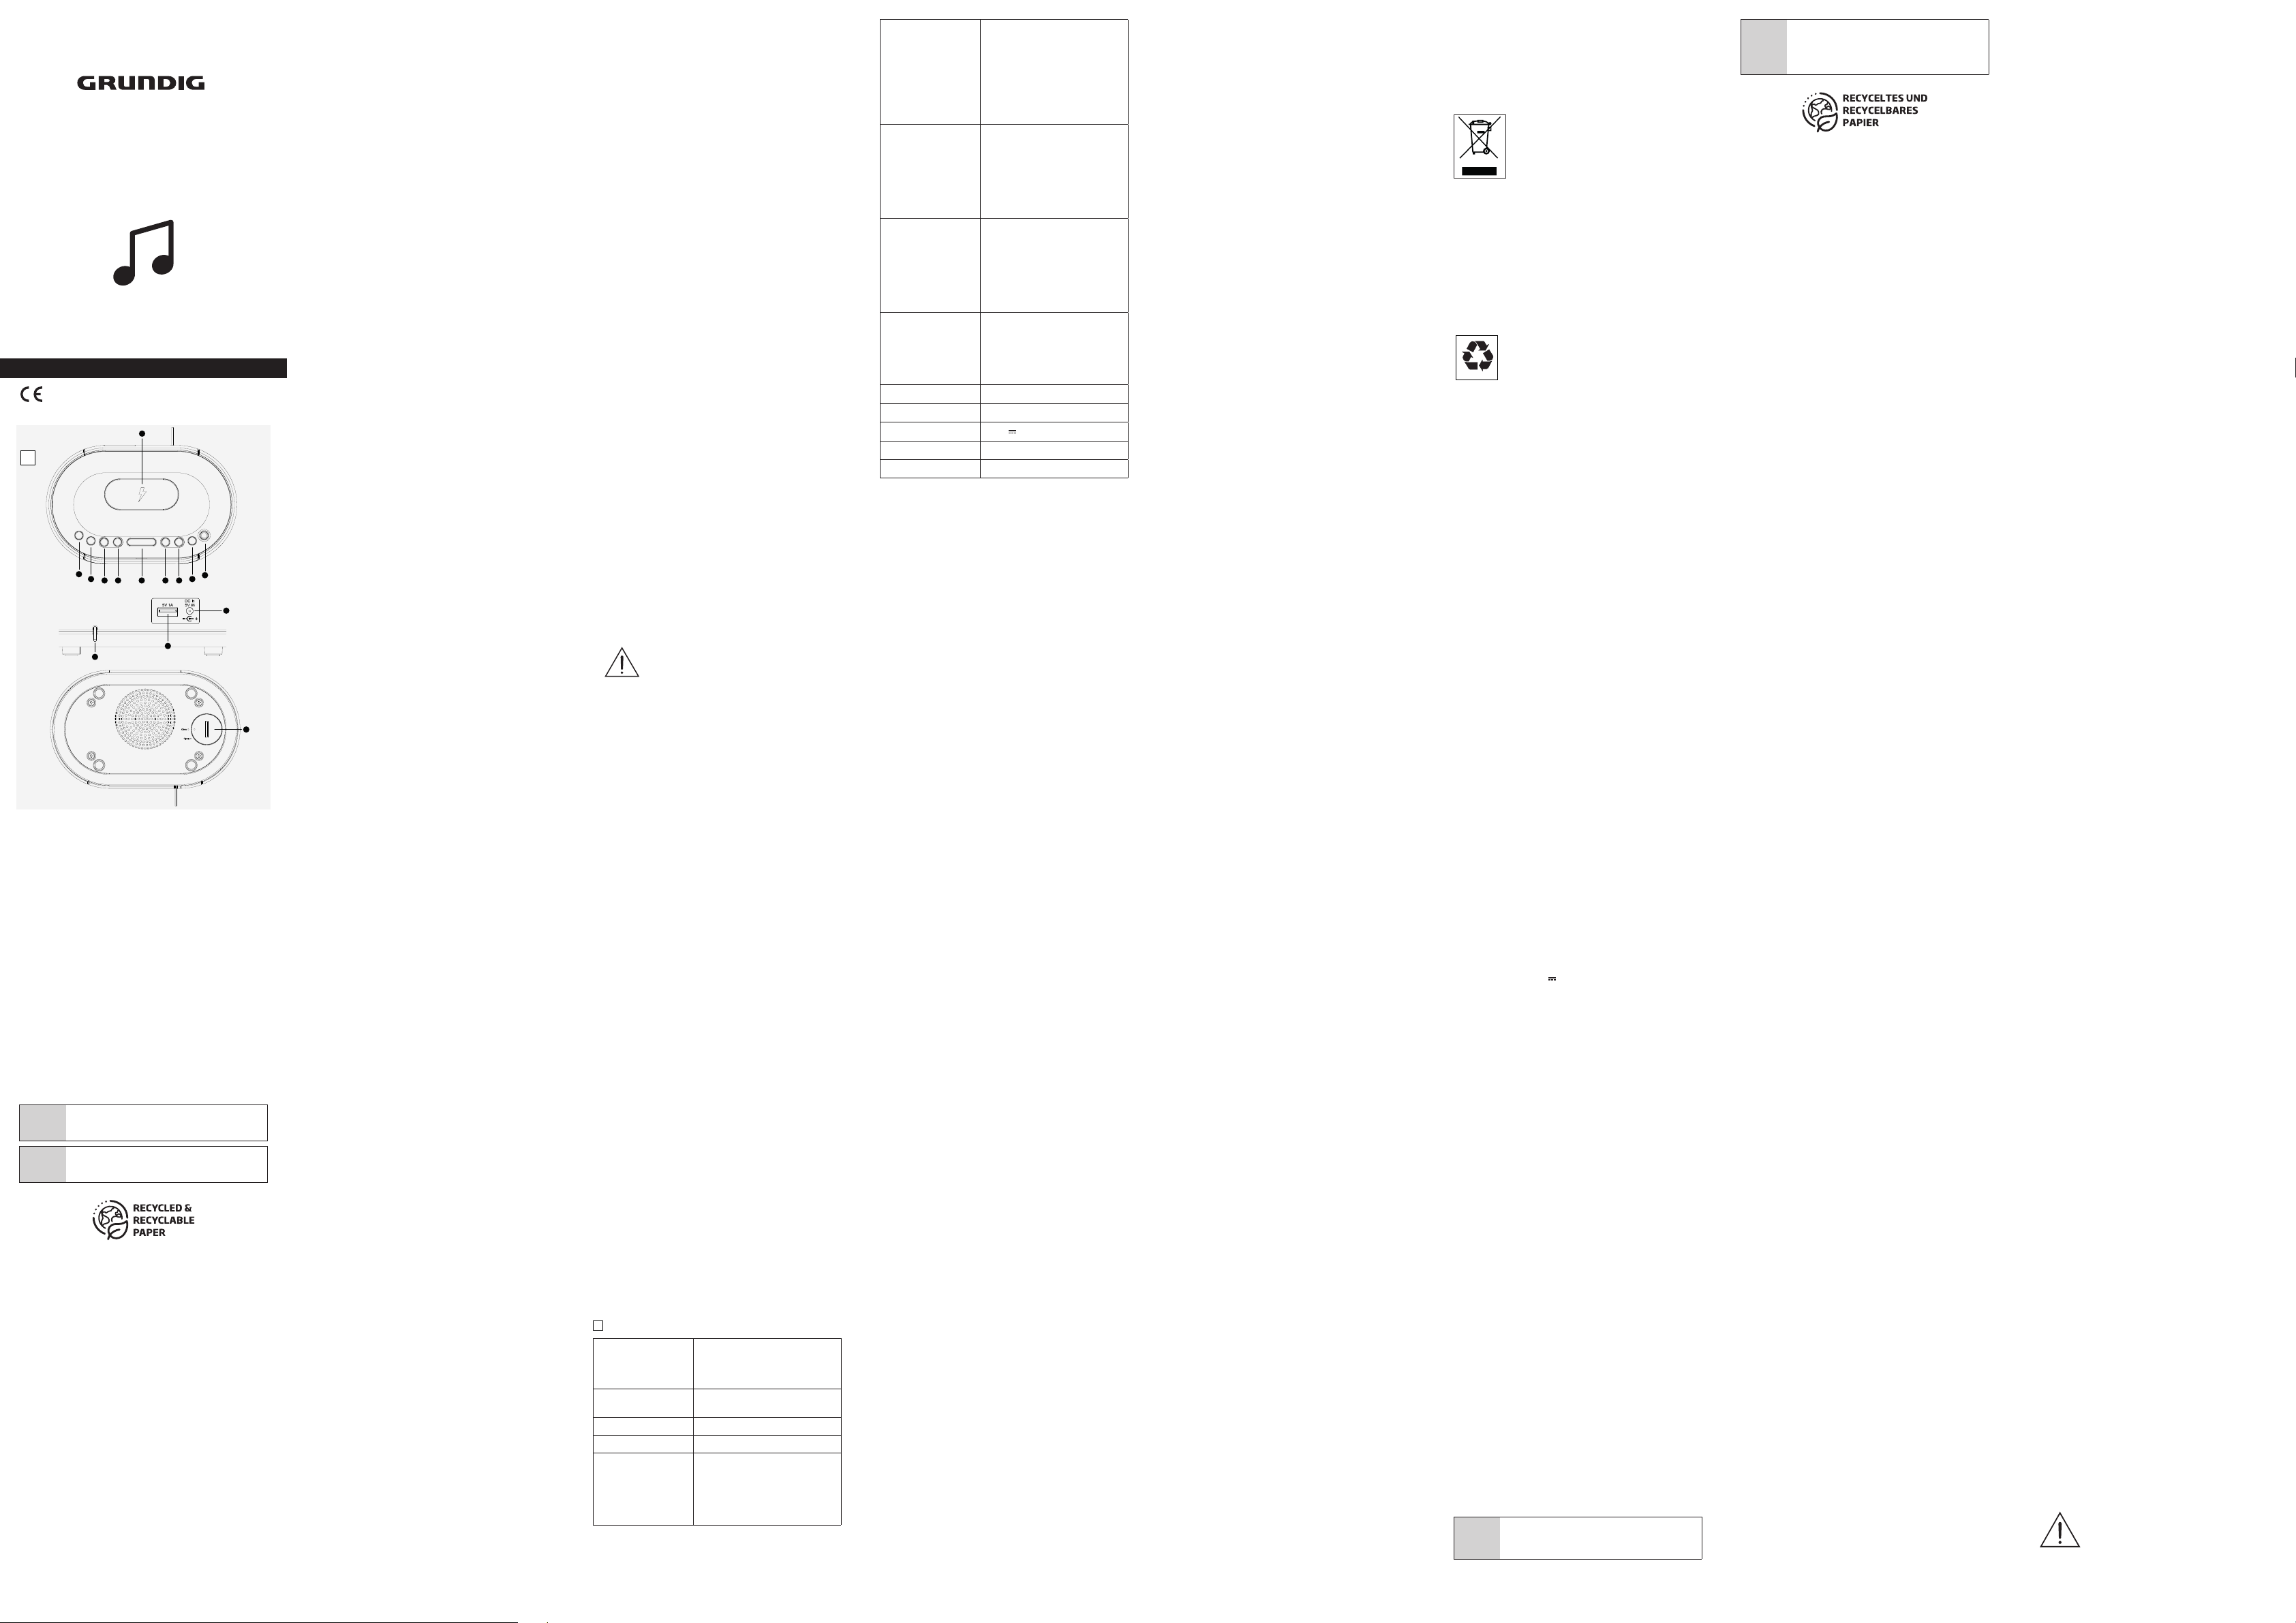
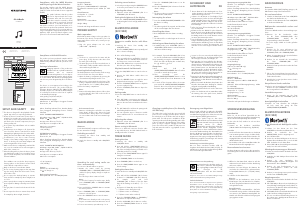
Controls and Parts
A
Grundig Wireless Charging Radio
1. ALARM SET Button
-Shortly pressed in Standby: Enable/Dis-
able alarms
-Pressed and hold in Standby: Alarm
setup mode.
2. TIME SET Button
-Pressed and hold in Standby: Flashing
the time and entering time setup
3. Vol (-) Button -Decrease volume level
4. Vol (+) Button -Increase volume level
5. SNOOZE/SLEEP/DIM-
MER Button
-Shortly pressed in Standby or Radio on:
Dimmer level adjustment
-Pressed and hold in radio on: Setting
sleep timer from 120mins to 0min
-Shortly pressed during alarm: Start
counting snooze timer
6. TUN (-) Button
-Shortly pressed in FM mode: Manual
tuning FM frequency for 100kHz down
-Pressed and hold in FM mode: Auto
searching for previously available FM
station
-Shortly pressed in BT mode: Skip to
previous song
-Pressed and hold in BT mode: Fast
backward searching in the song
7. TUN (+) Button
-Shortly pressed in FM mode: Manual
tuning FM frequency for 100kHz up
-Pressed and hold in FM mode: Auto
searching for the next available FM station
-Shortly pressed in BT mode: Skip to
next song
-Pressed and hold in BT mode: Fast for-
ward searching in the song
8. PRESET/PLAY/PAUSE
Button
-Shortly pressed in FM: Recall FM pre-
sets
- Shortly pressed in BT mode: Play or
Pause the song
-Pressed and hold in FM: Store current
station into memory
-Pressed and hold in BT mode: Enter BT
pairing
9. SOURCE/STANDBY
Button
-Shortly pressed in Standby: Last used
mode, either FM or BT
-Shortly pressed in radio on: Toggle in
between FM and BT mode
-Pressed and hold in radio on: Enter
standby mode;
10. Wireless Charger Pad -For wireless charging 5W output
11. Wire Antenna -Wired FM cable
12. USB OUT Jack -5.0 V 1.0 A (only for Charging out)
13. DC IN Jack -With adaptor power supply
14. Battery Compartment -Backup battery 1 x 3V CR2025
GETTING STARTED ______________
Power Supply
Insert back-up battery
The back-up batteries ensure that the stored settings are not lost
in the case of a power failure.
1. Open the battery compartment by unlocking and pulling out
the battery compartment cover.
2. Observe the polarity marked on the base of the battery com-
partment when inserting the battery (1 x 3V CR2025).
3. Close the battery compartment.
Mains operation
Check that the mains voltage on the type plate corresponds to
your local mains supply. If this is not the case, contact your spe-
cialist dealer.
1. Plug the power adapter into the wall socket.
Caution:
• The mains plug is used to disconnect the device, it shall re-
main readily operable and should not be obstructed during
intended use.
• Risk of fire or explosion if the battery is replaced by an incor-
rect type.
MAIN OPERATIONS ______________
Radio Mode
Antenna
For the best FM (UHF) reception it is sufficient to align the wire
antenna accordingly.
Switching ON or Standby
1. Switching the device from standby with “SOURCE/STANDBY”
button;
2. Switch the device to standby with “SOURCE/STANDBY’ button
by pressed and hold this button.
Searching for and saving radio stations - automatically
You can store 10 radio stations on presets.
1. Activate the station search by pressing “TUN (+)” or “TUN
(-)” buttons until the frequency display changes to rapid run-
through. The search stops when a station is found.
Note: To move the frequency forward in steps, briefly press “TUN
(+)” or “TUN (-)” several times.
2. Press and hold the “PRESET/PLAY/PAUSE” button to activate
the memory function.
3. Press “TUN (+)” or “TUN (-)” buttons to select the preset.
4. Press the “PRESET/PLAY/PAUSE” button to save the station.
Note: If the stations are already stored on the presets, they are
overwritten when new stations are stored.
5. To store more stations, repeat the steps 1 to 4.
Selecting stored stations
1. Select the preset by pressing the “PRESET/PLAY/PAUSE”
button to select the preset stations one after another.
Adjusting the volume
1. Adjust the volume with “VOL (-)” or “VOL (+)” buttons.
Setting the brightness of the display
1. Press the “SNOOZE/SLEEP/DIMMER” button to adjust
brightness levels in high, mid-high, middle, mid-low, low and
off levels.
Connect to mobile device with Bluetooth
1. Press briefly on the “SOURCE/STANDBY” button until BT
mode;
2. Then, the display will show ‘bt’ and the Bluetooth icon will
be flashing;
3. Go to your mobile device, and find the “SCC 400” from the
available Bluetooth device list. Then press to connect to the
radio.
4. When SCC 400 has been connected to the mobile device, the
Bluetooth icon will stop flashing.
Playback control via Bluetooth
1. Press briefly on the “SOURCE/STANDBY” button until BT
mode;
2. Connect the SCC 400 to mobile device via Bluetooth;
3. Press the “PRESET/PLAY/PAUSE” button to toggle the music
playback in between play or pause status;
4. Press the “TUN (-)” button to skip back to previous played
songs
5. Press the “TUN (+)” button to skip to the next songs;
BLUETOOTH OPERATION __________
Connect to mobile device with Bluetooth
1. Press briefly on the “SOURCE/STANDBY” button until BT
mode;
2. Then, the display will show ‘bt’ and the Bluetooth icon will
be flashing;
3. Go to your mobile device, and find the “SCC 400” from the
available Bluetooth device list. Then press to connect to the
radio.
4. When SCC 400 has been connected to the mobile device, the
Bluetooth icon will stop flashing.
Playback control via Bluetooth
1. Press briefly on the “SOURCE/STANDBY” button until BT
mode;
2. Connect the SCC 400 to mobile device via Bluetooth;
3. Press the “PRESET/PLAY/PAUSE” button to toggle the music
playback in between play or pause status;
4. Press the “TUN (-)” button to skip back to previous played
songs
5. Press the “TUN (+)” button to skip to the next songs;
TIMER MODE __________________
Setting the time
1. Switch the device to standby with “SOURCE/STANDBY” button;
2. Press and hold the “TIME SET” button to activate the setting.
3. The current day of the week will be flashing on the display.
“d1” is Monday, and “d7” is Sunday.
4. Press the “TUN (-)“ or “TUN (+)” button to choose, and press
the “TIME SET” button to confirm;
5. Then, you can choose either “24H” or “12H” as the time for-
mat of the product;
6. Press the “TUN (-)“ or “TUN (+)” button to choose, and press
the “TIME SET” button to confirm;
7. Then set the hour of current time.
8. Press the “TUN (-)“ or “TUN (+)” button to choose;
9. Then press the “TIME SET” button again for setting the minute
of current time.
10. Press the “TUN (-)“ or “TUN (+)” button to choose;
11. Press the “TIME SET” button again to confirm and save the
time settings.
Setting the alarm time
1. Switch the device to standby with “SOURCE/STANDBY” button;
2. Press and hold the “ALARM SET” button to activate the set-
ting.
3. The alarm 1 “AL1” will be flashing on the display; You can
choose to set either “AL1” for Alarm 1, or “AL2” for Alarm 2;
4. Press the “TUN (-)“ or “TUN (+)” button to choose, and press
the “ALARM SET” button to confirm;
5. Then, the alarm day will be flashing on the display. “1-5” for
weekdays alarm, “6-7” for weekends alarm, and “1-7” for dai-
ly alarm; Press the “TUN (-)“ or “TUN (+)” button to choose;
Then press the “ALARM SET” button again to confirm.
6. The display will flash the hour of the alarm time, press the
“TUN (-)“ or “TUN (+)” button to choose, and then, press the
“ALARM SET” button to confirm;
7. The display will flash the minute of the alarm time, press the
“TUN (-)“ or “TUN (+)” button to choose, and then, press the
“ALARM SET” button to confirm;
8. If you are setting alarm 1, the display will show “AL1” and
a flashing bell icon for buzzer alarm. Press the “TUN (-)“ or
“TUN (+)” button to choose either bell icon for buzzer alarm
or music icon for FM alarm; Press the “ALARM SET” button
again to confirm;
9. Then the display will flash the alarm volume level. You can
select the volume by pressing the “TUN (-)“ or TUN (+)” button;
10. Press the “ALARM SET” button again to confirm and save
the time settings.
Interrupting the alarm
1. Press the “SLEEP/SNOOZE/DIMMER” while the alarm is
sounding.
Note: The alarm signal will be stopped, and the alarm will be
sounded again after nine minutes.
Cancelling the alarm
1. Press “SOURCE/STANDBY” while the alarm is sounding.
Note: The alarm will be sounded again at the next set alarm time.
Activating and deactivating the alarm
1. In standby mode, press shortly and repeatedly on the “ALARM
SET” button to activate the alarm 1, or alarm 2, or alarm 1 +
alarm 2 with last used alarm settings.
Sleep timer
1. Press and hold the “SLEEP/SNOOZE/DIMMER” button to
activate the sleep timer.
2. Then repeatedly press the “SLEEP/SNOOZE/DIMMER” but-
ton to select the auto switch-off timer from 120 minutes to
5 minutes.
3. To switch off the sleep timer before the set time press and
hold “SLEEP/SNOOZE/DIMMER” button, then repeatedly press
the button again until “OFF” is displayed.
PHONE CHARGING ______________
Wireless Charging
Place your Qi enabled phone on the Wireless Charger pad of
the top cabinet. Depending on your phone’s design, the wireless
charging area may not be centred and will require some posi-
tional adjustment when placed on the surface of the SCC 400.
When your Qi enabled phone has been properly placed on the
wireless charging pad, the wireless charging icon on the display
will be lit to indicate the SCC 400 is allowed to charge your phone
without cable connection.
Charging a mobile phone with cable
The USB socket on the back side can provide DC power of 5V for
charging a mobile phone. Connect the mobile phone to the USB
socket with an appropriate cable. The USB power is available in
all the operating modes and including standby mode. Refer to the
user manual or the manufacturer of the mobile phone to verify if it
supports charging from an USB power. The USB socket is suitable
for DC power-out only and cannot be used for e.g. playback of
music from a USB stick.
TECHNICAL INFORMATION ________
Compliance with the WEEE Directive and Disposing of the
Waste Product:
This product complies with EU WEEE Directive (2012/19/EU).
This product bears a classification symbol for waste electrical
and electronic equipment (WEEE).
This symbol indicates that this product shall not be
disposed with other household wastes at the end
of its service life. Used device must be returned to
offical collection point for recycling of electrical
and electronic devices. To find these collection
systems please contact to your local authorities or retailer where
the product was puchased. Each household performs important
role in recovering and recycling of old appliance. Appropriate dis-
posal of used appliance helps prevent potential negative conse-
quences for the environment and human health.
Compliance with RoHS Directive
The product you have purchased complies with EU RoHS Directive
(2011/65/EU). It does not contain harmful and prohibited materi-
als specified in the Directive.
Package information
Packaging materials of the product are manufac-
tured from recyclable materials in accordance with
our National Environment Regulations. Do not dis-
pose of the packaging materials together with the
domestic or other wastes. Take them to the packaging material
collection points designated by the local authorities.
Information on Waste Batteries
This symbol on rechargeable batteries/batteries or on the packag-
ing indicates that the rechargeable battery/battery may not be dis-
posed of with regular house hold rubbish. For certain rechargeable
batteries/batteries, this symbol may be supplemented by a chemi-
cal symbol. Symbols for mercury (Hg) or lead (Pb) are provided if
the rechargeable batteries/batteries contain more than 0,0005 %
mercury or more than 0,004 % lead.
Rechargeable batteries/batteries, including those which do not
contain heavy metal, may not be disposed of with household waste.
Always dispose of used batteries in accordance with local environ-
mental regulations. Make enquiries about the applicable disposal
regulations where you live.
Technical Information
This device is noise-suppressed according to the applicable EU
directives. This product fulfils the European directives 2014/53/
EU and 2009/125/EC, 2011/65/EU.
You can find the CE declaration of conformity for the device in the
form of a pdf file on the Grundig Homepage www.grundig.com/
downloads/doc.
The type plate is located on the underside of the device.
Manufacturer of AC Adaptor : Dongguan Turnmax Electronic Co.,
Ltd.,
Address: Erxiafang Industrial Zone, Xiansha, Gaobu Town,
Dongguan, Guangdong Province 523287, P.R. China
Model: TM-K018VP-00503000PE-02
Input voltage: 100 - 240V~
Input frequency: 50/60Hz
Input current: 0.45 A
Output voltage: 5.0 V
Output current: 3.0 A
Output power: 15.0 W
Average active efficiency ≥ 81,39%
No-load power consumption : ≤ 0.1W
Power Supply
Standby power consumption: <1 W
USB charging out: 5.0 V 1.0 A
Frequency Coverage
FM: 87.5 ...108.0 MHz
Bluetooth: 2402 MHz ~ 2480 MHz
BT maximum transmitted power: 4dBm
Wireless charging output power: 5 W
Circuit features
Loudspeaker: 65.5mm
Output Power: 2 Watts
Aerial System
FM Wired Antenna
WxDxH: 185*115*81mm
Weight: 445 gr (without adaptor)
DE __________________________
Bitte lesen Sie zunächst diese Anleitung!
Sehr geehrte Kundin, sehr geehrter Kunde,
Vielen Dank, dass Sie sich für dieses Gerät der Marke Grundig
entschieden haben. Wir sind überzeugt, dass Sie mit diesem
Gerät, das mit den höchsten Qualitätsanforderungen und mod-
ernster Technologie hergestellt wurde, beste Ergebnisse erzielen
werden. Bitte lesen Sie die gesamte Bedienungsanleitung und
alle anderen Begleitdokumente aufmerksam, bevor Sie das Gerät
verwenden; bewahren Sie sie zum künftigen Nachschlagen si-
cher auf. Wenn Sie das Gerät an jemanden weitergeben, hän-
digen Sie ihm bitte auch diese Anleitung aus. Befolgen Sie die
Anweisungen, indem Sie alle Informationen und Warnhinweise in
der Bedienungsanleitung beachten.
Bitte denken Sie daran, dass diese Bedienungsanleitung even-
tuell für mehrere Modelle geschrieben wurde. Unterschiede
zwischen den Modellen werden in der Anleitung klar und deutlich
beschrieben.
Bedeutung der Symbole
Folgende Symbole werden in den verschiedenen Abschnitten
dieser Anleitung verwendet:
C
Wichtige Informationen und nützliche Tipps in
Bezug auf die Verwendung.
A
Warnhinweise zu gefährlichen Situationen im
Hinblick auf die Sicherheit von Leib, Leben und
Eigentum.
SICHERHEIT ___________________
Dieser Abschnitt enthält die
Sicherheitshinweise, die zum
Schutz vor Personen- und
Materialverlustrisiken beitra-
gen. Nichtbeachtung dieser
Anweisungenmacht die gewährte
Garantie ungültig.
• Lassen Sie das Gerät nicht fallen
und setzen Sie es keiner Flüs-
sigkeit, Feuchtigkeit oder Nässe
aus. Diese könnten das Gerät be-
schädigen.
• Wenn das Gerät von einer kalten
in eine wärmere Umgebung ge-
bracht wird, lassen Sie es sich an
die neue Temperatur anpassen,
bevor Sie es in Betrieb nehmen.
Andernfalls kann es zu Konden-
sation und Fehlfunktionen im
Gerät kommen.
• Verwenden Sie das Gerät nicht
in einer staubigen Umgebung,
da Staub die internen elektronis-
chen Komponenten beschädigen
und zu Fehlfunktionen im Gerät
führen kann.
• Schützen Sie das Gerät vor
starken Vibrationen und stellen
Sie es auf stabile Oberflächen.
• Versuchen Sie nicht, das Gerät zu
zerlegen.
• Wenn das Gerät über einen läng-
eren Zeitraum nicht benutzt wird,
trennen Sie es durch Ziehen des
Netzsteckers von der Stromver-
sorgung. So vermeiden Sie die
Gefahr eines Brandes.
• Die Ventilation darf nicht durch
Abdecken der Lüftungsöffnun-
gen mit Gegenständen wie Zei-
tungen, Tischtüchern, Vorhängen
usw. behindert werden.
• Stellen Sie keine offenen Flam-
men (z.B. brennende Kerzen) auf
das Gerät.
• Das Produkt muss in einem
gemäßigten Klima verwendet
werden.
• Verwenden Sie das Gerät nur
mit den mitgelieferten Teilen und
dem Netzadapter.
• Achtung! Halten Sie das Gerät
und den Netzadapter immer
trocken.
• Wenn der Ladeadapter und das
Netzkabel beschädigt sind, kön-
nen sie nicht repariert werden.
Bitte entsorgen Sie den Ladea-
dapter umweltgerecht. Sie kön-
nen Ihr neues Ladegerät beim
Hersteller oder autorisierten Kun-
dendienst beziehen.
• Stellen Sie das Gerät, das Zube-
hör oder den Netzadapter nie-
mals auf oder in die Nähe von
heißen Oberflächen.
• Prüfen Sie, dass die auf dem
Typenschild angegebene Netzs-
pannung mit der örtlichen Netzs-
pannung übereinstimmt.
• WARNUNG: Verwenden Sie nur
den mit dem Produkt gelieferten
Adapter.
• WARNUNG: Adaptörü suya
düşürmeyin.
• Vermeiden Sie es, das Netz-
kabel einzuklemmen, zu knicken
oder an scharfen Kanten zu rei-
ben, um eine Beschädigung des
Netzkabels zu vermeiden. Halten
Sie das Netzkabel von erhitzten
Oberflächen und offenen Flam-
men fern.
• Erstickungsgefahr! Halten Sie
das Verpackungsmaterial von
Kindern fern.
• Das Produkt muss vom Strom-
netz getrennt sein, bevor das
Akku herausgenommen wird.
Bitte entsorgen Sie gebrauchte
Batterien gemäß den örtlichen
Gesetzen und Vorschriften.
• Öffnen Sie niemals das Innere
des Geräts. Für Schäden, die
durch unsachgemäße Hand-
habung verursacht wurden,
werden keine Gewährleistung-
sansprüche anerkannt.
• Dieses Gerät kann von Kindern
ab 8 Jahren und Personen mit
eingeschränkten körperlichen,
sensorischen oder geistigen
Fähigkeiten oder fehlender Er-
fahrung und Kenntnissen benutzt
werden, wenn sie in sicherer
Weise beaufsichtigt oder unter-
wiesen wurden und die damit
verbundenen Gefahren verste-
hen. Kinder dürfen nicht mit dem
Gerät spielen. Reinigung und
Wartung durch den Benutzer
sollten nicht von Kindern durch-
geführt werden, es sei denn, sie
stehen unter der Aufsicht von
Erwachsenen.
• Ziehen Sie vor der Reinigung
und Benutzerwartung immer den
Stecker aus der Steckdose.
• Lassen Sie das Gerät nicht fallen.
• Achtung! Halten Sie das Gerät
und den Netzadapter immer
trocken.
• Verwenden Sie das Produkt nie-
mals, wenn Netzkabel, Produkt
und Schneidköpfe beschä-
digt sind. Kontaktieren Sie den
zuständigen Kundendienst.
• Dieses Gerät ist nur für den Ge-
brauch im Haushalt vorgesehen.
Stromversorgung
• Die Steckdose sollte in der Nähe des Geräts in-
stalliert und leicht zugänglich sein.
• Berühren Sie den Netzstecker nie mit nassen Händen und
ziehen Sie nie am Netzkabel, wenn Sie den Stecker aus der
Steckdose ziehen.


Joignez-vous à la conversation sur ce produit
Ici, vous pouvez partager ce que vous pensez du Grundig SCC 400 Radio-réveil. Si vous avez une question, lisez d’abord attentivement le mode d’emploi. La demande d’un mode d’emploi peut être effectuée en utilisant notre formulaire de contact.
répondre | Cela a été utile (0)