
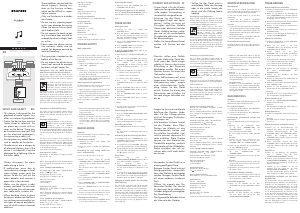
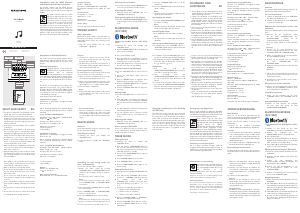
TUNING+ VOL+/AL 2
VOL-/AL 1
TUNING- ON/OFF
USB
SLEEP
SNOOZE
INFO/SELECT
PRESET
PLAY/PAUSE MODE/MENU
Sonoclock 3500
EN - DE - FR
User Manual
Clock Radio
01M-GCR1120-4122-08
EN __________________________
Please read this user manual first!
Dear Valued Customer,
Thank you for preferring this Grundig appliance. We hope that
you get the best results from your appliance which has been
manufactured with high quality and state-of-the-art technology.
For this reason, please read this entire user manual and all other
accompanying documents carefully before using the appliance
and keep it as a reference for future use. If you handover the ap-
pliance to someone else, give the user manual as well. Follow the
instructions by paying attention to all the information and warn-
ings in the user manual.
Remember that this user manual may also apply to other mod-
els. Differences between models are explicitly described in the
manual.
Meanings of the Symbols
Following symbols are used in various sections of this user
manual:
C
Important information and useful hints about us-
age.
A
Warnings against dangerous situations concerning
the security of life and property.
SETUP AND SAFETY ___________ EN
• This device is designed for the
playback of audio signals. Any
other use is expressly prohibited.
• Protect the device from mois-
ture (water drops or splashes).
Do not place any vessels such as
vases on the device. These may
be knocked over and spill fluid on
the electrical components, thus
presenting a safety risk.
• Do not place any naked flames
such as candles on the device.
• Thunderstorms are a danger to
all electrical devices. Even if the
device is switched off, it can be
damaged by a lightning strike to
the mains cable.
• Always disconnect the mains
cable during a storm.
• If malfunctions occur due to
static electricity charges or brief
mains voltage surges, reset the
device. To do this, pull out the
mains adapter and connect it
again after a few seconds.
• Make sure the device is ade-
quately ventilated. Do not cover
the ventilation slots with newspa-
pers, table cloths, curtains, etc.
• When deciding where to place
the device, please note that furni-
ture surfaces are covered by var-
ious types of varnish and plastic,
most of which contain chemical
additives.
• These additives can corrode the
device supports, leaving residues
on the furniture surfaces which
can be difficult or impossible to
remove.
• Only use the device in a moder-
ate climate.
• Do not use any cleaning agent,
as this may damage the casing.
Clean the device with a clean,
moist leather cloth.
• Do not expose the back-up bat-
tery to extreme heat, caused for
example by direct sunlight, heat-
ers or fire.
• Never open the device casing.
No warranty claims are accepted
for damage caused by incorrect
handling.
• The type plate is located on the
bottom of the device.
• Do not expose the device to ex-
treme heat, caused for example
by direct sunlight, heater fire.
Compliance with the WEEE Directive and Disposing of the
Waste Product:
This product complies with EU WEEE Directive (2012/19/EU).
This product bears a classification symbol for waste electrical
and electronic equipment (WEEE).
This symbol indicates that this product shall not be
disposed with other household wastes at the end
of its service life. Used device must be returned to
offical collection point for recycling of electrical
and electronic devices. To find these collection
systems please contact to your local authorities or retailer where
the product was puchased. Each household performs important
role in recovering and recycling of old appliance. Appropriate dis-
posal of used appliance helps prevent potential negative conse-
quences for the environment and human health.
Compliance with RoHS Directive
The product you have purchased complies with EU RoHS Directive
(2011/65/EU). It does not contain harmful and prohibited materi-
als specified in the Directive.
Package information
Packaging materials of the product are manufactured
from recyclable materials in accordance with our
National Environment Regulations. Do not dispose of
the packaging materials together with the domestic
or other wastes. Take them to the packaging material collection
points designated by the local authorities.
Technical data
This device is noise-suppressed according to the applicable EU
directives. This product fulfils the European directives 2014/53/
EU, 2009/125/EC and 2011/65/EU. You can find the CE declara-
tion of conformity for the device in the form of a pdf file on the
Grundig Homepage
www.grundig.com/downloads/doc
Power supply:
Manufacturer of AC Adaptor: Dongguan Turnmax Electronic Co., Ltd.
Adress: Erxiafang Industrial Zone, Xiansha, Gabou Town,
Dongguan, Guangdong Province 523287, P.R. China
Model: TM-K006VA-00501500PE-02
AC Adaptor Input:100 - 240V~, 50/60 Hz 0.25A;
Output: 5V 1.5A 7.5W
Average active efficiency: 76,65%
No-load power consumption: <0.1W
Max. Power consumption:
<11 W (operation)
<1W (standby)
Output:
USB host: 5V 1A charge out
Back up micro batteries:
Back up DC Batt: 2 x 1.5v UM4/R03/AAA
Frequency bands:
DAB/DAB+ 174.928 – 239.200 MHz
BT Frequency: 2402 - 2480 MHz
BT maximum transmitted power: 4dBm
FM 87.5 ...108.0 MHz
Circuit features:
Loudspeaker: 3 inch
Output Power: 2 W
Dimensions:
W x H x L 200 x 120 x 65 cm
Weight: 450 gr
Technical and design modifications reserved.
POWER SUPPLY ________________
Mains operation
Check that the mains voltage on the type plate (on the bottom of
the device) corresponds to your local mains supply. If this is not
the case, contact your specialist dealer.
1. Plug the power adaptor into the socket (100 - 240V~,
50/60 Hz).
Caution:
• The device is connected to the mains with the power plug. To
fully disconnect the device from the mains, pull out the plug.
• The mains plug is used to disconnect the device. It shall re-
main readily operable and should not be obstructed during
intended use.
• Risk of fire or explosion if the battery is replaced by an incor-
rect type.
Inserting the back-up battery
The back-up batteries ensure that the stored set¬tings are not
lost in the case of a power failure.
1. Open the battery compartment by pressing the area market
and pushing down the cover.
2. Observe the polarity marked on the base of the battery com-
partment when inserting the batteries (micro batteries, 2 x 1.5
V, R03/ UM 4/ AAA).
3. Close the battery compartment.
Note:
• Remove the back-up battery when it is flat or when you know
that the device will not be used for a long period of time.
Environmental note:
• Batteries, including those which do not contain heavy metal,
should not be disposed of with household waste. Always dis-
pose of used batteries in accordance with local environmental
regulations.
DAB MODE ____________________
Antenna
For the best DAB and FM (UHF) reception it is sufficient to align
the wire antenna accordingly.
Switching “ON/OFF”
1. Switching the device from standby with »ON/OFF« button;
2. Switch the device to standby with »ON/OFF« button
Searching for and saving radio stations - automatically
The radio will perform ATS when you use the radio for the first
time. The radio will search for the DAB stations and store into the
DAB radio list. And then, it will search for FM stations and store
into FM presets.
Selecting a DAB station
1. Press and release the »ON/OFF« button to switch on your
radio.
2. Press the »MODE/MENU« button until the DAB mode is se-
lected.
3. Press the »TUNING +« or »TUNING -« button to choose the
DAB station from the list.
4. When the desired station name appears on the display, press
the »SNOOZE/SLEEP/INFO/SELECT« button to select the sta-
tion. The radio will select the new station.
Display DAB information
Manual tuning allows you to tune your radio to a particular DAB
frequency in Band III.
1. Press and hold the »MODE/MENU« button for 2 seconds, the
display will show DAB menu.
2. Press the »TUNING +« or »TUNING -« button until ‘MANUAL’
shows on the display.
3. Press the »SNOOZE/SLEEP/INFO/SELECT« button to enter
manual tuning mode.
4. Press the »TUNING +« or »TUNING -« button to select the de-
sired DAB channel. press the »SNOOZE/SLEEP/INFO/SELECT«
button to tune to the chosen frequency.
5. If a signal is present, this will be indicated on a signal strength
display. The minimum signal marker (|) shows the minimum
signal strength needed for good DAB reception.
6. Press the »SNOOZE/SLEEP/INFO/SELECT« button to store the
new DAB stations into the list and return to normal tuning.
Display DAB information
Your radio has a range of display options when in DAB mode, press
the »SNOOZE/SLEEP/INFO/SELECT« button to cycle through the
various displays, including: Station name, DLS, Program type,
Multiplex name, Frequency, Bit rate, Signal strength, time and
data. All display options except the text display will revert to the
clock display after 10 seconds.
Dynamic Range Control (DRC)
The DRC facility can make quieter sounds easier to hear when
your radio is used in a noisy environment.
1. Press the »ON/OFF« button to switch on your radio.
2. Press and hold the »MODE/MENU« button for 2 seconds, the
display will show DAB menu.
3. Press the »TUNING +« or »TUNING -« button until ‘DRC’ shows
on the display.
4. Press the »SNOOZE/SLEEP/INFO/SELECT« button to enter
adjustment mode.
5. Press the »TUNING +« or »TUNING -« button to select required
DRC setting, DRC 0, DRC 1 or DRC ½;
6. Press and release the »SNOOZE/SLEEP/INFO/SELECT« button
to confirm the setting. The display will return to the station
name display after several seconds.
Prune stations - DAB
If you move to a different part of the country, some of the stations
which were listed may no longer be available. Stations which
cannot be found, or which have not been received for a very long
time are shown in the station list with a question mark.
The Prune stations function will delete the marked DAB stations
from your station list.
1. Press the »ON/OFF« button to switch on your radio and press
the »MODE/MENU« button to switch until DAB mode.
2. Press and hold the »MODE/MENU« button for 2 seconds, the
display will show DAB menu.
3. Press the »TUNING +« or »TUNING -« button until ‘PRUNE’
shows on the display.
4. Press the »SNOOZE/SLEEP/INFO/SELECT« button, then
‘SELECT’ will be shown on the display.
5. Press the »SNOOZE/SLEEP/INFO/SELECT« button to cause
the invalid station names to be removed from the station list.
The display will return to station name display after several
seconds.
FM MODE _____________________
Automatically and manually tuning for FM radio stations
You can store 10 radio stations on presets.
1. Activate the auto FM station tuning by pressing and holding
the »TUNING +« or »TUNING -« buttons until the frequency
display changes to rapid run-through. The search stops when
a station is found.
Note:
• To move the frequency forward in steps, briefly press »TUNING
+« or »TUNING -« several times.
2. Or to start FM manual tuning by briefly pressing the »TUNING
+« or »TUNING -« buttons, the radio will step up or down for
50kHz by each pressed.
Display FM information
Your radio has a range of display options when in FM display
mode, press the »SNOOZE/SLEEP/INFO/SELECT« button to cycle
through the various displays, including: Station name, Radio text,
PTY, Frequency, time and data. All display options except the text
display will revert to the clock display after 10 seconds.
FM scanning settings
Your radio includes a local FM for strong FM stations, and distant
option for all the strong and weak FM stations.
1. Press the »ON/OFF« button to switch on the radio to FM mode.
2. Press and hold the »MODE/MENU« button, the display will
show Setting.
3. Press the »SNOOZE/SLEEP/INFO/SELECT« button to enter
Setting.
4. Press the »TUNING +« or »TUNING -« button to select Local
FM or Distant;
5. Press the »SNOOZE/SLEEP/INFO/SELECT« button to confirm
the setting.
Searching for and saving radio stations for DAB or FM
You can store 10 radio stations on presets for each of the DAB
mode or FM mode.
1. Switch on the radio to DAB or FM mode.
2. Select the desired DAB station from the list, or search the
desired FM station by pressing »TUNING +« or »TUNING -«
buttons.
3. Press and hold the »PRESET« button to activate the memory
function.
4. Press »TUNING +« or »TUNING -« buttons to select the preset.
5. Press the »SNOOZE/SLEEP/INFO/SELECT« button to save the
station.
Note:
• If the stations are already stored on the presets, they are over-
written when new stations are stored.
6. To store more stations, repeat the steps 1 to 4.
Selecting stored stations
7. Select the preset by pressing the »PRESET« button to select
the preset stations one after another.
Adjusting the volume
8. Adjust the volume with »VOLUME -/AL1« or »VOLUME +/AL2«
buttons.
BLUETOOTH MODE ______________
Connect to mobile device with Bluetooth
1. Switching the device from standby with »ON/OFF« button.
2. Press the »MODE/TIME« button repeatedly until »bt« is shown
on display;
3. The Bluetooth icon will be flashing on LCD;
4. Go to your mobile device, and find the “Sonoclock 3500” from
the available Bluetooth device list. Then press to connect to
the radio.
5. When Sonoclock 3500 BT DAB+ has been connected to the
mobile device, the Bluetooth icon will be stopped flashing.
Playback control via Bluetooth
1. Press the »ON/OFF« button to switch on the radio.
2. Connect the Sonoclock 3500 BT DAB+ to mobile device via
Bluetooth.
3. Press the »PRESET« button to toggle the music playback in
between play or pause status.
4. Press the »TUNING-« button to skip back to previous played
songs.
5. Press the »TUNING+« button to skip to the next songs.
Pairing mode
1. Press the »ON/OFF« button to switch on the radio;
2. If the Sonoclock 3500 BT DAB+ is connecting to any mobile
device via Bluetooth, press and hold the »PRESET« button to
disconnect the current Bluetooth connection.
3. The Sonoclock 3500 BT DAB+ will be in Bluetooth pairing
mode with flashing the Bluetooth icon.
4. You can repeat the steps in “Connect to mobile device with
Bluetooth” for a new Bluetooth connection.
Adjusting the volume
1. Adjust the volume with »VOLUME -/AL 1« or »VOLUME +/AL
2« buttons.
Power saving in Bluetooth
If there is no Bluetooth connection from the radio to any mobile
devices, the Sonoclock 3500 BT DAB+ will switch to standby
mode after 15 minutes.
TIMER MODE __________________
Synchronise the time from either DAB or FM
1. Switch the device from standby with »ON/OFF« button, then
press and hold the »MODE/MENU« button for two seconds to
activate the menu setting.
2. Press the »TUNING +« or »TUNING -« button find ‘SYSTEM’,
then press the »SNOOZE/SLEEP/INFO/SELECT« button to en-
ter system menu;
3. Press the »TUNING +« or »TUNING -« button find ‘TIME’, then
press the »SNOOZE/SLEEP/INFO/SELECT« button to enter;
4. Press the »TUNING +« or »TUNING -« button find ‘UDPATE’,
then press the »SNOOZE/SLEEP/INFO/SELECT« button to
enter;
5. Now you can use the »TUNING +« or »TUNING -« button
choose the time source from ‘ANY’, ‘DAB’, ‘FM’ or ‘NONE’,
then press the »SNOOZE/SLEEP/INFO/SELECT« button to en-
ter system menu;
Manual set time
1. You can enter the time manually by following the step 1 to 3
from the ‘Synchronise the time from either DAB or FM’.
2. Select ‘SET TIME’, then press the »SNOOZE/SLEEP/INFO/
SELECT« button to enter manual set time.
3. Please use the »TUNING +« or »TUNING -« button to select the
desired time and date, and use the »SNOOZE/SLEEP/INFO/
SELECT« button to confirm the settings.
Set time display format
1. You can enter the time display format by following the step 1
to 3 from the ‘Synchronise the time from either DAB or FM’.
2. Select ‘SET FORMAT, then press the »SNOOZE/SLEEP/INFO/
SELECT« button to enter set time display format.
3. Please use the »TUNING +« or »TUNING -«button to select
the ‘12’ or ‘24’, and use the »SNOOZE/SLEEP/INFO/SELECT«
button to confirm the settings.
Setting the alarm time
1. Switch the device to standby with »ON/OFF« button;
2. Press and hold the »VOLUME -/AL 1« button for alarm 1 or
»VOLUME +/AL 2« for alarm 2;
3. For example, press and hold »VOLUME -/AL 1« button to enter
alarm 1 setting menu, then press the »SNOOZE/SLEEP/INFO/
SELECT« button to start alarm 1 setup.
4. Please choose »ON« to activate the alarm, or »OFF« to de-
activate the alarm, then press the »SNOOZE/SLEEP/INFO/
SELECT« button to next.
5. Please use the »TUNING +« or »TUNING -« button to select
the alarm time, and use the »SNOOZE/SLEEP/INFO/SELECT«
button to next step.
6. Please use the »TUNING +« or »TUNING -« button to choose
from ‘WEEKDAYS’, ‘WEEKENDS’, ‘DAILY’ or ‘ONCE’, and then
use the »SNOOZE/SLEEP/INFO/SELECT« button to the next
settings.
Note:
• If you choose ‘ONCE’ alarm, you must set the specific date
for the alarm.
7. Please use the »TUNING +« or »TUNING -« button to select
the desired alarm from ‘DAB’, ‘FM’ or ‘BUZZER’, then press
the »SNOOZE/SLEEP/INFO/SELECT« button to confirm the
settings.
Note:
• If you have chosen either ‘DAB’ or ‘FM’ as the alarm source,
you must choose the preset station or the last listened station
of the mode.
8. Please use the »TUNING +« or »TUNING -« button to select the
desired alarm volume, then press the »SNOOZE/SLEEP/INFO/
SELECT« button to confirm the settings. The display will be
showing ‘SAVED’ to exit the alarm setup.
Notes:
• The device wakes you up at the set alarm time, the alarm
duration is 60 minutes.
• After activating the alarm, the corresponding alarm icon will
be lightened.
Snooze the alarm
1. Press the »SNOOZE/SLEEP/INFO/SELECT« while the alarm is
sounding.
2. During snooze, the SNOOZE LED will be lightened.
Note:
• The alarm signal will be stopped, and the alarm will be
sounded again after nine minutes.
Cancelling the alarm
1. Press »ON/OFF« while the alarm is sounding.
Note:
• The alarm will be sounded again at the next set alarm time.
Activating and deactivating the alarm
1. In standby mode, press »VOLUME -/AL 1« or »VOLUME +/AL
2« button to activate the alarm with last used alarm settings or
to deactivate the alarm.
Sleep timer
1. Press and hold the »SLEEP/SNOOZE/INFO/SELECT« button for
about 2 seconds to activate the sleep timer.
2. Then repeatedly press the »TUNING +« or »TUNING -« but-
ton to select the auto switch-off timer from 90 minutes to
10 minutes, then press the »SNOOZE/SLEEP/INFO/SELECT«
button to confirm.
3. To switch off the sleep timer before the set time press and
hold »SNOOZE/SLEEP/INFO/SELECT« button for about 2 sec-
onds, then repeatedly press »TUNING +« or »TUNING -« but-
ton until »OFF« is displayed, then press the »SNOOZE/SLEEP/
INFO/SELECT« button to confirm.
Brightness settings
1. Switch the device from standby with »ON/OFF« button, then
press and hold the »MODE/MENU« button for two seconds to
activate the menu setting.
2. Press the »TUNING +« or »TUNING -« button find ‘SYSTEM’,
then press the »SNOOZE/SLEEP/INFO/SELECT« button to en-
ter system menu;
3. Press the »TUNING +« or »TUNING -« button find ‘DIMMER’,
then press the »SNOOZE/SLEEP/INFO/SELECT« button to en-
ter;
4. If you wish to setup the brightness level of radio modes, please
choose ‘NORMAL’; if you wish to setup the brightness level of
standby mode, please choose ‘STANDBY’.
5. Press the »TUNING +« or »TUNING -« button find ‘desired
brightness level from ‘HIGH’, ‘MID’ or ‘LOW’, then press the
»SNOOZE/SLEEP/INFO/SELECT« button to confirm;
Language settings
Factory reset
1. Switch the device from standby with »ON/OFF« button, then
press and hold the »MODE/MENU« button for two seconds to
activate the menu setting.
2. Press the »TUNING +« or »TUNING -« button find ‘SYSTEM’,
then press the »SNOOZE/SLEEP/INFO/SELECT« button to en-
ter system menu;
3. Press the »TUNING +« or »TUNING -« button find ‘FACTORY’,
then press the »SNOOZE/SLEEP/INFO/SELECT« button to
enter;
4. If you wish to reset all the settings to factory default, press the
»SNOOZE/SLEEP/INFO/SELECT« button to confirm;
Charging a mobile phone
The USB socket on the back side can provide DC power of 5V for
charging a mobile phone. Connect the mobile phone to the USB
socket with an appropriate cable. The USB power is available in
all the operating modes and including standby mode. Refer to the
user manual or the manufacturer of the mobile phone to verify if it
supports charging from an USB power. The USB socket is suitable
for DC power-out only and cannot be used for e.g. playback of
music from a USB stick.
DE __________________________
Bitte lesen Sie zunächst diese Anleitung!
Sehr geehrte Kundin, sehr geehrter Kunde,
Vielen Dank, dass Sie sich für dieses Gerät der Marke Grundig
entschieden haben. Wir sind überzeugt, dass Sie mit diesem
Gerät, das mit den höchsten Qualitätsanforderungen und mod-
ernster Technologie hergestellt wurde, beste Ergebnisse erzielen
werden. Bitte lesen Sie die gesamte Bedienungsanleitung und
alle anderen Begleitdokumente aufmerksam, bevor Sie das Gerät
verwenden; bewahren Sie sie zum künftigen Nachschlagen si-
cher auf. Wenn Sie das Gerät an jemanden weitergeben, hän-
digen Sie ihm bitte auch diese Anleitung aus. Befolgen Sie die
Anweisungen, indem Sie alle Informationen und Warnhinweise in
der Bedienungsanleitung beachten.
Bitte denken Sie daran, dass diese Bedienungsanleitung even-
tuell für mehrere Modelle geschrieben wurde. Unterschiede
zwischen den Modellen werden in der Anleitung klar und deutlich
beschrieben.
Bedeutung der Symbole
Folgende Symbole werden in den verschiedenen Abschnitten
dieser Anleitung verwendet:
C
Wichtige Informationen und nützliche Tipps in
Bezug auf die Verwendung.
A
Warnhinweise zu gefährlichen Situationen im
Hinblick auf die Sicherheit von Leib, Leben und
Eigentum.
SICHERHEIT UND AUFSTELLEN _____
• Dieses Gerät ist für die Wieder-
gabe von Tonsignalen bestimmt.
Jede andere Verwendung ist
ausdrücklich ausgeschlossen.
• Schützen Sie das Gerät vor
Feuchtigkeit (Tropf- und Sprit-
zwasser). Stellen Sie keine mit
Flüssigkeit gefüllten Gefäße
(Vasen oder ähnliches) auf das
Gerät. Gefäße könnten umkippen
und mit der auslaufenden Flüs-
sigkeit die elektrische Sicherheit
beeinträchtigen.
• Stellen Sie keine offenen
Brandquellen, z.B. Kerzen, auf
das Gerät.
• Gewitter stellen eine Gefahr
für jedes elektrische Gerät dar.
Auch wenn das Gerät ausge-
schaltet ist, kann es durch einen
Blitzschlag in das Stromnetz
beschädigt werden. Bei einem
Gewitter müssen Sie immer den
Netzstecker ziehen.
• Treten Fehlfunktionen auf,
etwa wegen einer kurzzeitigen
Netzüberspannung oder wegen
einer elektrostatischen Aufla-
dung, setzen Sie das Gerät
zurück. Ziehen Sie hierzu den
Netzstecker und schließen Sie
ihn nach einigen Sekunden
wieder an.
• Sorgen Sie für eine ausreichende
Belüftung des Gerätes. Bedecken
Sie die Lüftungsschlitze nicht mit
Zeitungen, Tischtücher, Vorhän-
gen, etc.
• Bitte beachten Sie beim Aufs-
tellen des Gerätes, dass Ober-
flächen von Möbeln mit den
verschiedensten Lacken und
Kunststoffen beschichtet sind,
welche meistens chemische
Zusätze enthalten. Diese Zusätze
können u.a. das Material der
Gerätefüße angreifen, wodurch
Rückstände auf der Möbelober-
fläche entstehen, die sich nur
schwer oder nicht mehr en-
tfernen lassen.
• Verwenden Sie das Gerät nur in
einem gemäßigten Klima.
• Reinigen Sie das Gerät nicht mit
Reinigungsmitteln; andernfalls
kann das Gehäuse beschädigt
werden. Reinigen Sie das Gerät mit
einem sauberen, trockenen Tuch.
• Öffnen Sie niemals das Ge-
häuse des Gerätes. Der Herstel-
ler übernimmt keine Haftung
für Schäden aufgrund unsach-
gemäßer Handhabung.
• Das Typenschild befindet sich an
der Unterseite des Gerätes.
• Stellen Sie das Gerät nicht in
unmittelbare Nähe der Heizung
oder in die pralle Sonne; dadurch
wird die Kühlung beeinträchtigt.
Ihre Pflichten als Endnutzer
Dieses Produkt erfüllt die Vorgaben der EU-
WEEE-Direktive (2012/19/ EU). Das Produkt
wurde mit einem Klassifizierungssymbol für elek-
trische und elektronische Altgeräte (WEEE)
gekennzeichnet.
Dieses Elektro- bzw. Elektronikgerät ist mit
einer durchgestrichenen Abfalltonne auf Rädern
gekennzeichnet. Das Gerät darf deshalb nur getrennt vom un-
sortierten Siedlungsabfall gesammelt und zurückgenommen
werden. Es darf somit nicht in den Hausmüll gegeben werden. Das
Gerät kann z.B. bei einer kommunalen Sammelstelle oder ggf. bei
einem Vertreiber (siehe unten zu deren Rücknahmepflichten in
Deutschland) abgegeben werden.
Das gilt auch für alle Bauteile, Unterbaugruppen und
Verbrauchsmaterialien des zu entsorgenden Altgeräts.
Bevor das Altgerät entsorgt werden darf, müssen alle Altbatterien
und Altakkumulatoren vom Altgerät getrennt werden, die nicht
vom Altgerät umschlossen sind. Das gleiche gilt für Lampen, die
zerstörungsfrei aus dem Altgerät entnommen werden können.
Der Endnutzer ist zudem selbst dafür verantwortlich, personenb-
ezogene Daten auf dem Altgerät zu löschen.
Die ordnungsgemäße Entsorgung gebrauchter Geräte trägt dazu
bei, mögliche negative Folgen für die Umwelt und die menschli-
che Gesundheit zu vermeiden.
Hinweise zum Recycling
Helfen Sie mit, alle Materialien zu recyceln, die mit
diesem Symbol gekennzeichnet sind. Entsorgen Sie sol-
che Materialien, insbesondere Verpackungen, nicht im
Hausmüll, sondern über die bereitgestellten
Recyclingbehälter oder die entsprechenden örtlichen Sammelsysteme.
Recyceln Sie zum Umwelt - und Gesundheitsschutz elektrische
und elektronische Geräte.
Rücknahmepflichten der Vertreiber
Wer auf mindestens 400 m² Verkaufsfläche Elektro- und
Elektronikgeräte vertreibt oder diese gewerblich an Endnutzer ab-
gibt, ist verpflichtet, bei Abgabe eines neuen Gerätes, ein Altgerät
des Endnutzers der gleichen Geräteart, das im Wesentlichen
die gleichen Funktionen wie das neue Gerät erfüllt, am Ort der
Abgabe oder in unmittelbarer Nähe, unentgeltlich zurückzune-
hmen. Das gilt auch für Vertreiber von Lebensmitteln mit einer
Gesamtverkaufsfläche von mindestens 800 m², die mehrmals im
Kalenderjahr oder dauerhaft Elektro- und Elektronikgeräte anbi-
eten und auf dem Markt bereitstellen. Solche Vertreiber müssen
zudem auf Verlangen des Endnutzers Altgeräte, die in keiner äu-
ßeren Abmessung größer als 25 cm sind, (kleine Elektrogeräte)
im Einzelhandelsgeschäft oder in unmittelbarer Nähe hierzu un-
entgeltlich zurückzunehmen; die Rücknahme darf in diesem Fall
nicht an den Kauf eines Elektro- oder Elektronikgerätes verknüp-
ft, kann aber auf drei Altgeräte pro Geräteart beschränkt werden.
Ort der Abgabe ist auch der private Haushalt, wenn das neue
Elektro- oder Elektronikgerät dorthin geliefert wird; in diesem Fall
ist die Abholung des Altgerätes für den Endnutzer kostenlos.
Die vorstehenden Pflichten gelten auch für den Vertrieb unter
Verwendung von Fernkommunikationsmitteln, wenn die Vertreiber
Lager- und Versandflächen für Elektro- und Elektronikgeräte bzw.
Gesamtlager und Versandflächen für Lebensmittel beinhalten,
die den oben genannten Verkaufsflächen entsprechen. Die un-
entgeltliche Abholung von Elektro- und Elektronikgeräten ist
dann aber auf Wärmeüberträger (z.B. Kühlschrank), Bildschirme,
Monitore und Geräte, die Bildschirme mit einer Oberfläche von
mehr als 100 cm² enthalten und Geräte beschränkt, bei denen
mindestens eine der äußeren Abmessungen mehr
Einhaltung von RoHS-Vorgaben
Das von Ihnen erworbene Produkt erfüllt die Vorgaben der EU-
RoHS Direktive (2011/65/EU). Es enthält keine in der Direktive
angegebenen gefährlichen und unzulässigen Materialien.
Technische Daten
Dieses Gerät ist funkentstört entsprechend den geltenden EU-
Richtlinien. Dieses Produkt erfüllt die europäischen Richtlinien
2014/53/EU, 2009/125/EC und 2011/65/EU. Den genauen
Wortlaut der Konformitätserklärung (DOC) finden Sie auf der
GRUNDIG Homepage
www.grundig.com/downloads/doc.
Spannungsversorgung:
Hersteller von AC-Adapter: Dongguan Turnmax Electronic Co., Ltd.
Adresse: Erxiafang Industrial Zone, Xiansha, Gabou Town,
Dongguan, Guangdong Province 523287, P.R. China
Modell: TM-K006VA-00501500PE-02
AC Adaptor Input:100 - 240V~, 50/60 Hz 0.25A;
Ausgangsleistung: 5V 1.5A 7.5W
Average active efficiency: 76,65%
No-load power consumption: <0.1W
Max. Leistungsaufnahme:
<11 W (im Betrieb)
<1 W (Stand-by)
Ausgang:
USB-Host: 5 V 1 A Ladeausgang
Speicher-Mikrobatterien:
Speicherbatterie: 2 x 1,5 V UM4/R03/AAA
Frequenzbänder:
DAB/DAB+ 174.928 – 239.200 MHz
Bluetooth-Frequenzen: 2402 – 2480 MHz
Maximale Bluetooth-Übertragungsleistung: 4 dBm
UKW 87,5 ... 108,0 MHz
Stromkreisfunktionen:
Lautsprecher: 7,62 cm
Ausgangsleistung: 2 W
Abmessungen:
B x H x L 200 x 120 x 65 cm
Gewicht: 450 g
Technische und optische Änderungen vorbehalten.
STROMVERSORGUNG ____________
Netzbetrieb
Prüfen Sie die auf dem Typenschild (an der Unterseite des
Gerätes) angegebene Netzspannung. Diese muss der lokalen
Netzspannung entsprechen. Falls nicht, wenden Sie sich bitte an
Ihren Fachhändler.
1. Netzteil an die Steckdose anschließen (100 bis 240 V
Wechselspannung, 50/60 Hz).
Achtung:
• Dieses Gerät ist über den Netzstecker mit der Stromversor-
gung verbunden. Ziehen Sie den Netzstecker zur vollständigen
Trennung des Gerätes von der Stromversorgung.
• Der Netzstecker dient der Trennung des Gerätes. Er muss je-
derzeit leicht zugänglich sein und darf während seines zweck-
mäßigen Gebrauchs nicht blockiert werden.
• Brand- oder Explosionsgefahr, wenn die Batterie durch einen
falschen Typ ersetzt wird.
Speicherbatterien einsetzen
Die Speicherbatterien stellen sicher, dass die gespeicherten
Einstellungen bei einem Stromausfall nicht verloren gehen.
1. Öffnen Sie das Batteriefach, indem Sie auf den markierten
Bereich drücken und die Abdeckung nach unten schieben.
2. Beachten Sie beim Einlegen der Batterien die am Boden des
Batteriefachs gekennzeichnete Polarität (Mikrobatterien, 2 x
1,5 V, R03/ UM 4/ AAA).
3. Schließen Sie das Batteriefach.
Hinweis:
• Entfernen Sie die Speicherbatterie, wenn sie erschöpft ist
oder Sie das Gerät voraussichtlich längere Zeit nicht benutzen
werden.
Hinweis zum Schutz der Umwelt:
• Batterien, vor allem solche, die Schwermetalle enthalten,
dürfen nicht über den Hausmüll entsorgt werden. Entsorgen
Sie verbrauchte Batterien immer in Übereinstimmung mit den
örtlichen Umweltrichtlinien.


Joignez-vous à la conversation sur ce produit
Ici, vous pouvez partager ce que vous pensez du Grundig Sonoclock 3500 BT DAB+ Radio-réveil. Si vous avez une question, lisez d’abord attentivement le mode d’emploi. La demande d’un mode d’emploi peut être effectuée en utilisant notre formulaire de contact.