
ENGLISH
Important
Read this user manual carefully before you use the
appliance and save it for future reference.
Check if the voltage indicated on the type plate
corresponds to the local mains voltage before you
connect the appliance.
Only connect the appliance to an earthed wall
socket.
Do not use the appliance if the plug, the cord or
the appliance itself shows visible damage, or if the
appliance has been dropped or leaks.
Check the cord regularly for possible damage.
If the mains cord is damaged, you must have it
replaced by Philips, a service centre authorised by
Philips or similarly qualied persons in order to
avoid a hazard.
Never leave the appliance unattended when it is
connected to the mains.
Never immerse the iron in water.
Keep the appliance out of the reach of children.
The soleplate of the iron can become extremely
hot and may cause burns if touched.
Do not let the mains cord come into contact with
the soleplate when it is hot.
When you have nished ironing, when you clean
the appliance, when you ll or empty the water
tank and also when you leave the iron even for a
short while: set the steam control to position 0,
put the iron on its heel and remove the mains plug
from the wall socket.
Always place and use the iron and the stand, if
provided, on a stable, level and horizontal surface.
Do not put perfume, vinegar, starch, descaling
agents, ironing aids or other chemicals in the water
tank.
This appliance is intended for household use only.
Electromagnetic elds (EMF)
This Philips appliance complies with all standards
regarding electromagnetic elds (EMF). If handled
properly and according to the instructions in this user
manual, the appliance is safe to use based on scientic
evidence available today.
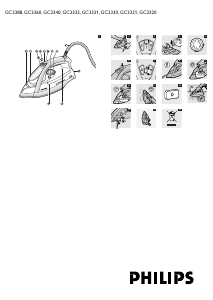
General description (Fig. 1)
A Spray nozzle
B Filling opening with cap
C Steam boost button (9)
D Spray button (8)
E Steam control
F Amber temperature light (GC3360 only: and red
auto-off light)
G Calc-Clean button
H Temperature dial
I Mains cord
J Heel
K Anti-Calc tablet (GC3388/3360/3340/3332/3331/33
30/3321 only)
L Water tank
Before first use
1 Remove any sticker, protective foil or plastic from
the soleplate (Fig. 2).
Preparing for use
Filling the water tank
Do not put perfume, vinegar, starch, descaling agents,
ironing aids or other chemicals in the water tank.
1 Make sure the appliance is unplugged.
2 Set the steam control to position 0 (= no
steam) (Fig. 3).
3 Open the cap of the lling opening.
4 Tilt the iron backwards and ll the water tank with
tap water up to the maximum level with a lling
cup. (Fig. 4)
Do not ll the tank beyond the MAX indication.
5 Close the cap of the lling opening (‘click’).
Setting the temperature
1 Put the iron on its heel.
,
,
,
,
,
,
,
,
,
,
,
,
,
,
2 To set the required ironing temperature, turn the
temperature dial to the appropriate position (Fig. 5).
Check the laundry care label for the required ironing
temperature:
1 Synthetic fabrics (e.g. acrylic, nylon, polyamide,
polyester)
1 Silk
2 Wool
3 Cotton, linen
If you do not know what kind or kinds of fabric an article
is made of, determine the right ironing temperature by
ironing a part that will not be visible when you wear or
use the article.
Silk, woollen and synthetic materials: iron the reverse side
of the fabric to prevent shiny patches. Avoid using the
spray function to prevent stains. Start ironing the articles
that require the lowest ironing temperature, such as those
made of synthetic bres.
3 Put the mains plug in an earthed wall socket.
The amber temperature light goes on.
4 When the temperature light goes out, wait a while
before you start to iron (Fig. 6).
The temperature light goes on from time to time during
ironing.
Using the appliance
Note:The iron may give off some smoke when you use it for
the rst time. This stops after a short while.
Steam ironing
1 Make sure that there is enough water in the water
tank.
2 Select the recommended ironing temperature (see
chapter ‘Preparing for use’, section ‘Setting the
temperature’).
3 Select the appropriate steam setting. Make sure
that the steam setting you select is suitable for the
ironing temperature selected: (Fig. 7)
1 - 2 for moderate steam (temperature settings 2
to 3)
3 - 4 for maximum steam (temperature settings
3 to MAX)
Note:The iron starts to steam as soon as it has reached the
set temperature.
Note:If the selected ironing temperature is too low (MIN
to 2), water may drip from the soleplate (see chapter
‘Features’, section ‘Drip stop’).
Ironing without steam
1 Set the steam control to position 0 (= no
steam) (Fig. 3).
2 Select the recommended ironing temperature (see
chapter ‘Preparing for use’, section ‘Setting the
temperature’).
Features
Spray function
You can use the spray function to remove stubborn
creases at any temperature.
1 Make sure that there is enough water in the water
tank.
2 Press the spray button several times to moisten the
article to be ironed (Fig. 8).
Steam boost
A powerful shot of steam helps to remove stubborn
creases.
The steam boost function can only be used at
temperature settings between 2 and MAX.
1 Press and release the steam boost button (Fig. 9).
Concentrated steam boost from the special
Steam Tip (GC3360/3340 only)
The concentrated steam boost from the long vents in
the Steam Tip enhances the distribution of steam into
every part of your garment. The concentrated steam
boost function can only be used at temperature settings
between 2 and MAX.
1 Press and release the steam boost button (Fig. 10).
-
-
-
-
,
-
-
Vertical steam boost
Never direct the steam at people.
The steam boost function can also be used when
you hold the iron in vertical position. This is useful for
removing creases from hanging clothes, curtains etc.
1 Hold the iron in vertical position and press and
release the steam boost button (Fig. 11).
Drip stop (GC3388/3360/3340/3332/3331/
3330 only)
This iron is equipped with a drip-stop function: the
iron automatically stops producing steam when the
temperature is too low to prevent water from dripping
out of the soleplate. When this happens you may hear a
sound.
Electronic safety shut-off function (GC3360
only)
If the iron has not been moved for a while, the electronic
safety shut-off function automatically switches off the iron.
The red auto-off light starts to ash to indicate that
the iron has been switched off by the safety shut-off
function (Fig. 6).
To let the iron heat up again, pick it up or move it slightly.
The red auto-off light goes out.
If the temperature light goes on, wait until it goes out
before you start to iron.
If the temperature light does not go on, the iron is
ready for use.
Cleaning and maintenance
Double-Active Calc System (GC3388/3360/
3340/3332/3331/3330/
3321 only)
The Double-Active Calc System consists of an Antic-Calc
tablet combined with the Calc-Clean function.
The Anti-Calc tablet prevents scale from clogging
the steam vents. The tablet is constantly active and
does not require replacement (Fig. 12).
The Calc-Clean function removes the scale
particles from the iron.
Calc-Clean function
Use the Calc-Clean function once every two weeks. If
the water in your area is very hard (i.e. when akes come
out of the soleplate during ironing), use the Calc-Clean
function more frequently.
1 Make sure the appliance is unplugged.
2 Set the steam control to position 0.
3 Fill the water tank to the maximum level.
Do not pour vinegar or other descaling agents into the
water tank.
4 Set the temperature dial to MAX.
5 Put the plug in the wall socket.
6 Unplug the iron when the temperature light goes
out.
7 Hold the iron over the sink, press and hold the
Calc-Clean button and gently shake the iron to and
fro (Fig. 13).
Steam and boiling water come out of the soleplate.
Impurities and akes (if any) are ushed out.
8 Release the Calc-Clean button as soon as all the
water in the tank has been used up.
9 Repeat the Calc-Clean process if the iron still
contains a lot of impurities.
After the Calc-Clean process
1 Put the plug in the wall socket and let the iron heat
up to allow the soleplate to dry.
2 Unplug the iron when the temperature light goes
out.
3 Move the iron gently over a piece of used cloth to
remove any water stains that may have formed on
the soleplate.
4 Let the iron cool down before you store it.
,
-
-
,
,
,




Joignez-vous à la conversation sur ce produit
Ici, vous pouvez partager ce que vous pensez du Philips GC3330 Fer à repasser. Si vous avez une question, lisez d’abord attentivement le mode d’emploi. La demande d’un mode d’emploi peut être effectuée en utilisant notre formulaire de contact.